Monthly Archives: January 2013

Making Plans with Nigel

Vegetable, Bean & Citrus Stew

Stew, Changed

(c) I. Nemes 2013

A couple of weeks ago, I found out that a few fellow bloggers had, like me, received Nigel Slater’s Kitchen Diaries II. Like me, they had also read it cover to cover, and enjoyed it as much as his first diary (which I have also read; I’m afraid my shelf life is too short for 50 shades, when I can fill my head with the sights, sounds and smells of food). Unlike me, Janice and Susan decided to pay him homage by hosting the Dish of the Month in his honour. Obviously, I was keen to join in, whilst cursing the fact that I hadn’t thought of it first!

I decided to cook from both books, on alternate months. Originally, I had intended to cook things I haven’t tried before from each of the books in turn. However, I was cooking stew for my new team, because I could make it the night before. One of them professed a love for beans and chickens. And just like laid plans, and mice; my intentions gang aft agley.

Once I knew of these preferences, I had to cook the humbly-named Chicken Stew and Mash from Kitchen Diaries (p.79). It has become a favourite. Although it uses winter seasonal vegetables, it tastes a bit like summer.

Two of my team are vegetarian. And you know me, I had to make them  feel as welcome as the others. So I needed a veggie stew. But couldn’t get away from the thought that this stew was the one I wanted to make. So, I had to come up with a vegetable version that would still hit the citrus and savoury spot, but with the same depth of flavour as the meat version.

The depth came from caramelised onions. The bulk came from pumpkin, as being in season, and good with orange. And a few chickpeas, because I had some that I’d cooked and frozen previously.

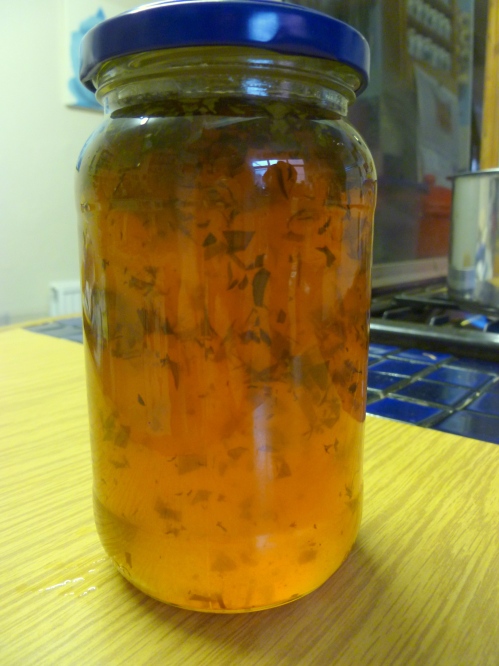
What I ended up was reminiscent of the original stew, with the savoury, citrus, and sweet tones from the orange, herbs and balsamic vinegar; but by necessity was pretty different. Since Nigel himself says in the introduction to Kitchen Diaries II “neither am I someone who tries to dictate how something should be done, and I am never happier than when a reader simply uses my recipes as inspiration for their own”, I think he won’t mind too much, do you?

If you’d like to enter Dish of the Month, then you can find the full details over at Farmersgirl Kitchen or at a Little Bit Of Heaven On A Plate. Add your post to the linky there, so that we can all see what dish you’ve chosen.

Dish of the Month

Recipe: A Bright Vegetable Stew

Ingredients

100 g white beans,

100 g chickpeas

1 1/2 onions, sliced

2 tsp herbs de Provence

2 bay leaves

3 cloves garlic

Pared rind and juice of an orange

2 leeks, sliced into coins

3 tbsp balsamic vinegar

2-3 tbsp plain flour

1/2 butternut squash, diced

Vegetable stock 

Method

If you are using dried beans and chickpeas, soak them in plenty of cold water overnight. Cook them in fresh, unsalted water. They will cook further in the stew, so make sure they are not soft when you drain them. Nigel and I agree on about 40 minutes.

Some of the depth of flavour in Nigel’s version of this stew comes from the Maillard reaction that occurs as the meat browns. I had to replace this somehow, and probably the best way is to allow onions to caramelise really slowly until they are brown. As they started to turn golden, I added the herbs and the bay leaves.

As the onion reaches a deep brown, add the garlic cloves and the orange rind, and cook for a further minute. Add the flour, and mix it in well, followed by the juice of half an orange once you’ve cooked the flour through.

Add the squash and the beans to the a deep casserole dish with a lid, then add the cooked onion and flour mixture.

In the same pan as you browned the onion in, soften the leeks, being careful not to burn them. When you can separate the concentric rings, they are about ready. Add the juice from the rest of the orange, balsamic, and about 500 ml of veg stock to the softened leeks. You can also add a pinch more of the herbs de Provence too, if you feel it needs it. I did. Bring all of this to the boil, season generously with salt and pepper, and then pour this over the vegetables in the casserole dish. 

You want the liquid in the pan to come about three-quarters of the way up the vegetables, bearing in mind that the veg themselves will give off extra liquid as they cook. If you need more liquid, add more vegetable stock.

Cook for 40 mins to an hour at 180°C, until the butternut is tender, but still holds its shape. The flour that you have added should have thickened the sauce somewhat, but if you want to thicken it further, slake a little cornflour in a few drops of cold water, and mix that in. Return it to the oven for 5-10 minutes, until it has thickened up. If you are gluten intolerant, skip the flour at the beginning, and just do this step instead (you’ll need about a tablespoon if you are not using flour, then slake and add as instructed)

I return to Nigel’s instructions, and recommend that this is also served with a big pile of creamy mash  – potatoes, or a mix of potato and celariac – so that the juices can form little puddles in the mash.

5 Comments

Filed under Feast

A Fruity Little Snifter

Japanese quince brandy

There’s Brandy in the Jar – Oh!

As you will probably have gathered if you have read more than this post, I do like to get the maximum use from my produce, especially if I have grown or gathered it myself. In this, the last of my Japanese quince posts, I am getting even more out of my harvest. I’m also starting right in on my resolutions, by blogging about booze. And I assure you, this one couldn’t be easier.

I have read a lot about quince liqueurs with vodka and honey. I have also read a fair bit about quince brandy, which sounded a lot better to me. Especially after I was given a copy of Salt, Sugar, Smoke by Diana Henry for Christmas, and she gives some really tempting takes on Kir Royale using quince brandy and either French cider or English sparkling white wine. I am also thinking of taking the best of both ideas and making something with the brandy and this very special cider from Sussex, Gospel Green Champagne Method Cider (look out for them, they are from West Sussex, but don’t have a website. This is truly remarkable “bubbly” style cider) if I can get hold of some.

Fruit brandies of this kind, and those distilled from scratch used to be pretty popular. You may know them as eau de vie, rakia, or brandywine, and they are still popular across Europe, but especially in the Eastern countries – Bulgaria, Serbia, Macedonia, and as far down as Turkey.

Of course, these are meant for quince or Cydonia oblonga, but I see no reason why they shouldn’t translate into Japanese quinces too. I selected some of the nicest fruit, and set them aside.

Then the next dilemma was whether or not to go with sugar.  For advice on this, I turned to Twitter. Luckily for me, preserving queen, Vivien Lloyd and beekeeper extroadinaire, Zoë Lynch were listening, and they both said sugar was wise, so sugar it was. Thank you both, if you are reading, although I didn’t go with that much, because I figured that I can always add sugar, but I can’t take it away if the brandy is too sweet.

The brandy needs to steep  for anything up to a year, so I haven’t tried this yet, but when I do, I’ll let you know how it goes.

Recipe: Japanese Quince Brandy

Ingredients

5-6 Japanese Quince

50 g muscuvado sugar

2 star anise

Brandy

Sterilised jar wide enough to get the fruit into

Method

Slice the quince, but leave the seeds in. Layer the quince into the jar, and sprinkle the sugar and the star anise between the layers.

Top the jar up with brandy. The fruit will be fine in here, as long as the jar is full, and the fruit doesn’t get exposed to air. I used a 700 ml jar, so needed a fair bit of brandy.

Leave it in a cool, dark place for up to 12 months, taking it out to shake it when you remember.

Strain off the brandy, and pour into a sterilised bottle, where it will keep until you have tracked down some of that excellent cider. Top up with more brandy, if necessary.

Oh, and I’m also thinking that there will be a good use for the fruit, possibly added to apples. I’m sure I’ll think of something tasty to do with them.

6 Comments

Filed under Fermented

Sugar and Spice


Spiced Japanese Quince Jam

…Makes This Jam Nice!

Following on from yesterday’s jelly making escapades, I had a load of fruit pulp from the Japanese quince to use up. I always try to use up the fruit pulp leftover from making jelly, and frequently make fruit butters, or even add them into a pie.

Japanese quince is perfect for this kind of repurposing, and you can make all manner of things, like pies, crumbles, stewed fruit, and many other things. Had I found these earlier on in the year, I may have been tempted to use the pulped fruit in a mincemeat of some kind, but I will probably experiment with that later. I could also have made a sweetmeat, like the membrillo I made last year.

However, this quince needed to be transportable, so I decided upon jam, since it had to get lugged all the way back to the Netherlands and needed not to leak into our luggage.

In keeping with the Persian theme, I wanted to spice the quince with flavours from the Middle East. I decided upon cardamom and cloves, to give it heat. A lapse of concentration also meant that a teaspoon or so of cinnamon also found its way in there, but it’s none the worse for it.

This jam is sweet, although not as sweet as it could be. I used a bit less sugar than the standard 1:1 ratio of the traditional set jam. I had the pectin from the fruit, and the bag of seeds in any case, and I wanted it to be more spicy than sweet. I think the spice mix would also have worked well had I decided to make a membrillo with it.

The only unfortunate thing is that Japanese quince do not turn the beautiful red that ordinary quince become after a long cooking time, so this is a rather brown jam, but it is no less tasty for it. Like the jelly, this will also be good in stews and gravies, but this will work better with lamb, and chickpeas.

Recipe: Spiced Japanese Quince Jam

Ingredients

Jam jars with lids

Boiled Japanese quince pulp, once drained of liquid

Seeds from the quince, tied up in muslin

Sugar (in the ratio 3:4 with the pulp)

Water (equal weight to the fruit pulp)

5 cardamom pods

6-8 cloves

1 ½ tsp ground cinnamon or one cinnamon stick

Waxed discs

Method

While the fruit is still warm, after boiling, pass it through a sieve, so that any skin and remaining pips are retained by the sieve, and you only have fruit pulp left. You will probably need to push it through with a wooden spoon.

Sterilise the jam jars and lids, in a dishwasher, in a low oven or in a pressure cooker.

Weigh your pulp. I got 400 g of fruit pulp from mine. Then you need 3 parts granulated sugar to four parts fruit, so I measured out 300 g of sugar.

Put the seeds in muslin that you used to produce the jelly into the pan with the fruit pulp, sugar, and equal weight of water. Tie the spices up in more muslin, or in the same piece of muslin as the seeds if it is big enough. If you are using ground cinnamon, add this straight into the pulp and mix in well.

Heat gently until the sugar has dissolved completely and then bring it up to a rolling boil. Again, the jam will set when it reaches 104.5°C, or passes the fridge test.

As soon as the jam reaches setting point, sterilise any ladles, jugs or jam funnels you are going to use with boiling water.

Pour the jam into the jars, and fill it to within 2mm of the top. This jam is quite thick, so give it a bang if you can to dispel any air bubbles. Put wax discs on the top, with the wax side down, and seal with the lids while the jam is still hot.


5 Comments

Filed under Found

Jam and Japonica

Japanese Quince and Tarragon Jelly

A Persian Twist

Most Fridays, I go foraging with a small group of great people. You may remember that I met one of them back when I did the seed workshop. One of them, Jennie is a herbalist, and we are learning a lot about the medicinal and culinary uses of wild plants from each other, and we all share good spots to find useful ‘weeds’.

On the last forage of last year, we hit gold, despite the cold. We found a huge stash of Japanese quince, or Chaelenomeles Japonica fruit. The Japonica is usually grown for its beautiful flowers, as many people have no idea that the fruits are so delicious, or so beautifully scented.  At this time of the year, the fruit are pretty obvious, although I used to assume that they were ordinary bushes that some kindly person had studded with apples for the benefit of the birds in winter.

Japanese Quince on the bush

Hedge Decoration

Of course, this is a valuable winter fruit for the birds too, so if you do come across some yourself, then make sure you don’t take them all, as the birds will appreciate them, especially after they have bletted well. In fact, you will also think that they are better for a good bletting. Like their rosaceous namesakes, they are not at all good when you eat them raw, but they are delicious when cooked in pies, baked or as preserves, and they are really high in pectin, so great for this purpose.

Japanese quince , halved

Seedy!

The Japanese quince is thin skinned, and has a lot of small seeds. I removed all of the seeds, and put half in a muslin bag for two types of jam, for the pectin. The other half I kept, and some of these may well find itself wending its way around in the next round of Seedy Penpals, which will be coming up shortly.

The fruits are also beautifully scented, and they have been brought into homes to simply sit in a room and lend it a lovely, delicate fragrance. As I cycled around, my foraged fruit was filling my nostrils, and my living room smelled lovely for a few days before I was off to spend Christmas at my parents, when they were unceremoniously stuffed into a bag, so we could make things with them.

Both quinces and Japanese quinces are used extensively in Persian and Moroccan cookery, and although I knew I was going to make jelly and jam, I wanted this to influence what I paired with them. Inspired by this recipe, I decided that I was going to make a quince jelly with tarragon, and then I could use the fruit pulp to make a different jam. I always try to use up the pulp from making jelly, and quinces make it really easy, due to the pectin.

I’m pretty pleased with this jelly; it is tasty and unusual on toast or yoghurt in the morning, as well as being good with meat. This year, Christmas dinner was a gammon, which was prepared in the same way as this baked ham. I added a tablespoonful of this jelly to the gravy, which made it rich and unusual, bringing a slight taste of the Middle East to a Western meal.

Recipe: Quince and Tarragon Jelly

Ingredients

3 jam jars

750 g Japanese quince

Water to cover

3 large stalks of tarragon, plus another 3 sprigs for chopping

Caster Sugar (400 g per 600 ml juice)

Wax discs

Method

Sterilise your jam jars and lids, by running them through a cycle in the dishwasher, cleaning them in hot soapy water and placing them in a low oven, or by steaming them in a pressure cooker.

Quarter the quince, and remove the seeds. Take about half of the seeds and wrap them in muslin for cooking with. Place the fruit and seeds in a large pan, and cover with water. Bring the fruit to a boil, then simmer them until the fruit is tender, and the perfume fills your kitchen. This will be between 40 minutes to an hour and a half, depending on how well bletted they were when you started.

Drain off the water through a piece of muslin, but keep the cooking liquid, as this will form your jelly. Set aside the fruit pulp, because this will be the basis of your jam. Measure out the liquid, as this will determine how much sugar you will need. For making jelly, you take 400 g sugar for every 600 ml juice. My fruits yielded 1.3 l, so I used 860 g sugar.

In a large, clean pan, add the liquid, sugar, tarragon stalks and the rinsed off muslin with the seeds in it. Heat gently, stirring while the sugar dissolves. Once the sugar has dissolved completely, bring the jelly up to a rolling boil. Don’t stir it after this. It needs to reach 104.5°C to set. You can measure this with a jam thermometer, or you can do the fridge test. I often do both.

Meanwhile, chop the rest of the tarragon finely, and set aside for later. Once the jam has reached setting point, take it off the heat; remove the muslin with the seeds, and the tarragon stalks. Don’t throw the seeds away, they are useful for more jam making later. Add the chopped tarragon, and leave the jam to cool for 10-15 minutes, so that the tarragon will be more evenly distributed through the jam in the jar.

Meanwhile sterilise any jugs, ladles and jam funnels that you will need to transfer the jelly into the jam jars, by covering them with boiling water. You’ll need to dry them off before use.

Pour the jelly into the sterilised jars, making sure that the jam is within a couple of mm from the top of the jar. Put the wax discs on the top, wax side down. Put the lids on and tighten them well while the jam is still hot.

12 Comments

Filed under Found

Resolutions Revisited

A table laden with sparkling wine

Cheers!

A very Happy New Year to you all! I hope that you had the party that I had, but that you skipped the hangover that nearly felled me once and for all yesterday!

And what a year it has been, with weddings, parties, anniversaries, and significant birthdays. It all culminated for me with a new job, and throwing a retirement party and 65th birthday party for my Dad, whose birthday was on New Year’s Eve. I cooked a load of things for that, including more tarted up mince pies and many other things, including some gluten free bits; some of which will appear here soon.

I thought that I would start 2013 with a bit of reflection on what I got up to, with a look back on last year’s resolutions, and to make a few more for the coming year. I’d also love to hear yours, if you want to leave them in the comments.

Varzea Viva, Portugal

Viva Varvea! Permaculture in Practice

Last year, I resolved to go on a permaculture course, and get better at growing food. I had a lovely 10 days in Portugal, with a great bunch of people where I learned about permaculture design. I have since volunteered in a permaculture garden at home, and it has made me a more knowledgeable gardener. I put some of the theory into action in my own garden, mostly with a lot of companion planting, and I hope to blog a bit more about that for this year’s plants.

Purple Eye Potatoes

You Can Only Get ‘Em Two Tone if You Grow Your Own

I also joined the 52 week salad challenge run by Michelle at veg plotting, and started Seedy Penpals  with Carl. All of these things have made me better at successional sowing, and growing in general. I have been exposed to a lot of new plants and new varieties this year, and I’ve met some brilliant people. Although I still haven’t met many of them in person, I have come to look on some as friends, through here and on Twitter.

Mornng Glory

I Found the Story, and It’s Inedible

I had to visit Japan for work once, and the dashis and ramen that I ate there often contained a pretty and pungent leaf vegetable that the English translation often listed as Morning Glory. I decided to track it down to try and grow it for myself. I was given a packet, and was disappointed that they are, in fact, not edible. It turns out that the little leaf I had eaten so often was actually shiso. Luckily, I’d also got hold of both the red and green varieties, and have been enjoying it in salads all summer.

I resolved to investigate more Asian and Middle Eastern food. I have eaten a lot more than in previous years; including pho, Hom Bao, a Lebanese –Inspired Chickpea dish, and have some Persian flavours in some blog posts that will follow. However, I probably could have done better.

Sprouted chickpea bread

Salad as Staple

Something else that I have done as a result of a resolution made last year is bake bread, although not as regularly as I’d hoped. Much of it has been fairly standard, so I have not blogged about it. I did manage to make some nice sprouted chickpea bread, and some hot cross buns, as well as the Hom Bao, which count as a bread, because you make a dough that needs proving.

I had hoped to do some butchery. I didn’t quite manage a whole beast, as I’d hoped, but I have deboned and jointed birds, and a rabbit or two. I have some of the adventures in photos ready to type up, but have been putting it off, because I know quite a few vegans and vegetarians follow my blog and I don’t wish to alienate or upset any of you. I may go ahead with these posts, but make most of it only visible if you click through to the whole post, then you don’t have to see the photos if you don’t want to. I’d be grateful if you are not a meat eater if you could let me know if this would suit you.

I have brewed many things, from blackberry wine and liqueur, elderflower champagne, elderberry wine (which I have great hopes for, this batch is still not ready but preliminary tests have proved promising) up to flavoured spirits from foraged goods. For reasons that I am not really sure of, I have not blogged any of the brewing. Maybe I will just get on and do so; I would like to share them.

Finally, I had a long list of places that I would like to visit. 2012 was not really the year of fine dining, so I didn’t make it to any of those on my shortlist. Ah well, there will always be exciting new and good restaurants to eat at.

And so we come to the year ahead. I have had a lot of fun making the resolutions, and stuck to a surprising number of them, even if I didn’t achieve as much as I’d hoped. So for this year, I have another list that I think is pretty ambitious, but will be fun to try and achieve.

Again, in no particular order, for 2013 I would like to:

  1. Grow unusual vegetables and fruits – especially a lot more perennials.
  2. I’m going to blog more boozy posts. I am going to make nettle beer this year, to see how that goes. I’ve also found wild hops this year, so maybe a beer from scratch could be on the cards?
  3. I want to learn how to smoke food. I’ll have to get hold of a stove top smoker (or a wok with a better lid than the one that I have), and hopefully start experimenting with smoke. My neighbour has a larger smoker in his shed, so maybe I’ll be able to work my way up to smoking with him – although I expect that will take much more than a year.
  4. I want to experiment with cheese. I’ve made soft curd cheeses, but I am just curious about the process and what could be possible in small batches, and without anything in the way of specialised equipment.
  5. I have developed a bit of an obsession with Bath Chaps. It will probably be a challenge to source a well reared pig’s head, but I’m going to give it a good try, then I’m going to attempt a brine, and we’ll see where it goes.
  6. Given my new job I’m going to have a go at some Filipino food, although maybe not some of the most adventurous dishes.
  7. Finally, I’m going to say that I intend to eat out more this year than last, and revisit the resolve to eat at some fantastic restaurants across Europe. I’m not going to list them this year, but if I do get the chance to eat at some, I am going to blog about them.

So let’s see how far I get this time.

8 Comments

Filed under Uncategorized