Category Archives: Found

We’re Going on a Bear Garlic Hunt

Allium ursinum or wild garlic, ransoms or bear garlic carpeting the forest floor
We’ll Have to Go Through It!

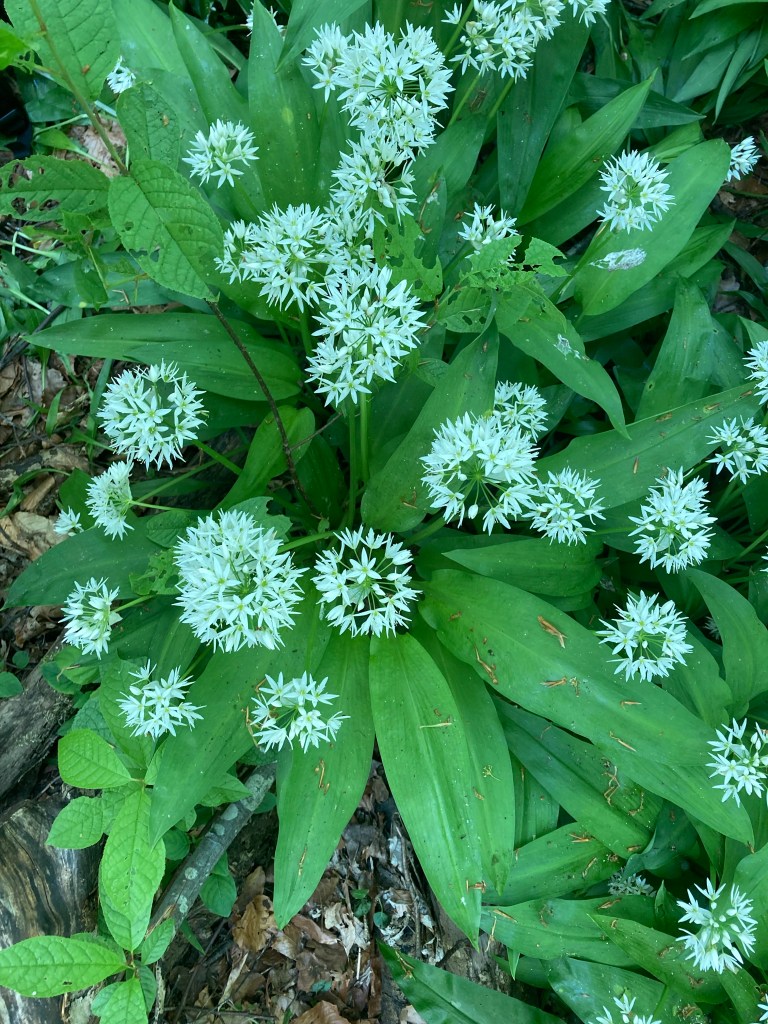
Allium ursinum goes by many names; Ramsons in North America, wild garlic, in some places, bear garlic in many others – which is derived from its Latin name. In the Netherlands, we call it daslook. It’s native to temperate parts of Europe and Asia and naturalised in many other temperate regions of the world. It grows in deciduous woodland, where it prefers damp conditions, so you can often find it along banks of rivers and streams.

Right now, it’s high season, and wild garlic is abundant and verdant. It’s also in flower, so there is no longer any risk of mistaking it for anything else.

I spent a very pleasant afternoon yesterday with a good friend in the forest where we were looking for a bunch of wild garlic. We didn’t have to look that far, to be honest. When searching for wild garlic, I can often smell it before I see it, but this time, I didn’t need to engage my nose at all. The forest was carpeted in green, with a cloud of white flowers gently bobbing in the breeze above it.

Of course, if you’re going foraging yourself please operate on a safety-first basis. As well as being guided by your senses, it’s best to follow these simple rules.

Allium ursinum, bear garlic, wild garlic with it's typical globes of white stellate flowers. Covered in spring debris.. All parts of this spring plant are edible.
Starry Lights!

Wild garlic is such a lovely treat. It’s far less pungent than its more bulbous cousin and is better on the breath. I love the stuff and make a lot of recipes using it, including this delightful recipe for a wild garlic tart which is great for a picnic or late spring party. You can also make herb butter or cream cheese with the leaves. The flowers are great as a pretty garnish in salads or other light dishes, and the flower stalks can be used anywhere you might find chives.

And knowing a spot means that I don’t have to let them take over my own garden, because they are absolutely prolific. They’re also a great entry point for beginner foragers – just remember if you don’t smell garlic, then don’t eat them.

Wild garlic loves to grow under trees. As such, at this time of year, it’s often covered in pollen and the scales that previously covered the buds of the newly-emerged leaves. This kind of debris is evident on the leaves. Don’t let that put you off. It’s completely normal and rinses off easily. If you pick from the centre of the patch, you won’t need to worry about dog urine that much, but do avoid leaves with bird poo on them.

Today, I’m sharing a pesto recipe that I’ve veganised.

I really recommend giving wild garlic a go. Subtlely flavoured, easy to find and to pick, and if nothing else you get a couple of hours of forest bathing in. What’s not to love?

Wild Garlic or bear garlic pasto, ready to use.
I’ve Got A Jam Jar Full of Pretty Green

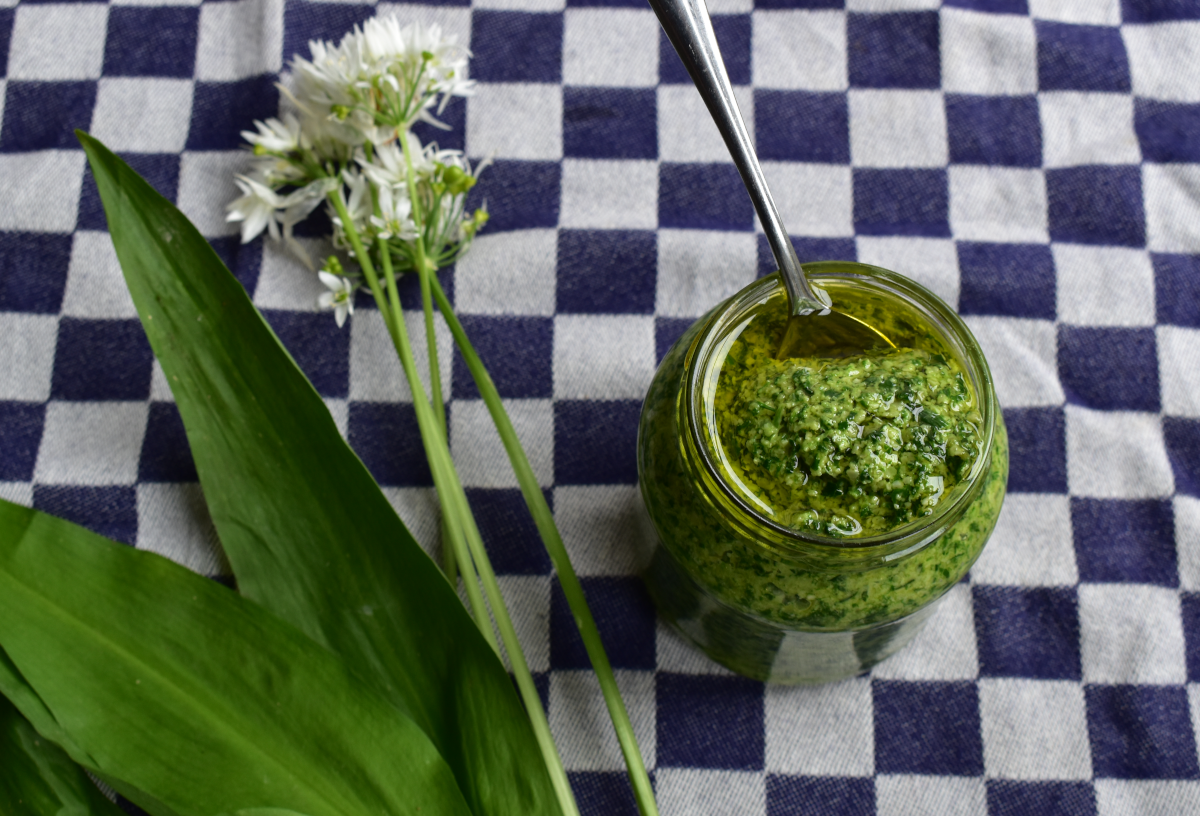
Recipe: Vegan Wild Garlic Pesto

Makes a jar of pesto
Prep Time: 20 minutes, plus the time well spent wandering about in the woods

Ingredients

The amounts given below are for one jar of pesto. If you’ve picked more or less garlic, you can adjust the ratio of the other ingredients accordingly for a balanced pesto.

200g wild garlic leaves
Salt and pepper
100 g whole almonds
Zest of one lemon, reserving the juice for when you serve, where appropriate.
120 ml of extra virgin olive oil, plus more to cover

Method

Rinse the wild garlic thoroughly in cold water. You can leave it to soak for a while in the sink if you like.

Meanwhile, bring a pan of salted water to a boil.

When the wild garlic is clean, chop the leaves into three or four pieces across the width of the leaf. This is just to make it easier to blend them later. You can skip this step if you’re in a pinch.

Put the wild garlic into the boiling water and bring it back to a boil, along with any other herbs you’re going to use. You want to blanch the leaves for a few seconds. The leaves will brighten, and the midrib will become floppy. You may need to blanch the leaves in batches, depending on how much pesto you’re making.

Blanching helps the pesto to keep its verdant green colour. Unblanched leaves will tend to brown a little over time. They’re fine to eat, but look much less appealing.

Once you see the subtle colour change, remove the leaves from the water with a slotted spoon, and put them in a sieve. Rinse briefly with cold water to stop the leaves from cooking further. Set aside to cool.

In the same pan that you blanched the wild garlic in, lightly cook the almonds. Add the almonds to the water and return to the boil for 4-5 minutes. Drain them and set aside to cool slightly.

If the almonds that you’re using had their skins on, they are easily removed at this stage. The nuts will pop out of their skins readily if you apply a little pressure to the base once they’re cool enough to handle. If you’re using pre-skinned almonds, then just leave them to cool for 10 minutes or so.

Once cooled, add the nuts to your blender. I find the mini processor attachment that came with my stick blender to be the best size for this amount of pesto, but any blender will do. Blitz the nuts a little. At this stage, they need to be in smallish bits.

Squeeze the wild garlic leaves to remove as much of the water as possible. Too much water will dilute the subtle flavour of the garlic too much and will affect how well it will store.

Add the wild garlic to the blender and pulse a couple of times to combine with the nuts. Add the lemon zest and about half the oil and blitz until the pesto is an even green colour. Stir through the rest of the olive oil and taste for seasoning. You will definitely need freshly ground black pepper, and you’ll probably need to add a bit of salt at this stage.

Slowly add the remaining oil, whilst blitzing a bit more, until the pesto is about as thick as yoghurt. You may not need to use all of the oil I’ve recommended here, it depends on how oily your nuts are too.

Put the pesto into a sterilised jam jar. Cover the top with a little bit more olive oil to form a seal to the air, to help the pesto keep longer.

Serving Suggestions and Substitutions

Of course, you can make wild garlic pesto with parmesan or another finely grated cheese if you like, but I’m trying to be a lot more plant-based these days.

You could also choose to use different nuts. Lightly-toasted pine nuts would be fine, for a more traditional Genoese-style sauce. Hazelnuts could be an interesting addition. Use the whole nut, gently roasted in the oven until the aroma fills the air. Then rub the brown skins off as best you can with an old, dry, clean tea towel. I say use an old towel because the skins can stain the cloth a bit. You’ll also probably not get all the skins off entirely, so don’t bother striving for perfection. There is no need to blanch either type of nut in this case.

If you like, you can also add other herbs, such as flat-leaf parsley, or basil. They’ll need blanching in a similar way to the wild garlic, and squeezing out before adding it to the blender.

This pesto is perfect over pasta. You can add it to soups and salad dressings, or even to brighten up a sandwich. If you eat meat, you can use it to coat a little fish or chicken breast before you grill or bake it, or you could use it as a marinade before frying your fish. It’s especially excellent with salmon or other oily fish.

Stir a little lemon juice through the pesto before serving. The amount of lemon juice that you’ll need will vary with the application – you’ll need a little to season it if you’re smearing it in a sandwich, perhaps 1/2 tsp or so. Over pasta, you’ll need the juice of at least half a lemon. Adjust it to your own taste.

I have another couple of recipes that I’ll be using it in over the next few days, which I’ll be sharing with you soon. I’d love to hear where you would use this pesto in the comments.
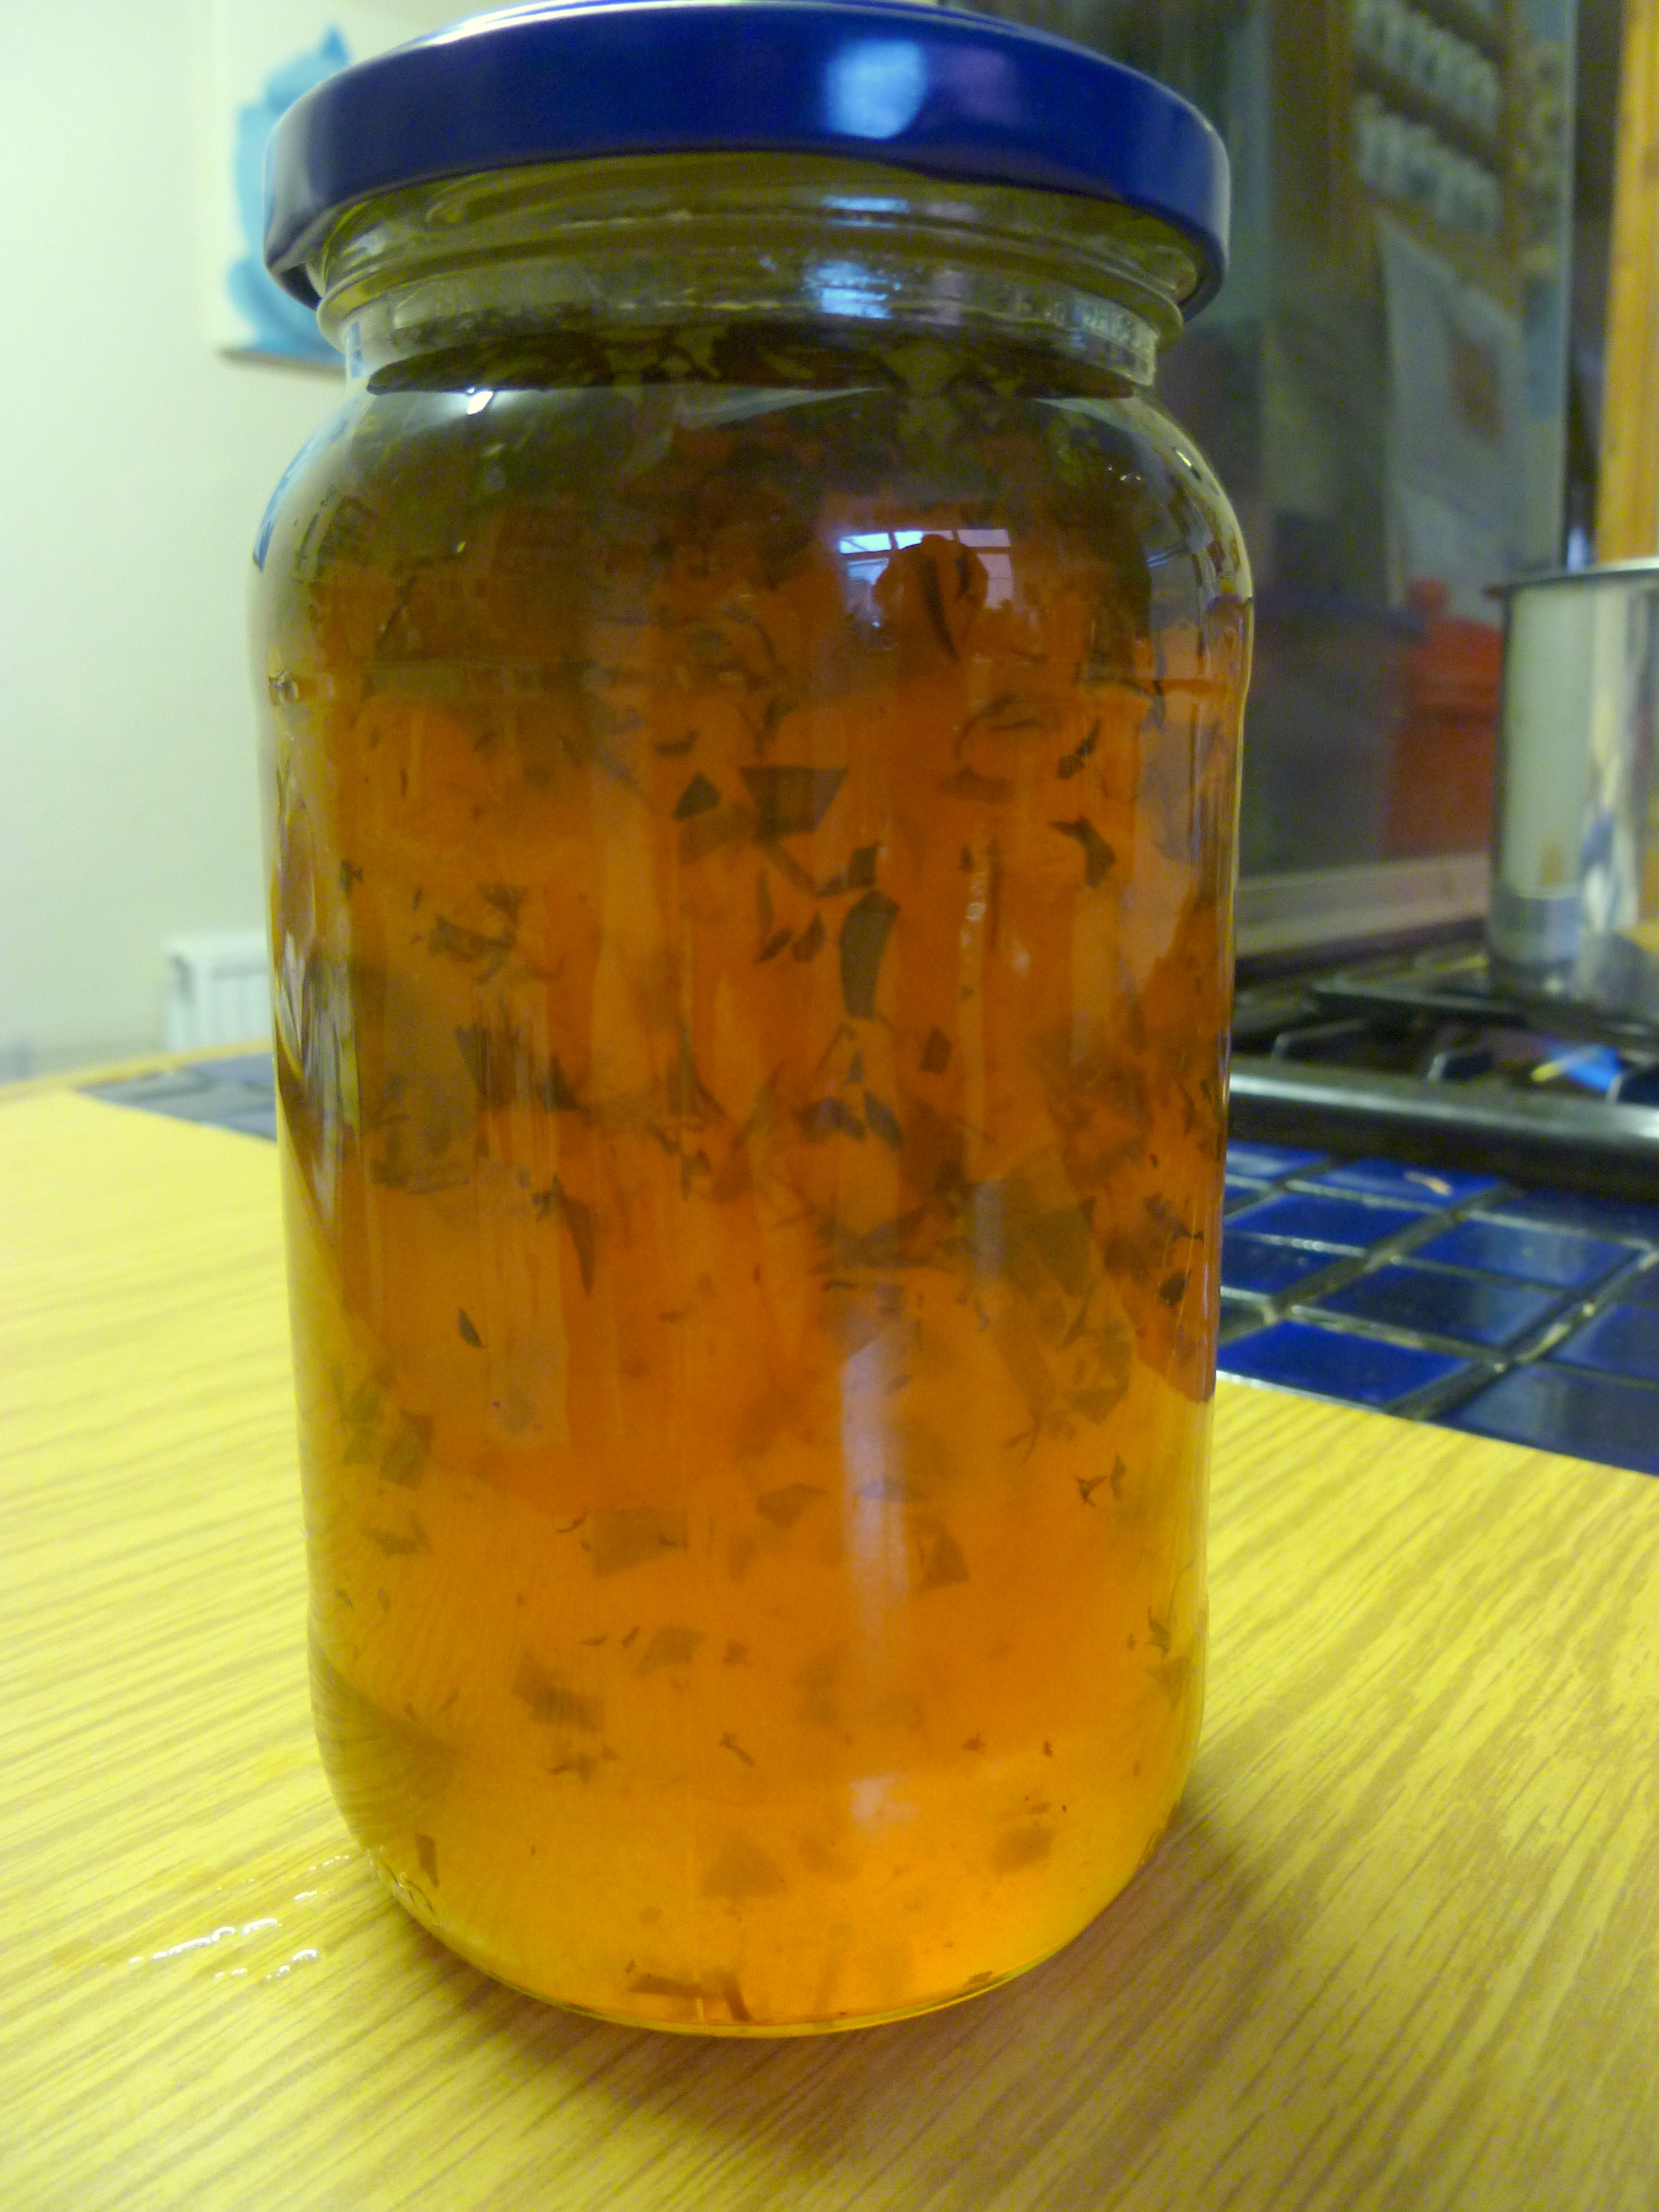
How to Store

The pesto keeps well in the fridge. If you don’t use all of the pesto at once, then make sure to add a little more olive oil to create an air seal over the pesto. This will help you to keep it for up to two weeks.

Advertisement

Leave a comment

Filed under Found

Flower Sour

elderflowers

Sweet Little Flowers

Well the elders are in bloom again, and hedgerows all over froth and foam with the delicate white unbrels, almost like the spring tides coming in. This year is a bit later than ususal, due to the length of the Northern hemisphere winter, but now the sunshine has returned, and naure is more than making up for her long sleep.

I love this time of the year, and stock up on elderflowers for cordialsugar, and champagne. All of it delicious, and making the most of the best of the season’s forage.

Elder is really abundant where I live, so there is always plenty to go around during the flowering and fruiting seasons; for us foragers and for the birds.

Elderflowers are not just for the sweet things in life, they are also great in salads, and I have heard of sauces to go with meat. An elderflower sauce is on my list of Things I Want To Experiment With. Like most food bloggers, I guess, I have several such lists – electronically, on paper and in my head. A colleague of mine recently found them in some notes I had taken as part of a work trip, and seemed surprised that I would also be making lists of flavours in between meetings.

As well as the flavours that exist on my lists, or go around in my head, I have a number of different or unusual flavours in my kitchen. For example, I am never without vinegars of all kinds of flavours – raspberry, blackberry, tarragon, rosemary; I even have coconut vinegar since a Filipina friend introduced me to it when she kindly gave me her adobo recipe.

For me, then, it wasn’t too much of a stretch to think that elderflower vinegar would be a great way to keep hold of the elderflower season for just a little bit longer, but without all the sugar.

Try to pick elderflowers on a dry day, in the morning. There will be more pollen and nectar in them, which makes the flavour more intense.

This vinegar is good with salads. I am currently embarking on the 5:2 regimen, because my need to develop great food for this blog was beginning to have a toll on my waistline. I have found that the addition of a few herbs to some of this vinegar is a good way to dress a slad without the need for oil.

You can make marinades with it, and even a couple of drops in some water gives a nice flavour, that is not too sweet.

Elderflower Vinegar

Not So Sweet Little Flowers

Recipe: Elderflower Vinegar

Ingredients

40 g elderflowers

500 ml white wine vinegar

Method

Try to pick the flowers in the morning after a dry spell, in order to maximise the pollen and the flavour.

Remove the elderflowers from the stalks by pulling a fork through the stalks in the diretion of the flowers. You don’t have to be too fussy, as long as you have removed the largest stalks.

Steep the elderflowers in the vinegar, in a non-metallic container or bowl. Cover with a tea towel, and set aside for a few days.

Whenever you remember, give the flowers a stir.

After three days to a week, your vinegar should have reached the strength of flavour that you want.

Bottle up into sterilised bottles. This vinegar will keep well in a cupboard. I cannot resist this fragrant flavour, so the trouble is making it last!

7 Comments

Filed under Found

Sugar and Spice


Spiced Japanese Quince Jam

…Makes This Jam Nice!

Following on from yesterday’s jelly making escapades, I had a load of fruit pulp from the Japanese quince to use up. I always try to use up the fruit pulp leftover from making jelly, and frequently make fruit butters, or even add them into a pie.

Japanese quince is perfect for this kind of repurposing, and you can make all manner of things, like pies, crumbles, stewed fruit, and many other things. Had I found these earlier on in the year, I may have been tempted to use the pulped fruit in a mincemeat of some kind, but I will probably experiment with that later. I could also have made a sweetmeat, like the membrillo I made last year.

However, this quince needed to be transportable, so I decided upon jam, since it had to get lugged all the way back to the Netherlands and needed not to leak into our luggage.

In keeping with the Persian theme, I wanted to spice the quince with flavours from the Middle East. I decided upon cardamom and cloves, to give it heat. A lapse of concentration also meant that a teaspoon or so of cinnamon also found its way in there, but it’s none the worse for it.

This jam is sweet, although not as sweet as it could be. I used a bit less sugar than the standard 1:1 ratio of the traditional set jam. I had the pectin from the fruit, and the bag of seeds in any case, and I wanted it to be more spicy than sweet. I think the spice mix would also have worked well had I decided to make a membrillo with it.

The only unfortunate thing is that Japanese quince do not turn the beautiful red that ordinary quince become after a long cooking time, so this is a rather brown jam, but it is no less tasty for it. Like the jelly, this will also be good in stews and gravies, but this will work better with lamb, and chickpeas.

Recipe: Spiced Japanese Quince Jam

Ingredients

Jam jars with lids

Boiled Japanese quince pulp, once drained of liquid

Seeds from the quince, tied up in muslin

Sugar (in the ratio 3:4 with the pulp)

Water (equal weight to the fruit pulp)

5 cardamom pods

6-8 cloves

1 ½ tsp ground cinnamon or one cinnamon stick

Waxed discs

Method

While the fruit is still warm, after boiling, pass it through a sieve, so that any skin and remaining pips are retained by the sieve, and you only have fruit pulp left. You will probably need to push it through with a wooden spoon.

Sterilise the jam jars and lids, in a dishwasher, in a low oven or in a pressure cooker.

Weigh your pulp. I got 400 g of fruit pulp from mine. Then you need 3 parts granulated sugar to four parts fruit, so I measured out 300 g of sugar.

Put the seeds in muslin that you used to produce the jelly into the pan with the fruit pulp, sugar, and equal weight of water. Tie the spices up in more muslin, or in the same piece of muslin as the seeds if it is big enough. If you are using ground cinnamon, add this straight into the pulp and mix in well.

Heat gently until the sugar has dissolved completely and then bring it up to a rolling boil. Again, the jam will set when it reaches 104.5°C, or passes the fridge test.

As soon as the jam reaches setting point, sterilise any ladles, jugs or jam funnels you are going to use with boiling water.

Pour the jam into the jars, and fill it to within 2mm of the top. This jam is quite thick, so give it a bang if you can to dispel any air bubbles. Put wax discs on the top, with the wax side down, and seal with the lids while the jam is still hot.


5 Comments

Filed under Found

Jam and Japonica

Japanese Quince and Tarragon Jelly

A Persian Twist

Most Fridays, I go foraging with a small group of great people. You may remember that I met one of them back when I did the seed workshop. One of them, Jennie is a herbalist, and we are learning a lot about the medicinal and culinary uses of wild plants from each other, and we all share good spots to find useful ‘weeds’.

On the last forage of last year, we hit gold, despite the cold. We found a huge stash of Japanese quince, or Chaelenomeles Japonica fruit. The Japonica is usually grown for its beautiful flowers, as many people have no idea that the fruits are so delicious, or so beautifully scented.  At this time of the year, the fruit are pretty obvious, although I used to assume that they were ordinary bushes that some kindly person had studded with apples for the benefit of the birds in winter.

Japanese Quince on the bush

Hedge Decoration

Of course, this is a valuable winter fruit for the birds too, so if you do come across some yourself, then make sure you don’t take them all, as the birds will appreciate them, especially after they have bletted well. In fact, you will also think that they are better for a good bletting. Like their rosaceous namesakes, they are not at all good when you eat them raw, but they are delicious when cooked in pies, baked or as preserves, and they are really high in pectin, so great for this purpose.

Japanese quince , halved

Seedy!

The Japanese quince is thin skinned, and has a lot of small seeds. I removed all of the seeds, and put half in a muslin bag for two types of jam, for the pectin. The other half I kept, and some of these may well find itself wending its way around in the next round of Seedy Penpals, which will be coming up shortly.

The fruits are also beautifully scented, and they have been brought into homes to simply sit in a room and lend it a lovely, delicate fragrance. As I cycled around, my foraged fruit was filling my nostrils, and my living room smelled lovely for a few days before I was off to spend Christmas at my parents, when they were unceremoniously stuffed into a bag, so we could make things with them.

Both quinces and Japanese quinces are used extensively in Persian and Moroccan cookery, and although I knew I was going to make jelly and jam, I wanted this to influence what I paired with them. Inspired by this recipe, I decided that I was going to make a quince jelly with tarragon, and then I could use the fruit pulp to make a different jam. I always try to use up the pulp from making jelly, and quinces make it really easy, due to the pectin.

I’m pretty pleased with this jelly; it is tasty and unusual on toast or yoghurt in the morning, as well as being good with meat. This year, Christmas dinner was a gammon, which was prepared in the same way as this baked ham. I added a tablespoonful of this jelly to the gravy, which made it rich and unusual, bringing a slight taste of the Middle East to a Western meal.

Recipe: Quince and Tarragon Jelly

Ingredients

3 jam jars

750 g Japanese quince

Water to cover

3 large stalks of tarragon, plus another 3 sprigs for chopping

Caster Sugar (400 g per 600 ml juice)

Wax discs

Method

Sterilise your jam jars and lids, by running them through a cycle in the dishwasher, cleaning them in hot soapy water and placing them in a low oven, or by steaming them in a pressure cooker.

Quarter the quince, and remove the seeds. Take about half of the seeds and wrap them in muslin for cooking with. Place the fruit and seeds in a large pan, and cover with water. Bring the fruit to a boil, then simmer them until the fruit is tender, and the perfume fills your kitchen. This will be between 40 minutes to an hour and a half, depending on how well bletted they were when you started.

Drain off the water through a piece of muslin, but keep the cooking liquid, as this will form your jelly. Set aside the fruit pulp, because this will be the basis of your jam. Measure out the liquid, as this will determine how much sugar you will need. For making jelly, you take 400 g sugar for every 600 ml juice. My fruits yielded 1.3 l, so I used 860 g sugar.

In a large, clean pan, add the liquid, sugar, tarragon stalks and the rinsed off muslin with the seeds in it. Heat gently, stirring while the sugar dissolves. Once the sugar has dissolved completely, bring the jelly up to a rolling boil. Don’t stir it after this. It needs to reach 104.5°C to set. You can measure this with a jam thermometer, or you can do the fridge test. I often do both.

Meanwhile, chop the rest of the tarragon finely, and set aside for later. Once the jam has reached setting point, take it off the heat; remove the muslin with the seeds, and the tarragon stalks. Don’t throw the seeds away, they are useful for more jam making later. Add the chopped tarragon, and leave the jam to cool for 10-15 minutes, so that the tarragon will be more evenly distributed through the jam in the jar.

Meanwhile sterilise any jugs, ladles and jam funnels that you will need to transfer the jelly into the jam jars, by covering them with boiling water. You’ll need to dry them off before use.

Pour the jelly into the sterilised jars, making sure that the jam is within a couple of mm from the top of the jar. Put the wax discs on the top, wax side down. Put the lids on and tighten them well while the jam is still hot.

12 Comments

Filed under Found

A Shaggy Mushroom Story

Shaggy Ink Cap Mushroom

Shaggy Ink Cap

I have just got back from the UK, where I was attending my sister’s wedding.  She and her groom did a lovely job, with the help from friends and family. A great time was had by all, and the weather mostly held off. Congratulations to my sister and her new husband!

I also managed to fit in a little bit of a forage, between the wedding day and the train home. I found some blackberries, at last. This year has been terrible here, probably because of the lack of pollinators. I got enough for a couple of good crumbles, or maybe even a pie. I also got a sizeable amount of rowan berries, which I am experimenting with. I will bring you the recipe shortly.

I found these little beauties. I wasn’t looking for them, in fact I was busy with other things, but once you start to forage, spotting things in fields and hedgerows becomes like second nature. You can’t help but investigate, which often leads to thinking up ways to use your finds.

As Shaggy Ink Caps do not keep well at all, I quickly made them into a tasty little soup. It was really delicious, as they have a nice nutty, mushroomy taste. I did not get pictures, because (as the name suggests) it was a grey/black colour, not unlike food containing squid ink. I think that adding wilted and chopped spinach would help to make the dish look more appetising, if you are averse to odd-coloured food. Don’t let the colour put you off, the soup is definitely worth it.

I have given the recipe below, in case you come across any for yourself.

WARNING: It is very easy to confuse the Shaggy Ink Cap with the Common Ink Cap. Both are edible, but the Common Ink Cap will poison you if you eat it with alcohol.There have been no reported fatalities from this kind of poisoning, but the symptoms can be uncomfortable.  In fact, alcohol is best avoided for at least the next day too, to be on the safe side.  Please also stick to Basic Fungus Foraging Rules when picking mushrooms.

Common Ink Cap Mushrooms – not to be taken with alcohol

This soup was enough for 2 people, and will freeze well before the cream is added.

Recipe: Shaggy Ink Cap Soup

Ingredients

6 young Shaggy Ink Cap mushrooms (before they flatten out and look black and kind of slimy)

1 tbsp olive oil

Small knob of butter (optional)

1 medium onion

1 fat garlic clove

400 ml chicken or vegetable stock

100 ml cream (or milk would probably do)

Small bunch parsley, finely chopped

Leftover pasta to thicken (optional)

Method

Chop the onion, and roughly chop the garlic, and sweat them off in some olive oil, until translucent.

Roughly chop the caps of the mushrooms, and chop the stalks reasonably finely. Add to the onion and garlic, and add the butter. Season well with salt and pepper, and fry off. This stage may take a while, as you want to try to drive off the black moisture that will seep from the mushrooms.

At this point I added the pasta, to give a bit of bulk. You could also add leftover rice, or cooked potato. You could probably also add raw potato when you sweat the onion. Or leave out the starch altogether. I mainly added it because it was in the fridge.

Add warm stock, and the chopped stalks of the parsley. Bring to the boil, then simmer for 5-10 minutes.

Blitz in a food processor, or with a stick blender until it is as smooth as you like your soup. I don’t like it completely smooth, so I don’t do this as long as I could if I liked a more homogenous texture.

Return to a pan, and add the cream and the chopped parsley leaves. Warm, but do not boil. Taste for seasoning, and serve.

You can also add a swirl of cream in the bowl if you want it to look a bit more fancy, but really, how fancy can a kind of grey/black soup get?

7 Comments

Filed under Found

You Can’t Always Get What You Want

Sauteed Chanterelles for Breakfast

…But If You Try Sometimes, You Might Find, You Get the Breakfast You Need.

We were recently in Sweden, and spent a wonderful afternoon with the Big Guy’s sister and her family foraging in a wood. We are never in one place for long in Sweden, and I had spent much of the week eyeing up the meadowsweet and rosebay willow herb that was abundant in the area we were in at the start of the week. I have never seen either plant in the Netherlands, so was looking forward to cooking up some goodies with them. In Swedish, meadowsweet is called älgört (pronounced el-lee-yurt), which means moose herb. Rosebay willow herb is called rallarros (pronounced rah-lor-rose), as it used to be the first plant to line the railways once they had been cleared through the forest, hence the name of railway rose. This is what makes it a pioneer species.

Tettigoniidae spp Bush Cricket

A Fellow Forager

As is often the way, when we got out to where his sister lives, we were actually in a subtly different habitat, and so there was no meadowsweet or rosebay willow herb to be had. This is a good foraging lesson – if you see it, grab some, as conditions may not be the same the next time you come back, or if you move onto a different spot.

Wild raspberry

Forest Jewels

However, all was not lost, we came across some other things I am yet to find in the low countries. First was wild raspberries. Slightly smaller than their domestic cousins, but just as sweet. They were great to come across, and we filled a few tubs.

Bilberries

Edible Carpet

Blue berries are everywhere in Swedish forests. We would call this variety bilberries in the UK, they are a little smaller and less sweet than the ones you would typically buy from the shops. They carpet the forest floor, alongside their cousins, the lingonberry. They are actually not at their peak for a few more weeks yet, but I like them when they are sharper too.

Unripe lingonberry

Not Ready Just Yet


The lingonberries are not yet ripe, so we didn’t even try to pick them. Apparently, there is a hybrid between the lingonberry and the blueberry that they call the ‘blingon’. We didn’t find any of those, but I’d love to taste one, just to see what it is like.

Too young Chanterelles

Beloved by Chefs, But Better Left a While

The main thing that we actually did go out to find was the chanterelles, and we were not disappointed. We started to come across really tiny ones. This is the kind that chefs often prefer because they are fairly regular sizes, and can pretty up a dish. However, many foragers lament this habit, because if everyone only took the smallest ones, they would not have time to spore, thus spoiling things for future forages, and the fungus itself.

Mature Chanterelles

We Struck Gold

We were lucky in that we didn’t have far to go to find more mature ones, and we found large mushrooms by the bucketful.

Cleaning Chanterelles

House Work

Because these mushrooms grow in the leaf litter (often quite well hidden, but once you have found one, there will be more) they will need a little trimming, and a bit of a clean with a stiff bristled brush. This can be time consuming, but well worth it to get rid of grit from between the fine gills.

Cleaned Chanterelles

A Bucket of Breakfast

The next day, we ate a king’s breakfast, starting with sautéed chanterelles and scrambled egg, followed by muesli and yoghurt, liberally scattered with raspberries and blueberries. We were leaving Sweden that day, and it was a fantastic start to our travels.

Muesli and foraged berries

Second Breakfast of Champions

We did manage to get through all of the chanterelles, even though we picked a lot. We left many of the berries for the Big Guy’s sister, and I know that she will make delicious things with them. I’m also very lucky that she likes to forage as well, and I’m very grateful to her for a wonderful afternoon, and for the huge pot of mushrooms that she’d dried from last year’s bounty.

Dried Chanterelle spp

Once-Buried Treasure


Leave a comment

Filed under Found

They Called me the Wild Rose

Wild Rose Jelly

…But my Name was Eliza Dane

I’ve been back collecting rose petals again. As I mentioned in my post about rose cordial, the roses in my favourite spot are probably rosa acicularis. These are quite a long flowering variety, and you don’t need that many for this recipe, so you can still find them now if you try. Don’t forget to leave the bees behind when you pick them, though.

This time I made a really delicately flavoured jelly. My version definitely has all the flavour of rose, but has quite a subtle colour. If you would like a darker coloured jelly, then you can boil the petals up in the water before you add the apples, but I personally don’t think it needs it.

I have never made rose petal jelly before, but once you have the proportions in your head, making jelly is easy. You will need a jelly bag, or muslin and a sieve to strain the liquid. I have a thick piece of muslin that I nail to the frame of a chair with the seat removed, and that works well for me. Whatever method you use, it needs to support a bit of weight.

This makes 3 standard pots of jam, but I actually used smaller jars, as it was a lovely one to give away as gifts. I was also thinking ahead to possible foodie penpals. When I sent my first parcel out, I found to my penpal’s cost that sending jars mean that I can send much less, due to weight limitations. A nice work around is to try to send small jars as testers. I will see if that works.

This jam is a good breakfast preserve, and nice with yoghurt. However, I actually think this has more potential as a glaze for patisserie. I am going to try making a raspberry tart, and use rose petal jam as the glaze, where you would probably ordinarily use apricot jam. Of course, I shall let you know the results when I try it.

Wild Rose petals

Pretty In Pink

Recipe: Rose Petal Jelly

Ingredients

15 g rose petals

500 g apples

400 ml water

Granulated sugar – the exact amount will depend on how much liquid you have

Method

Rinse the rose petals, and remove the claw.

Cut the apples into chunks. There is no need to peel or core them, as this contains pectin, which you need to help the jam set.

Place the apples, petals and water in a pan, and bring to the boil. Reduce to a simmer, and cook for half an hour. At the same time, boil your muslin to sterilise it.

Strain the fruit pulp through your muslin/jelly bag/ whatever set up you use into a large bowl. Leave  it to strain overnight, so you get the maximum amount of juice from your pulp. Don’t be tempted to squeeze the bag, or push the pulp through though, or your beautiful clear jelly will be cloudy.

I usually make fruit butter with the leftovers from jelly making. It is a tasty preserve, but it does have a short shelf life. Unfortunately, I didn’t have enough time to make it or to find homes for the pots where it would not go to waste. As there has been no sugar added, you can still compost the pulp with no adverse effects.

Before you start to make the jelly, sterilise some jars. You can do this in various ways, including washing them in hot water, rinsing well, and putting them in a warm oven; you can steam them in a pressure cooker; or wash them in a dishwasher, being careful to time your cycle with about the right time that the jam is ready. At the same time, boil your muslin to sterilise it.

Measure your juice that was strained from the pulp. This is where the proportions come into play. For every 600 ml of juice that you have, you need 400 g sugar.

In your preserving pan, gently warm the juice and the sugar, stirring while the sugar dissolves. Then bring to a rapid rolling boil. Allow to boil like this for about 10 minutes. Your jelly will have reached setting point at 104.5 °C, or when you get a skin forming on jam dropped on a cold plate and left in the cold  for a minute.

Pour into the sterile jars while both are still hot. Fill to within 3 mm of the top, then put a wax disc over it, wax side down. Seal with a screw lid, or a cellophane cover.

Label them and give them a week for the flavour to develop. Once you have opened a jar, keep it in the fridge.

1 Comment

Filed under Found

A Whole Lot of Rosie

Wild rose petal cordial

Entente Cordiale

At the same time as we collected all the elderflower, we were also delighted to find some wild roses. The most common of these is the dog rose, but they have mostly gone over in the more accessible places. I did manage to get a photo, but couldn’t reach the  blooms, as they were on a steep slope, and behind a lot of brambles.

Wild Dog Rose

Dog Rose

Luckily, we also came across a load of what I think is most likely to be prickly rose, or rosa acicularis. This is a really beautiful rose, with abundant, dark pink flowers. They also have a lot of thin thorns on them. I was so excited to find them that I forgot to take pictures, but I’ll try to go back soon to get some. When the sunshine comes back. If the sunshine comes back.

The good news is that all rose petals are edible. The more highly scented, the better they will taste. As well as some basic foraging rules please be careful that the roses that you use have not been sprayed with any pesticides, which can be an issue if you are foraging in a park. Another word of caution; if you are allergic to bee stings, like I am, please check each flower before you pick the petals. Bees love roses, and will spend a lot of time feeding from each one. I very nearly picked one up with some petals, but it warned me by buzzing angrily, and I quickly dropped the petals. Bees are quite polite really, and will warn you before they sting.

You could dry the petals, and use them in cakes and jelly, or even brush them in egg white and dip them in caster sugar to crystallise them and then use them as a cake decoration.

Rose petals with & without claw

The white claw (L) is bitter and must be removed

When you use rose petals, you need to remove the claw, or the part where by which the petal is joined t the rest of the flower. This is bitter and can taint your produce. I usually just snip them off with scissors.

The first thing that I made was a cordial. This recipe is inspired by one that Sandie made at Herb and Wild Food Recipes. Sandie intended to make a jam, but actually made a syrup with dog roses. I used the same technique to prepare the roses, and then made a cordial as I would normally. This is a great blog, full of wild food recipes, so please do go and have a look.

It has also taken on the dark pink of the rose. I have had it as a refreshing drink, but I’m also going to try this in a syllabub, and maybe to cook some gooseberries in. If you have any suggestions for ways to try this cordial, I’d love to hear them in the comments.

Recipe: Rose Cordial

Ingredients

2 large handfuls of rose petals (claws removed as above)

Juice of a lemon

500 ml water

300 g sugar

Method

Sterilise a 500 ml bottle and the lid. You can do this in a number of ways. I find it trickier to get bottles clean in the dishwasher, as I would do for jam jars. You can wash them in hot soapy water, using a bottle brush to get into the nooks and crannies. I give them a good soak in the steriliser I use for brewing before I rinse, and put in them in a w arm oven (150°C). If you have a pressure cooker, you can also hold it in steam.

In a saucepan, add the lemon juice to the flower petals and the water. Simmer for 15 minutes.

Strain through muslin, and return the liquid to the saucepan. As you would expect, I didn’t throw out the rose petals. I have a great recipe for them to come. You can refrigerate or freeze them, if you want to use them later.

Add the sugar to the rose-water, and heat, stirring until the sugar has dissolved. Allow to simmer for five minutes, then hot-fill the sterile bottle.

Keep this little jewel in the fridge.

3 Comments

Filed under Fermented, Found

A Spoonful of Elderflower Sugar

Preparing to infuse sugar

This Will Help the Medicine Go Down

I have been frantically trying to preserve a lot of elderflowers. Last weekend, the Big Guy and I went out picking elderflowers and rose petals.

I greedily decided to try a second champagne recipe, and went off picking without really reading how much I would need. The recipe I chose to use required far less than I had imagined, so I had a lot leftover.  Of course, not being one to waste them, I have lots of recipes to share in the next few days. I’m waiting for some of them to finish brewing.

However, if you are going to be able to take advantage of these this year, you can still find some flower bracts now, but we are definitely coming towards the end of their display, at least here in the Netherlands. Go out and get some, and keep them in the fridge for some of the elderflower recipes to follow.

The simplest thing to do to preserve the flavour of these short-lived but beautiful flowers is to infuse sugar with them, in a similar way to the vanilla sugar that makes the use of high quality vanilla beans worthwhile.

The elderflower sugar keeps well and is a lovely reminder of the early summer when the flowers are in full bloom. You can use it in cakes, biscuits and many other things, and I will be experimenting with some baking in the coming weeks. If you only have enough elderflowers for one more thing, this is the stepping-stone recipe you should probably make.

And this is how you do it:

Get a large glass jar with a lid. The amount of flower bracts that you will need will be determined by the size of the jar.

Pick through elderflower heads, and remove any brown flowers or bits. Remove the flowers from their stalks. This is easily done, by gripping the stalk between your thumb and forefinger, and pushing them down to the flowers. They will pop off with very little pressure.

You need to keep as much of the pollen as possible, because that is where the flavour is, so try to get the blooms in the jar as you strip them from the stalks.

Keep going until you have filled about a quarter of the jar. Top up the rest with the sugar, give it a stir and leave it to infuse for at least 3-4 days.

Sieve out the flowers before use.

9 Comments

Filed under Found

Respect Your Elders

Elderflower cordial

Extending the seasons

It is that glorious time of the year when lots of delicious produce is in season. In the garden broad beans, the last of the asparagus, courgettes, the very first tomatoes (if you can grow them under glass); and in the hedgerow you will find nettles, dock, sorrel, mallow, and many other delicious treats. It is also your shortish window for the elderflower.

Gathering Elderflowers

Harvest Festival!

The elder has been used and revered for centuries. It has provided stakes, shelter, medicine, fuel and food to animals and man since prehistoric times. There is a lot of folklore and superstition around the elder, and in some places people would leave offerings for the Elder Mother before they picked from the tree.

Harvested elderflowers

An Exuberance of Elderflowers

In early summer, hedgerows froth with white elder flowers at hedge height, and moon daisies at their feet. It is a time of great potential, and great recipes. Although, it is also important to remember that the potential of this tree is not just about summer, but that there are also good things to be had at all stages of fruiting, as well as the berries being a valuable food supply for many bird species, who will be laying down reserves for the coming winter.

Luckily, the elder is ubiquitous in most parts of Europe, and they seed themselves easily, even in places where there is no tradition of a hedgerow (such as the Netherlands). As long as you don’t take all of the blooms from a single tree or shrub, there will be plenty left throughout mid-May to mid-June to allow for your own use of elderberries and for the birds, as well as allowing the tree to reproduce.

This year, I have also learned some other tricks from wise women on Twitter about uses for this wonderful tree.  Cally from Country Gate mentioned that elder leaves make a good pesticide against aphids. I have been plagued by them this year, seemingly more so than in previous years. She says to simmer 500 g of elder leaves in 3.5 l of water (use an old saucepan if you can for this), and replace any water lost as steam. Strain, and bottle. This concoction should keep for 3 months, and is great for aphids.

Elder buds

Bud of Delights

Liz from Forage also mentioned that the buds of elderflowers are delicious in salads and omelettes, and lend a smoky flavour to a dish. I picked a couple of elderflower brackets in bud to test this, and they are really very good in an omelette aux fines herbes. Although it is probably a little late in the year to get the buds now, I am definitely going to play a little more with this next year.

When picking the flowers, try to go in the morning, on a sunny day, when the pollen levels will be at their highest. Try to pick fresh, white brackets with no brown patches or blemishes, as these have the best taste. Elderflowers will keep for a couple of days, but they start to go brown quickly, and will deposit pollen and nectar, which is essential for the flavour, so it is best to try to use them on the day that they are picked.

This is my recipe for elderflower cordial. I originally cut it from a reader’s letter to the Guardian, years ago. Unfortunately, I don’t have that cutting anymore, so I don’t know the name of the person who sent it in. As you will see, the recipe is basically based around the number four, so once you get the amounts, then you will understand why I have misplaced the clipping.

Elderflower cordial is a great way to preserve the delicate taste of summer, and is the basis of many things, from refreshing drinks and summery cocktails, to use with other fruits and in many desserts.

I’m going to be writing about some of my elderflower cordial recipes in the coming months, but I’d really love to hear how you use it in your recipes, in the the comments.

Steeping elderflower cordial

Steeping to Success

Recipe: Elderflower Cordial

Ingredients

40 elderflower bracts

4 pints boiling water

4 lb (1.8 kg) sugar

2 lemons, sliced

4 tsp citric acid.

Method

I often only have raw cane sugar in the house, which makes the cordial slightly darker than you may be used to – it still tastes delicious, but most people use white sugar.

You can get citric acid from home-brew shops and possibly the chemist (in the UK). If you cannot find citric acid, then add the juice of another lemon. If you use this method, I would recommend freezing the cordial once bottled, to make sure that your cordial does not go mouldy.

Method

Steep the blooms in the boiling water in a large, non-corrosive container.

Add the sugar, lemons and citric acid, and stir until the sugar has all dissolved.

Cover with a tea towel, and leave in a place that you will walk past daily. Leave for four days at room temperature, stirring well twice a day.

Sterilise some bottles, and a funnel. You can use new ones, or old oil, vodka or screw-top wine bottles will also be fine. I find that bottles are much less likely to get thoroughly clean in a dish washer, so I clean mine by hand with a long bottle brush, then I sterilise them with campden tablets, which are also available from home-brew suppliers. This recipe makes a little over 4 l, so you will need an appropriate number, plus one for luck.

Strain the elderflower through muslin, then bottle and seal tightly.

This should keep for up to a year. Once it is opened, store the bottle in the fridge.

Then pour yourself a nice tall glass of diluted cordial, add mint and some ice, and think about what recipes you could use the cordial in.

13 Comments

Filed under Fermented, Found