Tag Archives: Preserves

Under the Milky Whey

Fresh Whey and Vegetables

Chop A-Whey!

A quick look on Pinterest reveals that you can lacto-ferment pretty much anything – from garlic to hummus. I saw fruits, vegetables, herbs, spices, beers, mayonnaise, BBQ sauces and even mustard on there. Apparently it is amazing what won’t be improved by bunging in some whey.

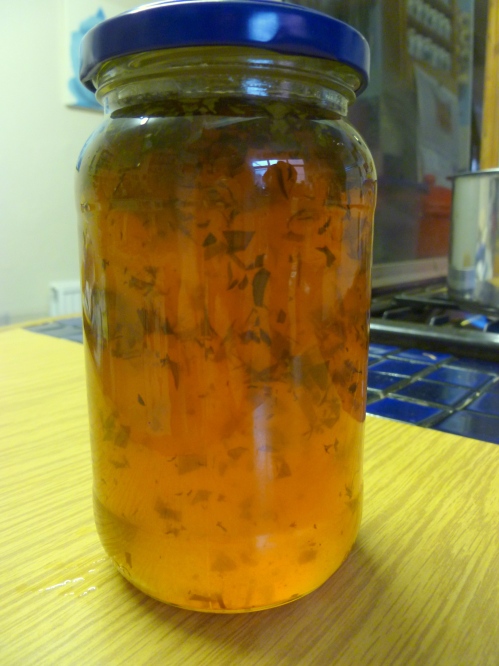
As you know, I happen to have quite a lot of whey taking up all the space stored very carefully in my fridge.It is the yellowish liquid in the photo above, and it is the by-product of making your own cheese, or straining yoghurt.

Apart from the miracle of being the new superfood, due to all the probiotics; you can feed whey to animals, use it as a fertiliser, make various toiletries for skin benefits, and body builders dry it then consume it by the bucket load.

You can also soak beans, or grains in it before cooking, use it instead of the liquid in pancakes, cakes, and bread (or pizza dough). soups, and stock. You can even add it to shakes and use it as a cheese starter in some kind of lactose Inception.

Whatever you do with it, you should not pour it down the sink. Apparently, it can de-oxygenate water systems. So, for this reason, and the fact that I hate waste, I’m going to use mine. Don’t worry, it also freezes really well, so if you can’t get through it all, you can keep it for later.

You may have noticed that I enjoy a nice pickle, go crazy for chutney, and take pleasure in preserves. It is only natural, then,  that I should have a go at lacto-fermenting as a novel way of preserving food, and as a way to use up leftovers. I’ve had a good dig round the internet, including over at the lovely host of Cheese, Please!, who lacto-fermented cucumber and carrots to come up with the following recipes.

For the first, I wanted to be able to make a direct comparison with a pickle that I already know. I make pickled fennel a lot, based on the River Cottage Preserves book, so I used the same aromats and dill here.

The second lot are inspired by a friend of mine who makes amazing pickled cucumber from a mysterious Asian salt. I have no idea what this stuff is, but it is hot, sour and sweet at the same time. I have tried to recreate this with the whey – we’ll see where we get to.

Apparently, lacto-fermenting is pretty long-lasting, but depends on how strong the cell wall of the thing you are preserving is. You can expect the fennel to last between 4-6 months in cold storage, and the cucumber to last up to 3. The fermentation will continue, even in cold storage, so it is something to be aware of, and date the jars well before you store them in a cool, dry place.


Lacto fermented fennel and cucumber

Perfectly Preserved

Recipe: Lacto-Fermented Vegetables

Ingredients

For the Fennel:
1 tsp mixed peppercorns
1 tsp coriander seed
1 tsp fennel seed
1 bulb of fennel, cored and thinly sliced
Fronds of dill
100 ml whey
300 ml boiled water, allowed to cool
1 tbsp rock salt

For the Cucumber:
1 tsp mixed peppercorns per jar
1 tsp juniper berries per jar
1 large cucumber, in 3 cm slices on the diagonal
1 red chillies, sliced on the diagonal but seeds left in
Fronds of dill
200 ml whey
600 ml boiled water, allowed to cool
1 tbsp table salt
1 tbsp sugar

3 jam jars

Method

Sterilise your jars on a hot cycle in the dishwasher, or by washing in hot soapy water, drying and placing in a low oven for an hour.

Prepare the vegetables, and boil the water for your fermenting liquid.

To the sterile , still warm jars, add the relevant spices, then layer up the vegetables, making sure to get a layer of dill fronds in between them as you go. Pack them as tightly as you can.

Mix together the whey, water and salt, as well as the sugar for the lacto-fermented cucumber. Fill the now packed jars with the fermenting liquid, up to 3 mm from the top of the jar. Screw on the lids tightly and store in a cool dark place for between 3 days and the maximum time for the vegetables.

I intend to leave these for about a month, before I try them. When I do, I will be sure to let you know what I thought.

Advertisement

11 Comments

Filed under Fermented

Show Some Love This Valentine’s – If You Must

melting moents with grapefruit cream

Melting Moments – When Your Work’s Worth Sharing

I come from a fairly stoical family, who are not big on physical affection. We prefer friendly pats on the back to full-blown hugs.  When I got my A Level results, my Mum had to tell my Dad to give me a hug to show he was proud of me. I knew anyway, and he knew that I knew; but we hugged for my Mum’s sake, and it was awkward. That hug has stuck with me for 20 years, so it just goes to show that it was a Momentous Occasion. We show love through our merciless mickey-taking – and long may it continue!

It will come as no surprise whatsoever to you then, when I confess that I do not have a romantic bone in my body (and whenever I have spare bones hanging about, I tend to make stock from them, so even if I had, it wouldn’t have lasted that long). Cut flowers and chocolates will not woo me (although edible seeds and chocolate as an ingredient would win my heart  in a flash). George, from the Famous Five, was more my style than Cinderella, or Sleeping Beauty. I have never dreamed of fairytale weddings, or handsome princes. My dreams were more likely to feature horses and hansom cabs! The Big Guy and I have never celebrated Valentine’s Day. I think he would love to be a bit more romantic on a more consistent basis, but I don’t like all that soppy stuff.

So, in light of this information, you may surprised to find a Valentine’s post on Edible Things. Not to worry, I am not being inconsistent. We have an organisation-wide meeting on today, and the HR department thought it would be a good excuse to have a bit of a celebration, so they asked us all to show our colleagues some love for Valentine’s, by making each other some fair food.

This set me off in a bit of a panic; if I can’t see what is romantic about a meal for the Big Guy, how was I ever going to come up with something original and interesting for my workmates? So, I turned to Facebook (whilst love may make me queasy, I’m always happy for people to show their likes…) to ask folks over there what they thought. I got some great suggestions but when Emma mentioned melting moments, with a passion fruit filling, I knew this was the perfect thing to serve up. And that I was going to make and blog about passion fruit curd. To me, this is the king of the fruit curds, tart and sweet. Unfortunately, no passion fruits were to be found, so I settled for the next best thing; ruby grapefruit. Once citrus is well cooked, most of it will go orange, so don’t be disappointed to find that you haven’t got a ruby coloured curd.

Ruby Grapefruit Curd

You Ain’t in Kansas Anymore

The curd needs to have time to cool before you use it in the filling, so you should make it the day before you bake the biscuits.

These easy and delicious treats look, and taste impressive. When all’s said and done, what better way to show your colleagues that you are fond of them?

Recipe: Melting Moments With Grapefruit Curd Filling

Ingredients

For the Curd (makes 2 jars):

Zest of one, unwaxed grapefruit

200 ml grapefruit juice

125 g butter

450 g sugar

200 ml beaten egg (about 4)

For the Melting Moments:

125 g softened butter

115 g plain flour

45 g icing sugar

50 g custard powder (or cornflour and a tsp of vanilla extract)

For the Filling:

200 ml double cream

Method

Making the curd isn’t hard, but does require patience. Firstly, sterilise your jars, by washing in hot water and placing in a low oven, or by running them and the lids through a hot cycle on the dishwasher. You can seal curd with cellophane,  but if you use lids, these will need to be boiled as the curd is approaching doneness.

There are two methods for cooking curd – direct and indirect heat. The direct method is quicker, but there is a greater risk of the egg scrambling. Sometimes, with very vigorous whisking off the heat, you can save it, as long as you notice as soon as it starts to curdle. The indirect method runs much lower risk of splitting, but it does take a lot more time. If you want to use indirect heat, you will need to cook the mixture in a double boiler, making sure the water at the bottom does not touch the bottom of the bowl, and check it occasionally to make sure the water has not evaporated.

Whichever method you choose, combine the grapefruit zest and juice, butter and sugar, and heat gently, until all of the butter has melted.

Making the curd - after the egg is added

Curd Away

Over a low heat, slowly add the egg to the buttery mixture, whisking vigourously as you go. When all of the egg is combined, increase the heat to medium, and stir until the mixture is thick and creamy. This could take a while, so settle in with a good book, but make sure you don’t allow the curd to catch on the bottom, and remember to scrape down the sides too.

Once the pouring consistency reaches thick ribbons, put it in the hot jars, and fill to 3 mm from the top. Cover with a wax disc, and seal immediately. The curd will last up to 4 weeks. Once opened, store in the fridge.

To make the melting moments, preheat the oven to 160°C, and line two cookie sheets with baking paper.

Beat the butter until pale and fluffy. Add the flour, icing sugar and custard powder, and mix well. This is a pretty dry mix, but it should all come together. There is no need to bother with seiving the dry ingredients.

Formed melting moments

Not as Flat as a Pancake!

Roll small lumps of the dough into balls. This amount of dough should give you about 26 biscuits. Place them on the cookie sheets, then flatten them with the back of a fork, which you should dust occasionally with icing sugar.

Bake them for 15-20 minutes, until crisp. Be aware that these biscuits should come out of the oven pale, as they will continue to cook, and colour more while cooling. Allow to cool.

Whip up the cream until it is pretty stiff, and stir through 3 tbsp of the curd. You can leave it as swirls through the cream, if you want. Place a little curd on the base of a biscuit, add a tiny dollop of the cream (or you will lose it out of the sides) and sandwich it together with a second. Sit back, and enjoy a melting moment.

In theory, these should last a couple of days in an airtight container, but I’ve not yet been able to test this theory.

6 Comments

Filed under Feast

Flower Sour

elderflowers

Sweet Little Flowers

Well the elders are in bloom again, and hedgerows all over froth and foam with the delicate white unbrels, almost like the spring tides coming in. This year is a bit later than ususal, due to the length of the Northern hemisphere winter, but now the sunshine has returned, and naure is more than making up for her long sleep.

I love this time of the year, and stock up on elderflowers for cordialsugar, and champagne. All of it delicious, and making the most of the best of the season’s forage.

Elder is really abundant where I live, so there is always plenty to go around during the flowering and fruiting seasons; for us foragers and for the birds.

Elderflowers are not just for the sweet things in life, they are also great in salads, and I have heard of sauces to go with meat. An elderflower sauce is on my list of Things I Want To Experiment With. Like most food bloggers, I guess, I have several such lists – electronically, on paper and in my head. A colleague of mine recently found them in some notes I had taken as part of a work trip, and seemed surprised that I would also be making lists of flavours in between meetings.

As well as the flavours that exist on my lists, or go around in my head, I have a number of different or unusual flavours in my kitchen. For example, I am never without vinegars of all kinds of flavours – raspberry, blackberry, tarragon, rosemary; I even have coconut vinegar since a Filipina friend introduced me to it when she kindly gave me her adobo recipe.

For me, then, it wasn’t too much of a stretch to think that elderflower vinegar would be a great way to keep hold of the elderflower season for just a little bit longer, but without all the sugar.

Try to pick elderflowers on a dry day, in the morning. There will be more pollen and nectar in them, which makes the flavour more intense.

This vinegar is good with salads. I am currently embarking on the 5:2 regimen, because my need to develop great food for this blog was beginning to have a toll on my waistline. I have found that the addition of a few herbs to some of this vinegar is a good way to dress a slad without the need for oil.

You can make marinades with it, and even a couple of drops in some water gives a nice flavour, that is not too sweet.

Elderflower Vinegar

Not So Sweet Little Flowers

Recipe: Elderflower Vinegar

Ingredients

40 g elderflowers

500 ml white wine vinegar

Method

Try to pick the flowers in the morning after a dry spell, in order to maximise the pollen and the flavour.

Remove the elderflowers from the stalks by pulling a fork through the stalks in the diretion of the flowers. You don’t have to be too fussy, as long as you have removed the largest stalks.

Steep the elderflowers in the vinegar, in a non-metallic container or bowl. Cover with a tea towel, and set aside for a few days.

Whenever you remember, give the flowers a stir.

After three days to a week, your vinegar should have reached the strength of flavour that you want.

Bottle up into sterilised bottles. This vinegar will keep well in a cupboard. I cannot resist this fragrant flavour, so the trouble is making it last!

7 Comments

Filed under Found

I Want (Fennel) Candy

Candied Fennel

Sweet and Fresh

Having been inspired to start blogging again, I have been making the most of recent inspiration for the next few Feast posts. The cooking and recipes, as always, are my own, but credit for the dishes are definitely due elsewhere. I take a magpie approach to food, often finding shiny little pieces here and there. Maybe one day I’ll enter the 21st century and get myself a smart phone, but for now, I forage for ideas, as well as edibles, and record them all in a series of notebooks, which I have to go digging through in order to remember the inspirations. Does anyone else do this? Please tell me that I am not the only one scribbling things down furtively in restaurants, shops and even the street. For me, it is like foraging and farming in note form, and as much of an obsession as they are for me in real life.

I’m sure we are all familiar with candied peel, and even crystalised angelica, if you are fond of cake decoration. These days , it seems that candied vegetables of all nature are appearing on both sweet and savoury dishes in restaurants and pop ups up and down the country. One of the first, and the one that instantly caught my magpie eye was candied fennel. I have also seen candied celery and beets (especially chioggia beets) among other things on menus, although I find the idea of them much less appealing.

Fennel is one of my favourite vegetables, and I love it in risotto, soup, and salad, braised, roasted and raw. This is a great way to use the tougher outer leaves and stalky bits if you are not keeping them for stock, too.

This version is really simple, despite my fears that it may require multiple exposures to sugar syrups of varying strengths, it isn’t the case. I kept mine plain, but they are also good served as sweets, and sprinkled with sugar.

Today’s recipe was inspired by Simon Rogan, who is a far better forager and cook than I could ever hope to be. I can’t remember where I first heard about it, but I suspect it was on a cookery programme, because  I have written down “candied fennel, Rogan. V. interesting, possibly for strawberry tarts? Experiment”. I finally got round to making this, as part of an even wider experiment, that does not involve strawberries or tarts of any kind, but you’ll have to wait until my next Feast post to find out more about what I wanted them for. This cliffhanger is not quite of Eastenders Duff Duff proportions, but hopefully, you’ll want to keep reading.

Recipe: Candied fennel

Ingredients

50 g sugar

50 ml water

1 tbsp lemon juice

Half a fennel bulb diced

Method

Make a simple sugar with the water, sugar and lemon juice. Heat gently until the sugar has dissolved.

Add the fennel. Bring to the boil then reduce to a simmer until the fennel is translucent, but retains some texture. It took me about 15 minutes, but it depends on the size of the dice,  and how much bite you want them to have.

Remove from the heat, and strain off the cooking syrup. Don’t discard this, it is perfectly good for other uses, and you know it’s a shame to waste such a tasty sauce.

Put some greaseproof paper, wax side up on a baking tray, and spread the fennel dice out into a single layer. Allow to cool on the tray, then store in an airtight container before use.

Enjoy them on their own, with sugar or as part of something delicious.

2 Comments

Filed under Feast

A Fruity Little Snifter

Japanese quince brandy

There’s Brandy in the Jar – Oh!

As you will probably have gathered if you have read more than this post, I do like to get the maximum use from my produce, especially if I have grown or gathered it myself. In this, the last of my Japanese quince posts, I am getting even more out of my harvest. I’m also starting right in on my resolutions, by blogging about booze. And I assure you, this one couldn’t be easier.

I have read a lot about quince liqueurs with vodka and honey. I have also read a fair bit about quince brandy, which sounded a lot better to me. Especially after I was given a copy of Salt, Sugar, Smoke by Diana Henry for Christmas, and she gives some really tempting takes on Kir Royale using quince brandy and either French cider or English sparkling white wine. I am also thinking of taking the best of both ideas and making something with the brandy and this very special cider from Sussex, Gospel Green Champagne Method Cider (look out for them, they are from West Sussex, but don’t have a website. This is truly remarkable “bubbly” style cider) if I can get hold of some.

Fruit brandies of this kind, and those distilled from scratch used to be pretty popular. You may know them as eau de vie, rakia, or brandywine, and they are still popular across Europe, but especially in the Eastern countries – Bulgaria, Serbia, Macedonia, and as far down as Turkey.

Of course, these are meant for quince or Cydonia oblonga, but I see no reason why they shouldn’t translate into Japanese quinces too. I selected some of the nicest fruit, and set them aside.

Then the next dilemma was whether or not to go with sugar.  For advice on this, I turned to Twitter. Luckily for me, preserving queen, Vivien Lloyd and beekeeper extroadinaire, Zoë Lynch were listening, and they both said sugar was wise, so sugar it was. Thank you both, if you are reading, although I didn’t go with that much, because I figured that I can always add sugar, but I can’t take it away if the brandy is too sweet.

The brandy needs to steep  for anything up to a year, so I haven’t tried this yet, but when I do, I’ll let you know how it goes.

Recipe: Japanese Quince Brandy

Ingredients

5-6 Japanese Quince

50 g muscuvado sugar

2 star anise

Brandy

Sterilised jar wide enough to get the fruit into

Method

Slice the quince, but leave the seeds in. Layer the quince into the jar, and sprinkle the sugar and the star anise between the layers.

Top the jar up with brandy. The fruit will be fine in here, as long as the jar is full, and the fruit doesn’t get exposed to air. I used a 700 ml jar, so needed a fair bit of brandy.

Leave it in a cool, dark place for up to 12 months, taking it out to shake it when you remember.

Strain off the brandy, and pour into a sterilised bottle, where it will keep until you have tracked down some of that excellent cider. Top up with more brandy, if necessary.

Oh, and I’m also thinking that there will be a good use for the fruit, possibly added to apples. I’m sure I’ll think of something tasty to do with them.

6 Comments

Filed under Fermented

Sugar and Spice


Spiced Japanese Quince Jam

…Makes This Jam Nice!

Following on from yesterday’s jelly making escapades, I had a load of fruit pulp from the Japanese quince to use up. I always try to use up the fruit pulp leftover from making jelly, and frequently make fruit butters, or even add them into a pie.

Japanese quince is perfect for this kind of repurposing, and you can make all manner of things, like pies, crumbles, stewed fruit, and many other things. Had I found these earlier on in the year, I may have been tempted to use the pulped fruit in a mincemeat of some kind, but I will probably experiment with that later. I could also have made a sweetmeat, like the membrillo I made last year.

However, this quince needed to be transportable, so I decided upon jam, since it had to get lugged all the way back to the Netherlands and needed not to leak into our luggage.

In keeping with the Persian theme, I wanted to spice the quince with flavours from the Middle East. I decided upon cardamom and cloves, to give it heat. A lapse of concentration also meant that a teaspoon or so of cinnamon also found its way in there, but it’s none the worse for it.

This jam is sweet, although not as sweet as it could be. I used a bit less sugar than the standard 1:1 ratio of the traditional set jam. I had the pectin from the fruit, and the bag of seeds in any case, and I wanted it to be more spicy than sweet. I think the spice mix would also have worked well had I decided to make a membrillo with it.

The only unfortunate thing is that Japanese quince do not turn the beautiful red that ordinary quince become after a long cooking time, so this is a rather brown jam, but it is no less tasty for it. Like the jelly, this will also be good in stews and gravies, but this will work better with lamb, and chickpeas.

Recipe: Spiced Japanese Quince Jam

Ingredients

Jam jars with lids

Boiled Japanese quince pulp, once drained of liquid

Seeds from the quince, tied up in muslin

Sugar (in the ratio 3:4 with the pulp)

Water (equal weight to the fruit pulp)

5 cardamom pods

6-8 cloves

1 ½ tsp ground cinnamon or one cinnamon stick

Waxed discs

Method

While the fruit is still warm, after boiling, pass it through a sieve, so that any skin and remaining pips are retained by the sieve, and you only have fruit pulp left. You will probably need to push it through with a wooden spoon.

Sterilise the jam jars and lids, in a dishwasher, in a low oven or in a pressure cooker.

Weigh your pulp. I got 400 g of fruit pulp from mine. Then you need 3 parts granulated sugar to four parts fruit, so I measured out 300 g of sugar.

Put the seeds in muslin that you used to produce the jelly into the pan with the fruit pulp, sugar, and equal weight of water. Tie the spices up in more muslin, or in the same piece of muslin as the seeds if it is big enough. If you are using ground cinnamon, add this straight into the pulp and mix in well.

Heat gently until the sugar has dissolved completely and then bring it up to a rolling boil. Again, the jam will set when it reaches 104.5°C, or passes the fridge test.

As soon as the jam reaches setting point, sterilise any ladles, jugs or jam funnels you are going to use with boiling water.

Pour the jam into the jars, and fill it to within 2mm of the top. This jam is quite thick, so give it a bang if you can to dispel any air bubbles. Put wax discs on the top, with the wax side down, and seal with the lids while the jam is still hot.


5 Comments

Filed under Found

Jam and Japonica

Japanese Quince and Tarragon Jelly

A Persian Twist

Most Fridays, I go foraging with a small group of great people. You may remember that I met one of them back when I did the seed workshop. One of them, Jennie is a herbalist, and we are learning a lot about the medicinal and culinary uses of wild plants from each other, and we all share good spots to find useful ‘weeds’.

On the last forage of last year, we hit gold, despite the cold. We found a huge stash of Japanese quince, or Chaelenomeles Japonica fruit. The Japonica is usually grown for its beautiful flowers, as many people have no idea that the fruits are so delicious, or so beautifully scented.  At this time of the year, the fruit are pretty obvious, although I used to assume that they were ordinary bushes that some kindly person had studded with apples for the benefit of the birds in winter.

Japanese Quince on the bush

Hedge Decoration

Of course, this is a valuable winter fruit for the birds too, so if you do come across some yourself, then make sure you don’t take them all, as the birds will appreciate them, especially after they have bletted well. In fact, you will also think that they are better for a good bletting. Like their rosaceous namesakes, they are not at all good when you eat them raw, but they are delicious when cooked in pies, baked or as preserves, and they are really high in pectin, so great for this purpose.

Japanese quince , halved

Seedy!

The Japanese quince is thin skinned, and has a lot of small seeds. I removed all of the seeds, and put half in a muslin bag for two types of jam, for the pectin. The other half I kept, and some of these may well find itself wending its way around in the next round of Seedy Penpals, which will be coming up shortly.

The fruits are also beautifully scented, and they have been brought into homes to simply sit in a room and lend it a lovely, delicate fragrance. As I cycled around, my foraged fruit was filling my nostrils, and my living room smelled lovely for a few days before I was off to spend Christmas at my parents, when they were unceremoniously stuffed into a bag, so we could make things with them.

Both quinces and Japanese quinces are used extensively in Persian and Moroccan cookery, and although I knew I was going to make jelly and jam, I wanted this to influence what I paired with them. Inspired by this recipe, I decided that I was going to make a quince jelly with tarragon, and then I could use the fruit pulp to make a different jam. I always try to use up the pulp from making jelly, and quinces make it really easy, due to the pectin.

I’m pretty pleased with this jelly; it is tasty and unusual on toast or yoghurt in the morning, as well as being good with meat. This year, Christmas dinner was a gammon, which was prepared in the same way as this baked ham. I added a tablespoonful of this jelly to the gravy, which made it rich and unusual, bringing a slight taste of the Middle East to a Western meal.

Recipe: Quince and Tarragon Jelly

Ingredients

3 jam jars

750 g Japanese quince

Water to cover

3 large stalks of tarragon, plus another 3 sprigs for chopping

Caster Sugar (400 g per 600 ml juice)

Wax discs

Method

Sterilise your jam jars and lids, by running them through a cycle in the dishwasher, cleaning them in hot soapy water and placing them in a low oven, or by steaming them in a pressure cooker.

Quarter the quince, and remove the seeds. Take about half of the seeds and wrap them in muslin for cooking with. Place the fruit and seeds in a large pan, and cover with water. Bring the fruit to a boil, then simmer them until the fruit is tender, and the perfume fills your kitchen. This will be between 40 minutes to an hour and a half, depending on how well bletted they were when you started.

Drain off the water through a piece of muslin, but keep the cooking liquid, as this will form your jelly. Set aside the fruit pulp, because this will be the basis of your jam. Measure out the liquid, as this will determine how much sugar you will need. For making jelly, you take 400 g sugar for every 600 ml juice. My fruits yielded 1.3 l, so I used 860 g sugar.

In a large, clean pan, add the liquid, sugar, tarragon stalks and the rinsed off muslin with the seeds in it. Heat gently, stirring while the sugar dissolves. Once the sugar has dissolved completely, bring the jelly up to a rolling boil. Don’t stir it after this. It needs to reach 104.5°C to set. You can measure this with a jam thermometer, or you can do the fridge test. I often do both.

Meanwhile, chop the rest of the tarragon finely, and set aside for later. Once the jam has reached setting point, take it off the heat; remove the muslin with the seeds, and the tarragon stalks. Don’t throw the seeds away, they are useful for more jam making later. Add the chopped tarragon, and leave the jam to cool for 10-15 minutes, so that the tarragon will be more evenly distributed through the jam in the jar.

Meanwhile sterilise any jugs, ladles and jam funnels that you will need to transfer the jelly into the jam jars, by covering them with boiling water. You’ll need to dry them off before use.

Pour the jelly into the sterilised jars, making sure that the jam is within a couple of mm from the top of the jar. Put the wax discs on the top, wax side down. Put the lids on and tighten them well while the jam is still hot.

12 Comments

Filed under Found

Thinking Outside the Box

Foodie Penpals Parcel October

Brain Box

It’s Foodie Penpals time again. This will be my last box for a little while, but I look forward to joining in again in the New Year. I will continue to look around for other people’s updates, and blog posts. I really enjoy the scheme, and getting a box of food is like a little Christmas each month. And I have “met” some lovely people too. As always, thanks to Carol Ann of Rock Salt, who organises this so well each month Europe.

This month, I was paired with two readers again. I sent a parcel to Kelly, but unfortunately her parcel seems to be languishing in the sorting office. We are trying to sort this out now, and I hope that she will soon be able to do a guest post about her parcel. As usual, I sent her a few typically Dutch items, so I hope that she likes them, when they eventually get delivered!

I received my parcel this month from Ruth. She is a busy student, so it was especially nice for her to take time out of her first week back at uni to get me some things. Ruth was thinking outside the box both in the fact that some of the items were not edible (though still very much food related), and because this month, I didn’t get a box, but the items came in a bubble wrap bag. Great idea, and it should save a bit in postage. Of course, I have popped all the bubbles saved the bag for another  occasion. Ahem!

Mini Tabasco

Teeny Tabasco

Ruth sent me some really cool things. Not least of which were these cute little Tabasco bottles. They stand about 3 cm tall, but of course, they punch far above their weight in the flavour department. Tabasco with cheese on toast is A Thing, you know.

Rococo Bee Bar Organic Milk Chocolate

A Treat for Me and The Bees

This is a lovely little sweet treat. Apparently, they are called Bee Bars because Rococo uses a bee pattern on their chocolate moulds. I am an inveterate nibbler of chocolate, and can happily make a bar last a month. Much to the Big Guy’s consternation. He feels that chocolate should be consumed all at once. I have hidden this, so I can nibble in peace.

Seaweed Snack

A Crisp Alternative

I received some healthy snacks. I think that Ruth has been reading my latest efforts to eat better, but with lower calories. These Seaweed thins fit the bill perfectly, especially for those times when you know that only a salty snack will do.

Fruit Snacks

Fruit Fooled

In keeping with the healthy theme, I also got some fruit leather and flavoured raisins. I suppose that these are the same as soaking rum in raisins, or similar. I am looking forward to adding the pineapple raisins to my next batch of muesli. I think the orange ones will go well in mince pies and has given me an idea for a slightly different mincemeat, so I may do a little bit of experimenting, so that I have some ready for my annual mince pie and mulled wine party.

Sparklers, Stencils, Spatula

Fun with Food

Last, but not least, I also got some cake sparklers, and a packet of Christmas stencils, both of which will also be a big hit at the mince pie party. And this lovely little gingerbread spatula. It is traditional at this time of year to make parkin, especially for Bonfire Night. We don’t get a Bonfire Night over here, but there is definitely something about autumn that makes you crave ginger and warmer spices. I have a parkin in a tin, developing that lovely sticky richness. Now I am inspired to make some ginger bread biscuits too.

Thanks again Ruth, a really good parcel, and one from which I have also got a bit of inspiration.

Do you fancy joining in? It’s fun, and interesting to see other people’s choices of food.If you do fancy it, here are a few details:

  • All interested parties in the UK and Europe – bloggers and blog readers alike – sign up by the form available at the bottom of this post
  • Participants are matched on the 5th of the month
  • Penpals send thoughtful, food related parcels, on or before the 20th of the month. The parcel must include something hand written – a note explaining the box’s contents, a recipe card, whatever you like. The price limit for the boxes is £10 – this is a limit, the point is not the cost, but the thought (no, really!)
  • Penpals open their boxes and rejoice!
  • At the end of the month, everyone blogs about their box, or writes a guest blog post if they are usually a blog reader and not writer. Everyone reads one another’s posts and rejoices some more. Posts are made available on Lindsay’s blog so we can all find each other easily

9 Comments

Filed under Feast

Green Bean Chutney: A Taste of My Childhood

Runner Beans, Unknown var

From One Generation to the Next

Every year I grow runner beans in my garden. I don’t know what variety they are, they were originally given to me by my father from seed that he saved from his garden. I have never bought runner beans, and subsequent generations of dad’s seeds have grown successfully across four different gardens/climates and in two different countries.

We always had runner beans, fresh from the garden, throughout the summer and early autumn months. I used to take them for granted, since they always came, no matter what the weather or growing conditions that year.

After I moved out of home, I only really got runner beans if I was visiting my parents. Back then, I tended to shop in supermarkets, and runner beans were not a popular supermarket choice, maybe because it is hard to get them to be completely uniform, like the Stepford style apples and tomatoes that they prefer to sell.

When I first started to get a veg box, I got some runners, to my delight. Just like Mum used to, I settled in to string and slice them. I was jolted by a powerful memory of Mum doing this, often in front of Last of the Summer Wine on a Sunday evening.

When large amounts of beans were being prepared, I always got a bit excited, because I knew that the next day she would make Green Bean Chutney.

Just as my Dad always grew our vegetables, Mum always made a lot of our food from scratch. Chutneys, pickles and jams were no exception. In fact, I didn’t have factory produced jam until I left home; and frankly, I found it wanting.

I have always loved Green Bean Chutney. I used to have it every day at school, and all of the other kids would say stuff like “eurgh, that’s gross” and “Why do you always have that yellow stuff in your sandwiches?”. I would smile at them, safe in the knowledge that they didn’t know what they were missing, and if they didn’t want to try any, then Mum would be less tempted to give some away.

Jars of Green Bean Chutney

Sandwich Filler

Now I am older, I make Green Bean Chutney for myself. The Big Guy is a total convert as well.

As you may have seen, I am a bit of a preserving addict, so I am always giving them as gifts to friends and relatives. Despite the fact that we grow extra runner beans, so that we can make this chutney, the Big Guy still severely rations the Green Bean, in order to keep more for himself.

If I am honest, I am a little loathe to give it away, too!

So, I thought that I would share the recipe for Green Bean Chutney with you, in the hope that you can make it for yourselves, and I get to keep all of the jars that I make!

So, here is my Mum’s Green Bean Chutney. She gave it to me, but I am not really sure where she got it from originally. Maybe she can let you know, by leaving her first ever blog comment – over to you Mum?

You can  also use French Beans in this recipe, or a mixture of both French and Runners. Next year, thanks to my Seedy Penpal, Charlotte, I am going to grow a few yard long beans too, so I shall be experimenting with those as well.

My bean harvest was a little late getting going this year, but hopefully you will still be able to find some beans to try it yourself.

Do  you have any food that evokes such strong childhood memories? I’d love to hear about them.

Green Bean Chutney, Cheese and Crackers

Super Match

Recipe: Green Bean Chutney

Ingredients

I have converted this recipe from imperial to metric

3-4 jam jars

700 g runner beans (or French or other green beans, or a mixture)

1 kg  onions

Cold water to cover

1 dstsp salt

350 g demerara sugar

600 ml malt vinegar (I can;t get malt vinegar over here, so I use 500 ml white wine vinegar and 100 ml balsamic)

1 dstsp turmeric

1 dstsp powdered English mustard

1 tbsp cornflour

Method

Sterilise the jam jars in a dishwasher, or wash them in hot water, dry them and leave them in a low oven while you make the chutney. Either way, they will need to be hot when you put the chutney in it.

String and slice the beans (or use a stringless variety), making sure that they are roughly the same size – this is especially important if you use a mix of bean varieties.

Peel and thinly slice the onions. Add them to a preserving pan (or a heavy-bottomed stainless steel pan) with the beans, cover them in water, and add the salt. Cook for about 10 minutes, or until tender.

Strain the water, and return the vegetables to the pan. Add half of the vinegar and the sugar. Cook for a further 10 minutes.

Mix together the cornflour, spices and the rest of the vinegar, and mix to make sure there are no lumps. Pour this into the pan, with the vegetables.

Bring the chutney back up to the boil, and hold it there for a few minutes, until the mixture thickens. You need some liquid though, because this will stop it drying out in the jars.

Fill the hot jars with the chutney. Then distribute the liquid between the jars, so that they are full to about 3 mm from the top.

Put a wax disc, wax side down, over the chutney, and seal it with cellophane. Don’t use a lid, the vinegar will corrode the metal, and may leave you exposed to some nasty microbial activity.

Don’t discard any excess liquid, it is great in salad dressings.

You need to leave the chutney for a week to allow it to meld and mellow.

This is a brilliant accompaniment to cheese, cold meats, salads, and is a particular marvel with jacket potatoes, and bubble and squeak.

UPDATE: In a very timely way, I found out that Susan at A Little Bit of Heaven on A Plate is running a Home Made and Well Preserved competition. So I thought that I would share my lovely childhood chutney there too, and maybe win some spices (fingers crossed).

37 Comments

Filed under Farmed

They Called me the Wild Rose

Wild Rose Jelly

…But my Name was Eliza Dane

I’ve been back collecting rose petals again. As I mentioned in my post about rose cordial, the roses in my favourite spot are probably rosa acicularis. These are quite a long flowering variety, and you don’t need that many for this recipe, so you can still find them now if you try. Don’t forget to leave the bees behind when you pick them, though.

This time I made a really delicately flavoured jelly. My version definitely has all the flavour of rose, but has quite a subtle colour. If you would like a darker coloured jelly, then you can boil the petals up in the water before you add the apples, but I personally don’t think it needs it.

I have never made rose petal jelly before, but once you have the proportions in your head, making jelly is easy. You will need a jelly bag, or muslin and a sieve to strain the liquid. I have a thick piece of muslin that I nail to the frame of a chair with the seat removed, and that works well for me. Whatever method you use, it needs to support a bit of weight.

This makes 3 standard pots of jam, but I actually used smaller jars, as it was a lovely one to give away as gifts. I was also thinking ahead to possible foodie penpals. When I sent my first parcel out, I found to my penpal’s cost that sending jars mean that I can send much less, due to weight limitations. A nice work around is to try to send small jars as testers. I will see if that works.

This jam is a good breakfast preserve, and nice with yoghurt. However, I actually think this has more potential as a glaze for patisserie. I am going to try making a raspberry tart, and use rose petal jam as the glaze, where you would probably ordinarily use apricot jam. Of course, I shall let you know the results when I try it.

Wild Rose petals

Pretty In Pink

Recipe: Rose Petal Jelly

Ingredients

15 g rose petals

500 g apples

400 ml water

Granulated sugar – the exact amount will depend on how much liquid you have

Method

Rinse the rose petals, and remove the claw.

Cut the apples into chunks. There is no need to peel or core them, as this contains pectin, which you need to help the jam set.

Place the apples, petals and water in a pan, and bring to the boil. Reduce to a simmer, and cook for half an hour. At the same time, boil your muslin to sterilise it.

Strain the fruit pulp through your muslin/jelly bag/ whatever set up you use into a large bowl. Leave  it to strain overnight, so you get the maximum amount of juice from your pulp. Don’t be tempted to squeeze the bag, or push the pulp through though, or your beautiful clear jelly will be cloudy.

I usually make fruit butter with the leftovers from jelly making. It is a tasty preserve, but it does have a short shelf life. Unfortunately, I didn’t have enough time to make it or to find homes for the pots where it would not go to waste. As there has been no sugar added, you can still compost the pulp with no adverse effects.

Before you start to make the jelly, sterilise some jars. You can do this in various ways, including washing them in hot water, rinsing well, and putting them in a warm oven; you can steam them in a pressure cooker; or wash them in a dishwasher, being careful to time your cycle with about the right time that the jam is ready. At the same time, boil your muslin to sterilise it.

Measure your juice that was strained from the pulp. This is where the proportions come into play. For every 600 ml of juice that you have, you need 400 g sugar.

In your preserving pan, gently warm the juice and the sugar, stirring while the sugar dissolves. Then bring to a rapid rolling boil. Allow to boil like this for about 10 minutes. Your jelly will have reached setting point at 104.5 °C, or when you get a skin forming on jam dropped on a cold plate and left in the cold  for a minute.

Pour into the sterile jars while both are still hot. Fill to within 3 mm of the top, then put a wax disc over it, wax side down. Seal with a screw lid, or a cellophane cover.

Label them and give them a week for the flavour to develop. Once you have opened a jar, keep it in the fridge.

1 Comment

Filed under Found