Tag Archives: Vegetarian

Blessed Are The Cheesemakers!

I have had a lot of fun with this month’s Cheese, Please! Challenge, hosted by Fromage Homage. This month, we were asked for recipes containing fresh cheese, which we had to make ourselves. I think it is great, encouraging people to develop skills of entry-level cheesemaking, as well as being creative in coming up with recipes to use the resulting curds. I have certainly found it inspiring. There are a lot of fantastic recipes on her blog, so do come over and have a look.

Shaped Mozzarella ball

Cheese Balls

First, I made mozzarella. That was a very interesting experience. My first efforts were a little rubbery, I think because I cooled the water to 80°C, as was mentioned in one of the posts I bodged my recipe together from. The second efforts were with unpasteurised milk, and hotter water, and they were a world apart from the first batch. I could already see the difference between the curds when they were forming in the pan, they were much creamier, and there were a lot more of them!

Curds from Unpasteurised Milk

Rich, Creamy and Unpasteurised

Then I had a go at ricotta, which was disappointing at first, but also vastly improved by using unpasteurised milk. From this I made gnudi, which I have always wanted to have a go at making. They were lovely, and light as a feather. I definitely recommend having a go at this, even if you can’t be doing with making fresh cheese. They were delightful, light and really very tasty. They will go with a lot of different sauces too, so also very versatile.

I smoked some of the mozzarella, which was mostly an experiment. It was successful in terms of flavour, but I think it needs longer between heating the wood chips, so that it has a better chance of staying spherical.

Breakfast Pizza - Bacon, sausage, mushrooms, spinach and egg

Breakfast Pizza

With all this cheese, there was only one thing for it – pizza! Which turned out to be both the perfect party food, and a hearty breakfast. It also had the added benefit of using up some of the whey.

Talking of which, I tried my hand at lacto-fermenting vegetables and making Gingerade; which is what you get when your ambition exceeds the time that you have available to brew the assortment of drinks that you had planned.

Cheese Please blog badge

From 4 l of unpasteurised cow’s milk, I got:

  • 500 g mozzarella (I smoked the cheese that I made from the pasteurised whole milk)
  • 200 g ricotta
  • 3.25 l whey
  • Pizza dough for 20 individual pizzas using the whey
  • Gnudi for 2 adults
  • 2 l lacto-fermented gingerade
  • The raw ingredients for a few more lacto-fermenting adventures
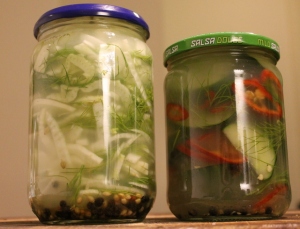
  • Lacto-fermented fennel
  • Lacto-fermented cucumber
  • A load of leftover vegetarian rennet, ready for more cheesey adventures.
  • Hands softer than kittens on a velvet pillow

Next, I think I’m going to try to find some buffalo milk, to make mozzarella di buffala, for that authentic fresh cheese. I’d also like to try to make a washed rind cheese, similar to a brie. I had a very good triple cream one from Neals Yard Dairy that I may try to recreate, if the brie goes well. But before I can do that, I’ll need to bodge up somewhere to age it, unless I can use the fridge?

I have also managed more blog posts in a fortnight than I managed for most of last year. This is a warning though, that I have a few other exciting projects on the go, including a new collaboration, in Dutch, with the Tweakfabriek, where I will be doing some basic recipes, then two different tweaks to make with them. I’m very excited about this collaboration indeed! It does mean that I will not be posting as many recipes as you have seen from me in the last fortnight, but if you’d like to read some more in Dutch (or using Google translate) then watch this space for more details.

For this month, I’ve made the most of new inspiration. I’ve had a lot of fun, with and without guests, eaten well, and learned new skills, as well as a few bodges to make a hot smoker colder. What could be better than that? So, thanks again, Fromage Homage, and here’s to the next challenge!


11 Comments

Filed under Feast

Under the Milky Whey

Fresh Whey and Vegetables

Chop A-Whey!

A quick look on Pinterest reveals that you can lacto-ferment pretty much anything – from garlic to hummus. I saw fruits, vegetables, herbs, spices, beers, mayonnaise, BBQ sauces and even mustard on there. Apparently it is amazing what won’t be improved by bunging in some whey.

As you know, I happen to have quite a lot of whey taking up all the space stored very carefully in my fridge.It is the yellowish liquid in the photo above, and it is the by-product of making your own cheese, or straining yoghurt.

Apart from the miracle of being the new superfood, due to all the probiotics; you can feed whey to animals, use it as a fertiliser, make various toiletries for skin benefits, and body builders dry it then consume it by the bucket load.

You can also soak beans, or grains in it before cooking, use it instead of the liquid in pancakes, cakes, and bread (or pizza dough). soups, and stock. You can even add it to shakes and use it as a cheese starter in some kind of lactose Inception.

Whatever you do with it, you should not pour it down the sink. Apparently, it can de-oxygenate water systems. So, for this reason, and the fact that I hate waste, I’m going to use mine. Don’t worry, it also freezes really well, so if you can’t get through it all, you can keep it for later.

You may have noticed that I enjoy a nice pickle, go crazy for chutney, and take pleasure in preserves. It is only natural, then,  that I should have a go at lacto-fermenting as a novel way of preserving food, and as a way to use up leftovers. I’ve had a good dig round the internet, including over at the lovely host of Cheese, Please!, who lacto-fermented cucumber and carrots to come up with the following recipes.

For the first, I wanted to be able to make a direct comparison with a pickle that I already know. I make pickled fennel a lot, based on the River Cottage Preserves book, so I used the same aromats and dill here.

The second lot are inspired by a friend of mine who makes amazing pickled cucumber from a mysterious Asian salt. I have no idea what this stuff is, but it is hot, sour and sweet at the same time. I have tried to recreate this with the whey – we’ll see where we get to.

Apparently, lacto-fermenting is pretty long-lasting, but depends on how strong the cell wall of the thing you are preserving is. You can expect the fennel to last between 4-6 months in cold storage, and the cucumber to last up to 3. The fermentation will continue, even in cold storage, so it is something to be aware of, and date the jars well before you store them in a cool, dry place.


Lacto fermented fennel and cucumber

Perfectly Preserved

Recipe: Lacto-Fermented Vegetables

Ingredients

For the Fennel:
1 tsp mixed peppercorns
1 tsp coriander seed
1 tsp fennel seed
1 bulb of fennel, cored and thinly sliced
Fronds of dill
100 ml whey
300 ml boiled water, allowed to cool
1 tbsp rock salt

For the Cucumber:
1 tsp mixed peppercorns per jar
1 tsp juniper berries per jar
1 large cucumber, in 3 cm slices on the diagonal
1 red chillies, sliced on the diagonal but seeds left in
Fronds of dill
200 ml whey
600 ml boiled water, allowed to cool
1 tbsp table salt
1 tbsp sugar

3 jam jars

Method

Sterilise your jars on a hot cycle in the dishwasher, or by washing in hot soapy water, drying and placing in a low oven for an hour.

Prepare the vegetables, and boil the water for your fermenting liquid.

To the sterile , still warm jars, add the relevant spices, then layer up the vegetables, making sure to get a layer of dill fronds in between them as you go. Pack them as tightly as you can.

Mix together the whey, water and salt, as well as the sugar for the lacto-fermented cucumber. Fill the now packed jars with the fermenting liquid, up to 3 mm from the top of the jar. Screw on the lids tightly and store in a cool dark place for between 3 days and the maximum time for the vegetables.

I intend to leave these for about a month, before I try them. When I do, I will be sure to let you know what I thought.

11 Comments

Filed under Fermented

Fresh Cheese – In the Gnudi

Ricotta Gnudi and Tomato Chilli Sauce

Naked Food

Following on from my cheese making efforts, I thought that I could have a go at making ricotta. Literally translated as “twice cooked”, ricotta is right up my alley, as a way to reduce waste, and maximise leftovers. So I set about gently heating the whey left from my mozzarella to 92ºC,  and left it to cool to about 60ºC, before straining it through a thick muslin. I was so dismayed to find that it yielded next to no additional curds – 35 g to be precise.

35 g Ricotta

Bitter curds

Convinced it was something I had done badly, I turned to Google for reassurance. Whilst the technique was sound, it appears that the whey is acid, which is not conducive to making ricotta, which needs a “sweet whey”, or one that is produced from bacterial coagulation, instead of one brought on by acid. I probably should have done a bit more homework on that before I started, it would have saved time and gas!

Not one to be put off by such things, I bottled up the whey for later use. And made more mozzarella with unpasteurised milk. Having nothing to lose, and because I wanted the whey from this batch, I decided to try and extract more curds in the only way I knew.This time, I also strained it through cheesecloth, although I found that I couldn’t squeeze this out, because the curds simply fell through it.

The difference was amazing, I got 200 g of fresh, soft curds! Whilst it is perfectly possible to make cheese with any kind of milk, I think using unpasteurised milk pays off, if you can get it. I may also have a go with milk powder just to see if this is a cheaper alternative. Plus I have a lot of rennet that I need to use up now.

I have always fancied having a go at ricotta gnudi – soft Italian pillows, not dissimilar to light gnocchi. Gnudi (pronounced nyoo-dee) are, as the name suggests, “naked” ravioli. That is; they are the ravioli filling, naked of its customary pasta. They are best served with the simplest of sauces. The Big Guy and I were both coming down with colds, and so I wanted some chilli spikes in this sauce. I wavered over chilli, garlic and olive oil; but in the end settled on a tomato sauce with chilli, in order to take it from a starter to more of a main course with the addition of a nice green salad.

As well as a delivering a lovely pasta dish, my inner four year old enjoys sniggering when I announce what is on the menu. Reports that such pronouncements were accompanied with an impromptu dance of joy are totally unfounded. Cheese Please blog badge As you have probably guessed by now, This is yet another entry for the Cheese, Please! fresh cheese challenge. I have enjoyed myself this month, and you know I hate waste, so I’m determined to use up every last bit of the milk.

Recipe: Ricotta Gnudi With Tomato and Chilli Sauce

Ingredients

For the Ricotta:
Whey from making any type of cheese, the best being sweet whey from bacterial coagulation, otherwise unpasteurised acid whey will be good.

For the Pasta Sauce:
1 tbsp oil
½ red onion, finely chopped
1 red chilli, finely chopped, removing the seeds are optional
1 clove garlic, crushed to a paste
250 g tomatoes, chopped
Salt and pepper

For The Gnudi:
200 g ricotta
Zest of one lemon
Good grind of black pepper
1 tsp thyme leaves
40 g parmesan, plus more for garnish
1 egg, lightly beaten
Approx 70 g plain flour
Large knob of butter, 1 tsp and the thyme stalks for cooking

Method

Heating whey to 92ºC to make ricotta

It’s Getting Hot in Here

Make ricotta by heating the whey gently to a temperature of 92ºC. You will need to watch it, especially as the temperature exceeds 85ºC, because you do not want this to boil over, unless you especially like cleaning. Allow the whey to cool again, to a minimum of 60ºC, but preferably lower.

Strain through a sieve lined with a cheesecloth into a container large enough to hold the whey. Keep this for more things later – such as some pizza dough, other bread, stock, soups, and something else I have up my sleeve for later this week.

What you have left is ricotta. You will need to use a spoon or a spatula to remove it from the cloth. If you have left it to dry long enough, you may have to crumble it off. This is great in sweet and savoury dishes – I’ve even found recipes for ice cream. What you do with it is up to you.

For the sauce, sweat the onion in the oil until translucent. Add  the chilli and the garlic to the pan, and allow to cook for a minute. Next, add the tomatoes, and cook them down on a low heat, stirring occasionally to prevent them sticking. When the sauce is thick and the gnudi are ready,  season to taste.

While the sauce is cooking, make the gnudi. Mix together the ricotta, zest, thyme, pepper, parmesan cheese and the egg. Gradually add the flour, and mix in until the mixture forms a ball. It may take a bit more or a bit less than 70 g flour.

Shape the gnudi with wet hands. A lot of people shape them into balls, but I liked to form more elliptical gnudi. Put them on baking paper, or another non-stick surface.

Get a deep pan full of boiling water with the salt, butter and thyme stalks in. It is important to have the pan at a rolling boil. Put the gnudi into the water and cook for about 5 minutes. When they are cooked, they will float. Drain with a slotted spoon, and add to the sauce. You may also need a tablespoon or two of the water that you cooked the gnudi in to loosen up the sauce.

Coat the gnudi with the sauce, then serve immediately with a sprinkling of extra parmesan cheese.

11 Comments

Filed under Feast

Goodness Gracious! Great Balls of Smoke?

Smoked Mozzarella

Holy Smokes!

Having made my own mozzarella, I got a little bolder with my cheese, and decided that I should smoke it. I was given a hot smoker for my birthday and I was going to use it. A quick scour of the internet later, and again mostly inspired by The Barefoot Kitchen Witch, I realised that all of the smoking is done in a cold smoker, which I don’t have. Not one to be put off by such things, I thought that I could rig something up with the hot smoker, to do just as well. So the Big Guy and I put our heads together and decided upon what I still think is a very good bodge job.

As you can see from the photo above, I didn’t quite manage it, but I am onto something, and think with a few more goes I could get it right. The lovely round balls on the right here are scamorza that I bought from the market to try to determine what wood they use for the smoke. I managed to make great discs of smoke, rather than the balls I’d hoped would be there.However, the smoke flavour was very good, and so I was happy enough with the result.

So, in case you are ever mad enough to try hot smoking cheese yourself, this is how I did it.

Improvising a cold smoker from a hot one

Smoking Rig

Firstly, I knew I had to elevate the cheese as far away from the flame as I could, while still being within the realm that I could feasibly wrap in foil, which I would need to seal in the smoke, because the lid would not allow me to elevate the cheese. I have a small shopping basket thing that I was given one Christmas. It’s supposed to be a kitchen or bathroom tidy, but was metal and grill shaped, so perfect for my needs. You could also use the racks you find in combi microwaves, or invent your own bodge job.

Alder and Oak chips for smoking mozzarella

Smoking Mix

For the smoking mix, I thought that I’d chance my arm with a mix of alder and oak chips. I wanted all oak smoke, which is stronger, but I also needed something to have enough size to keep smoking when I turned off the heat source – because the cheese really would not hold up to continuous heat. As you can see from the photo, the oak chips on the top are really small, and I couldn’t be sure that they would continue to smoke without help, so I added the alder in an attempt to keep it smoking for longer.

Concertinering foil to make a larger smoker

Concertina Action

We tried to wrap the foil using the lip around the smoker, but could not get a good enough seal, so we decided that we would have to wrap the whole smoker up in a parcel. To seal the seams, we had to concertina long strips of foil, large enough to encase the smoker. We needed four widths, so it is a lot more foil than you think you will need.

A Frame for the cheese to rest on

A is for Almost an A Frame

Then I rigged up the cheese platform. I draped a simple piece of cheesecloth over the kitchen tidy, butI didn’t want the foil to fall in on the cheese, in case it conducted heat straight onto it.  So, I rigged up a kind of A-frame with some chopsticks, and I placed some pastry dough scraps I had leftover from cooking an apple pie over the top to prevent them piercing the foil.

Foil wrapped smoker

Fumer en Papillote

Then I wrapped the whole thing in foil, and sealed it tightly by scrunching up the edges. I put it on the smallest hob on my stove, and heated gently to make the smoke start. When the smell of smoke was pretty strong, I would turn off the heat, and just allow the cheese to sit in the smoke that was created. When I could no longer smell the smoke, about every 10-15 minutes, I would turn the heat on again, for a few minutes, and then let the cheese sit in the smoke again. I did this for 2 hours.

After an hour, I checked the cheese by opening a little of one seam and shining a torch into the gap. They were definitely still whole and plump and round then. I think that the problem was that in the second hour, I got distracted by cutting up toppings for the pizzas, and the heat may have stayed on a little longer than I had hoped for a couple of the times. I think if I make sure that I am not distracted, and leave the heat on for no more than two minutes each time, then I will be more successful.

Cheese Please blog badge

I was very pleased with the smoke, and I would use the smoke mix again. The flavour was rich, but not overwhelming. And I still believe that the gentle heat and then allowing the cheese to sit will work, maybe I need to experiment with the total time that the cheeses smoke for. However, I want to enter this to Cheese, Please! hosted by Fromage Homage, and so I have posted these very tasty smoke discs, in order to qualify in time.

13 Comments

Filed under Feast

From Milk to Mozzarella

Home made Mozarella balls

Milk Solids

This month, I have got quite a few cheese posts on the way, inspired by the Cheese, Please! Challenge over at Fromage Homage. As soon as she announced that the challenge this month was to be fresh cheese, I knew I wanted to play. My mind was racing over the possibilities (of which, more to come), but I have a birthday party coming up and I want to let the kids make pizzas (with ingredients made from scratch, of course!). The obvious place to start on my fresh cheese odyssey is with mozzarella. I’m probably going to enter all of my recipes in one larger round-up post at the end of the month, but I am going to share the individual recipes that I make with all the fresh cheeses too.

So, we’ll start at the very beginning; a very good place to start; mozzarella, a fresh cheese with bounce!

I looked around online, and decided that mozzarella from scratch can’t be that hard, can it? I quickly found a few nice recipes, which I cobbled together to come up with my techniques I share here. Most of the recipes include using a microwave, which I don’t have. Instead I have been most inspired by the Barefoot Kitchen Witch and the techniques used in this post from the New England Cheese Supply Company.

Cheese Please blog badge

Making one’s own mozzarella counts as a fresh cheese recipe, doesn’t it? So I think it will be a great entry for Cheese, Please! And even if it is really only precursor for the actual recipes, it doesn’t matter, it was pretty simple, I had a lot of fun, and I have the softest hands I have had in ages, so that’s an added bonus!

Recipe: Home Made Mozzarella

Ingredients

2 l milk – you can use whole, semi skimmed, pastuerised or whatever you like really. The only milk that doesn’t work is UHT.
¾ tsp citric acid, dissolved in 60 ml blood temp water
2 drops vegetarian rennet in 30 ml cold water
Salt to taste

If you do not have a measuring jug that allows you to measure such small amounts of liquid, remember that 1 ml of water =1 g, so you might find it a lot easier to simply weigh the water.

In the Netherlands, rennet is called stremsel, which I personally think sounds a lot nicer. The great news, whatever you call it, is that vegetarian and original rennet are widely available. My regular online brewshop stocks all varieties, as well as citric acid, which is great for me!

In addition to the ingredients, it is a good idea to gather together the equipment you will need before you start.

Equipment

Large saucepan
Thermometer, preferably one that can measure low temps
Cheesecloth or muslin, sterilised by boiling
Sieve
Slotted spoon
At least four large bowls
Boiling water
Ice

Method

Curds after citric acid and gentle heat

Lemon/ Curd

Add the milk to your saucepan, with the dissolved citric acid. Heat gently until it gets to 32ºC. If, like me, your thermometer will not measure that low (I used my jam thermometer, which starts at 60ºC), heat very gently until your curds look like the photo above. When you stick a (clean) finger in it, it will feel cooler than you, but not that much.

Curds after adding rennet and heating

Rennet Ready

Add the rennet water, and heat a little bit more to 37-38 degrees. Again, if your thermometer doesn’t go that low, then use the photo above. You will not feel a temperature difference if you stick your finger in this liquid.

Curds after rennet and with rest

Curd Wayhey!

Take the curds from the heat, then allow to sit for 5 minutes or so. You will clearly see the separation of the curds and the whey, which will look more watery. Cut the curds crossways with a sharp knife.

Fresh Curds

Fresh Curds

Line your sieve with a cheesecloth, or muslin square, and place over one of the bowls. With a slotted spoon, remove the curds from the pan, and put them in the sieve. They will look quite wet, like above. Cut and fold them over with the slotted spoon, to get rid of some more of the whey.

Curds, after most of the whey has run off

Whey Less!

The curds will go from watery to looking much drier, and will lose quite a lot of volume. Don’t throw away the whey, it has a lot of uses, and keeps for a long time in the fridge.

Curds, after initial kneading

Curd Need

Remove the curds to a separate bowl, and knead for a little bit, until it looks a lot less lumpy. Boil enough water to allow you to sit your sieve on a third bowl, so that the sievey bit is submerged. Get a different bowl of iced water ready as well.

Place the curds in the sieve in the hot water, and allow them to pour, stretch and fold off the slotted spoon. I’m sorry, I didn’t get a good picture of this, because it’s pretty hard to do this and photograph yourself, and the Big Guy was at work. Anyway, it will start to get more stretchy and smoother as you go on.

Curds getting smoother and sretchier

Come Together

As the water cools, the cheese will stop stretching. Once this happens, boil a kettle again. While it is boiling, remove the curds to the bowl and knead some more. At this stage, add some salt to taste, and knead to mix well.

Stretchy Cheese

Nearly There

Repeat submerging in the boiled water, stretching and then kneading until you have a stretchy, pliable cheese. You can either shape this as one large ball, or divide it into smaller balls if you prefer.

Shaped Mozzarella ball

Cheese Balls

I found it easier to use the hot water for one final shaping. I used the sieve and the slotted spoon to roll the cheese around in the hot water to make a ball shape.

Once you have shaped the cheese, submerge in iced water. Mozzarella should be used fresh, but can be stored in briney water the fridge for up to 4 days.

19 Comments

Filed under Feast

A Summer Soup for Winter, Mostly From a Cupboard

Winter Vegetable Soupe au Pistou

A Staples Stand-By

The Big Guy has been worrying about our plants. More specifically, he has been fretting over a rather leggy basil plant, that really was on its last legs. After the third day of him agonising, I decided that we should use up the whole plant. Whilst mulling over winter uses of basil, I kept coming back to the thought of soupe au pistou; the Provençal summer soup.

Try as I might, I kept returning to the pistou, which is like pesto, but without the pine nuts. In fact, I couldn’t really think of anything else, so I gave in. Instead of courgettes and peas, it had to be about what I had knocking about. Between the fridge and the garden, I knew that I could come up with the goods.

Despite the name, the original recipe is more like a summer vegetable stew;  thick with beans, squash, tomatoes and alliums, as well as vermicelli. I could easily substitute most of these for suitable winter vegetables, so I went on a domestic forage.  As well as the basil, I grew thyme, garlic, carrots and cavalo nero (amongst other things), so these were definitely going in. The fridge yielded half a butternut squash, some aging tomatoes and a leek. If I didn’t have fresh tomatoes, I would have substituted these for half a tin of chopped tomatoes. That’s the brilliant thing about store cupboard soups – you use what you have.

I was also excited to experiment with cooking dried beans in my new pressure cooker. I’m dying to test the assertion that you can cook dried beans without a pre-soak, which will be amazing for someone who can forget to do the little things, like me. However, when I went to look, the cupboard was bare of dried beans, apart from some kidney beans I have, which wouldn’t have tasted right in this soup. I am still reluctant to forego the pre-soak for these beans, due to the toxins they contain. With a sigh, I added dried beans to my shopping list and went for tinned instead. I generally prefer dried beans for taste and texture, but I always have a tin or two on stand-by, because I am also a realist about my lack of foresight. Since this was a root-around, use-up, make-d0 type of soup, I wasn’t going to go shopping for beans, so I made use of what I had.

The classic soupe au pistou always contains starch. I used vermicelli, because I had some. Other pasta shapes (especially the small ones, such as ditolini, risoni, or stellini) are fine – or you could break up spaghetti into small bits and use those. You could add rice to this soup, in case you don’t have any pasta, or you can’t eat wheat. If you use rice you’ll need to add it much earlier than I suggest adding the pasta, or use pre-cooked rice.

This soup may be a winter version of a summer classic, but the intense smell as you mash the pistou is like a shot of glorious summer in a winter kitchen.

Since this is a winter warmer, and definitely comforting, I’m entering it into this month’s Cheese Please, over at Fromage Homage. There are some really great recipes there this month, so do come over and have a look.

Cheese Please blog badge

Recipe: Soupe au Pistou du Placard

Ingredients

For the Pistou:

1 fat garlic clove

A good pinch of salt

30 g basil leaves

About 60 ml extra virgin olive oil

About 40 g parmesan cheese, finely grated (or mature vegetarian cheddar, since parmesan is not vegetarian)

1 tomato, peeled and de-seeded (optional)

For the soup:

1 leek, washed and sliced

2 carrots, diced

1 bay leaf

1 tbsp olive oil

3 cloves garlic, minced

1 tsp fresh thyme leaves, or ½ tsp dried thyme

1.5 l vegetable stock

400 g butternut squash, or pumpkin, diced

100 g cavalo nero

400 g can of cannellini beans, drained and rinsed

2 medium tomatoes, diced; or half a tin of chopped tomatoes

100 g vermicelli noodles, rice or any other small pasta shape

Method

Make the pistou. I like to use a pestle and mortar, but you can also use a small food processor. If you are using the food processor, either mince the garlic first with a chef’s knife and the salt, or grate it on a microplaner before adding it to the processor.

Whichever method you are using to make the pistou, add and blend the ingredients in this order: garlic and salt, basil, some of the oil and cheese. Be sparing with the both the oil and the cheese. You must taste as you add these, because all basil will vary. You want  fairly thick pesto, but it still needs to be flavoursome. Once the pistou is to your liking, stop adding things.

Make a concasse of the tomato and stir it through the pistou. Traditionally soupe au pistou has tomato flesh gently crushed into the pistou with a pestle and mortar, which you can also do if you prefer. If you are using tinned tomatoes, omit the tomato from the pistou, or you risk diluting it too much.

Prepare all of the vegetables for the soup. I decided to cook the cavalo nero stalks separate to the leafy greens. So, I stripped the greens from the stalks, and sliced both. Slice the stalks into 1cm chunks, like the rest of the vegetables. Slice the greens thinly, and keep them separate.

Sweat  the leek, carrot and the bay leaf in the olive oil in a deep pan, until the leek turns a vibrant green. Add the garlic and thyme and sweat off for another minute or so.

Add the stock, and simmer for a few minutes, or none at all, if you prefer your carrots crunchy. Taste for seasoning and add salt and pepper as necessary.

Add the pumpkin and cook until you can just pierce it with the point of your knife. The time required will depend on the size of your dice. It took me about 5 minutes, based on 1cm dice.

Chuck in the beans, chopped tomatoes, and cavalo nero stalks, and allow them to simmer for five minutes, before adding the vermicelli and the greens.

Allow the soupe to cook until the pasta is al dente. Check for seasoning, and serve in deep bowls, topped with a large dollop of the pistou.

16 Comments

Filed under Farmed

A Picnic on Public Transport

Asparagus and Potato Tart

Tarted Up Leftovers

The Big Guy and I are seasoned travellers. If you live in a different country from either of your families, you have to get used to the rhythm of packing, transport, and departure times. Where we can, we take the train; it has a much better rhythm – with a continuity of movement, both in terms of the motion of the carriages, and because there is no hanging about in a departure lounge, or being forced through an array of harshly lit shops. The train gets you where you need to be without fuss; you have space to sit comfortably and to move around.

One of the things that we haven’t got the rhythm of is taking our own food. Although, I do know exactly where all the best places to buy food along the journey are. We have recently returned from one such trip abroad, although this time, we had a leg of the journey on a coach. It was OK, but I will be glad if they ever sort out the troubles on trains run by a certain rail company, which has been unable to run for far too long now.

We decided that we should be better prepared for this journey. Since our usual rhythm was interrupted, I could not guarantee getting to my favourite pit stops. I also had a few ingredients in the fridge that wouldn’t last until we returned. So, the obvious choice was to make something to take with us. A picnic, of sorts.

I had a little of the salad, some cream and some eggs that needed using up from the dinner I made for friends, and a few last sprigs of chervil. As so often happens, the day before I was leaving I woke up and knew that these would be perfect in a tart, with some goat’s cheese. We could have some for dinner that evening, and then we could take the rest as a picnic for the coach the next day.

Like many of the best laid plans, the idea for a nice goat cheese went a bit awry. It was a bank holiday, and none of the usual shops were open, so I had to dispatch the Big Guy to the supermarket. Unfortunately, all they had in the way of goat cheese was some presliced stuff, that could have been any generic cheese. It certainly never has the tang of goat that I was looking for in this dish. Fortunately, he returned with some sharp, crumbly feta instead. This was a much better option, it needed to match the asparagus.

The tart was tasty, filling and survived the journey. So did the salad we had with it, because we dressed it en route from a small jar. This is my top tip for picnic salads – if you dress it before you travel, the salad will cook in the acid, and you will be left with a container full of flaccid disappointment.

Cheese Please blog badgeFour Seasons Food Challenge Chez Foti & Delicieux

I know I have entered my dishes into a lot of blog hops lately, but I couldn’t resist entering this recipe into the inaugural Cheese Please Challenge, hosted by Fromage Homage. Then I heard about the inaugural Four Seasons Food, dreamed up by Anneli at Delicieux and Louisa at Chez Foti. This dish is so apt for both.

This was my perfect public transport picnic, and I didn’t waste anything in my fridge. I’d love to hear what appears on your picnic blanket, or even coach seat when you make food for on the go.

Recipe: Asparagus and Potato Tart

Ingredients

For the Pastry: 

100 g plain flour

50 g cold salted butter

Really good grinding of black pepper

1 egg yolk

For the Filling:

100 ml cream

4 eggs

small bunch chervil, very finely chopped

100 g of leftover asparagus salad, or 3-4 small salad potatoes and 5 asparagus spears cooked until just tender, and cut into 5 cm chunks

2 spring onions, sliced finely

90 g feta cheese

Method

Season the flour. I wanted this pastry to taste peppery, the rest of the tart can hold its own. Don’t be afraid of adding  more pepper than you think.

Rub the cold butter (it needs to be fridge temperature) into the seasoned flour until you have a breadcrumb consistency. Add the egg yolk and bring together into a dough. If you need to, you can add a little bit of cold milk to make it all come together. Add a splash at a time.

Form a disc with the dough, and cover it with cling film or foil, and leave it to rest in the fridge for 20 minutes to an hour.

Heat the oven to 200°C. Roll the pastry out thinly on a floured surface. Carefully line a greased flan case with the pastry, and press into the sides or fluting with a small offcut of pastry in a ball, to avoid any tears or holes, you don’t want the filling to leak and burn on the bottom.

Prick the bottom of the pastry all over with a fork. Line the pastry with greaseproof paper, and add a good layer of blind bake – this can be ceramic beans, dried beans or rice – to give some weight help keep it flat and thin. Bake in the oven for 15-20 minutes, or until the pastry looks dry and is beginning to brown on the sides. Remove the blind bake, and put back in the oven to allow the pastry to cook all over to a light golden colour.

While the pastry is browning, whisk together the cream, eggs, and chervil.

Once the tart case is cooked, remove and turn the oven down to 180°C.

Pick the salad over to remove any leftover capers and cornichons. Scatter the rest over the tart case, so that you get pretty even cover. Then scatter over the spring onions and crumble the feta around, again, so that the coverage is quite even.

Pour the eggs and cream over the rest of the filling, shaking the case a little, to ensure even distribution. Return it to the oven and bake for a further 30-40 minutes, or until the centre is just set, but still has a little wobble if you shake it.

As with all quiches, this is great served hot or cold, but if you want to serve it warm, let it rest for about 10 minutes after it comes out of the oven, so that the filling does not ooze all over the plate.

9 Comments

Filed under Feast

First in, Best Dressed

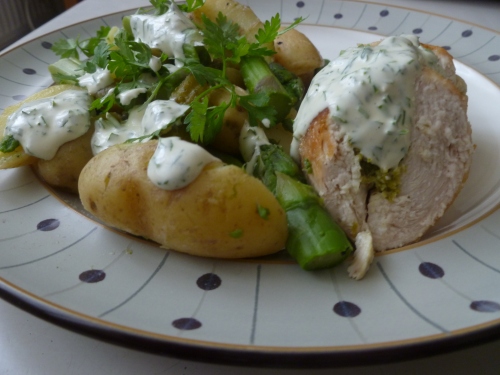
Asparagus Salad, Chervil Dressing and Asparagus Mousse-Stuffed Chicken Ballotine

Made for Each Other

I may have already mentioned how inspired I was by the Rollende Keukens (only once or twice…). I ate so many good things there, that I am now experimenting with.

Nestled in amongst the stalls, was the Bar d’Asperge, which sold all manner of brilliant dishes with asparagus; from the Dutch classic – white asparagus with ham, egg and a bechamel sauce, to grilled green asparagus, pasta salad and all manner of other things. I was in search of something on the healthier side to counterbalance all the barbecued goodies that the Big Guy was queueing for. We were both also hungry, so I wanted something substantial, too.

Asparagus Salad with a Delicious sour cream & chervil dressing

A Healthy Option – Fresh Asparagus Salad

I came across this lovely salad, which contained potatoes, white and green asparagus, mushrooms, capers and cornichons. As the lady served it to me, she smothered it in a dressing, casually mentioning it was home-made. It was good – creamy, rich and spiked with chervil. Asparagus and chervil: if ever a herb were meant to go with a vegetable, it would have to be these two.

I tried many things at the Rollende Keukens, but to be honest, I don’t remember much else from the first day that I went there. This salad, and this sauce have consumed the rest of my memories. I knew I had to recreate it, and I knew that I would need to do a bit of research first. A lot of the sauces I looked at were stock based, and thickened with cream. This dressing certainly had sour cream, but was sharper and fresher than that.

I thought that you would need the thickness of a mayonnaise to give the sauce its consistency. I also knew that a shop-bought mayonnaise would make it too claggy. Then I remembered that it was perfectly possible to make mayonnaise yourself, and I could make it at the thickness that I felt appropriate. And so, a homemade mayonnaise with a neutral-tasting oil was my starting point, and it went really well from there.

This salad, and the sauce went perfectly with the chicken ballotines that I stuffed with asparagus mousse. I am not a fan of white asparagus, so I left it out. The original salad also had silverskin onions in. I am not a huge fan of these, either, as I prefer the sharp tang of a home-made pickled onion to the sweetness of these tiny alliums.

I hope that you have a go at this sauce, I know a lot of people are put off by making a mayonnaise, but with this amount of oil, there shouldn’t be a problem, as long as you add the oil in very small amounts, and whisk it well in between so that it all of the oil is incorporated into the emulsion before you add the next lot.

Herbs on Saturday Blog Badge

As this dish makes use of one of my favourite herbs, I’m entering it into Herbs on Saturday, by Karen at Lavender and Lovage, which is being hosted this month by Anneli at Delicieux. You probably won’t come across chervil in the supermarkets, so look out for it at markets and farm shops. Or, even better, get hold of some seeds; it is one of the easiest of all of the herbs to grow from seed, the flavour is more intense, it has beautiful white flowers that are also tasty and will seed itself quite happily – if you don’t eat all the flowers first.

Asparagus Salad and Chervil Dressing

This recipe serves 4 people

For the Dressing:

1 egg yolk

1 tsp Dijon mustard

Lemon juice to taste

100 ml sunflower oil

100 g sour cream

15 g chervil, finely chopped

salt

For the Salad:

The proportions that I mention here are approximate. You can also adjust or add to your taste, things such as silverskin onions, hard-boiled egg, different mushrooms (Morels would be great if you can find them), spring onions, and probably many other things.

250 g small salad potatoes

100 g chestnut mushrooms

400 g asparagus (white, green or both)

2 tbsp capers

50 g cornichons

Chervil leaves to garnish

First make the dressing. Start with an egg yolk in a mixing bowl. Add the Dijon mustard, a pinch of salt and a good squeeze of lemon juice, and whisk together well. I did this by hand, because the heat from a food processor or stick blender is enough to scramble one egg yolk. You need a little lemon juice, because the you are essentially making an emulsion, and the acid helps to stabilise it, and stop it splitting. Don’t worry if you don’t think it is enough, you can add more later.

Then slowly add the oil, a little at a time. Make sure that it is well incorporated into the egg before you add more. Keep doing this until the oil is finished, or you think that you have a fairly thick mayonnaise. The exact amount that you’ll need will depend on the size and the age of the yolk.

Once you have a thick mayonnaise, whisk in the sour cream. Stir in the chervil. Season with salt, and taste to see if it is sharp enough for your tastes. If it isn’t, squeeze some more lemon juice into the mix. Set aside to allow the flavour to develop.

Boil the potatoes until they are just tender. Drain and set aside to cool.

Cut the mushrooms into quarters, grind over some black pepper and salt, and fry in a little oil or butter until the mushrooms have given up their moisture.

Break off the woody ends from the asparagus, and cut into 5 cm chunks. Blanche in boiling water for no more than 3 minutes, you want the asparagus to retain some bite. Refresh in iced water, or by running the pieces under a cold tap. Drain, and add to a salad bowl.

Cut the potatoes in half. I did mine on the diagonal for interestingly shaped salad. Add to the salad bowl, along with the mushrooms, capers and asparagus. If the cornichons are really tiny, add them whole. If they are slightly larger cut them in half lengthways, or into large chunks. Stir well.

Serve garnished with chervil leaves and with a generous helping of the dressing.

5 Comments

Filed under Feast

A Mousse Ate In a Windmill (In Old Amsterdam)

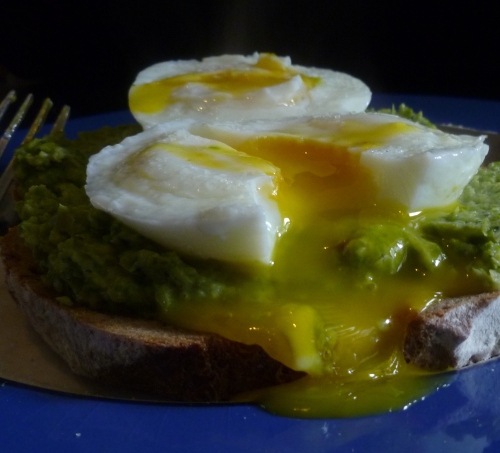
Asparagus Mousse and soft poached egg on sourdough toast

Twist on a Breakfast Classic

This year is the first year that I have been able to harvest my own asparagus. As you must, I planted four crowns two years ago, and it has been an agonising wait. I also thought that I’d been a little over zealous with the first harvest. I waited until I had a good few stalks, and before they got too long, then I plucked them all with the eagerness of a beaver who had just been presented with his own river that runs through a hardwood forest. I had the first batch simply steamed, and accompanied by a soft-boiled egg.

And then I waited. And waited. And the anxiety rose. And I started to worry that, having waited so long to crop them, I had been too impatient or greedy and that I would have to plant more crowns and wait another 2 years.

Asparagus Shoots Coming Anew in My Garden

Hope Springs Eternal

And then I went into the garden this morning, and was delighted to find this stalk poking its way through the soil and mulch. I will have more home-grown asparagus again this year, after all.

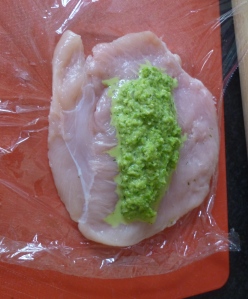
I had a few friends round to dinner at the weekend, which coincided with my panicky dearth of my own asparagus. But, I really wanted to  make asparagus the star of my main course, given that it is only with us for such a short time. So I dreamed up a main course that consisted of an asparagus salad, and a ballotine of chicken, stuffed with asparagus mousse. I have to admit, the food was lovely, seasonal and fresh, but my ballotine-making skills definitely require honing. They were not the most beautiful, and one or two lost some of the stuffing. But my guests enjoyed them, so I guess that is what matters.

Chicken Breast Stuffed with Asparagus Mousse

A Total Farce!

I also made far too much mouse for the number of chicken breasts (and, indeed, guests) I had. So, the next morning, I cooked up the rest in a water bath, and had it for breakfast on some sourdough toast and topped with a poached egg. It was a great breakfast. I can also imagine this mousse served as a starter, with crayfish, or maybe even lobster, if you want to push the boat out.

Simple and in Season Blog BadgeOne Ingredient, Asparagus How To Cook Good Food Blog Badge

I can’t get enough asparagus at this time of the year, and of course, there is never any waste, because I always use the woodier ends to make soup. I can eat them simply, or in recipes. But I’m always looking out for new recipes to make and to inspire. We have a few more weeks of the season left, so if you have some great asparagus recipes, link them up in the comment section. I’m also entering this into Ren Behan’s Simple and in Season, since there is nothing more seasonal than asparagus right now; and into One Ingredient, hosted this month by Laura at How To Cook Good Food since it is really appropriate right now.

Recipe: Asparagus Mousse

Ingredients

700 g asparagus

2 small shallots, finely chopped

1 clove garlic, sliced thinly

1 tbsp oil

100 ml cream

2 eggs

20 g chervil

Plenty of salt and pepper

Method

Remove any woody ends from the asparagus, by gently snapping them. As I have mentioned, no need to waste this bit, it may not be good to chew in a dish, but makes a great soup, or you can add it to vegetable stock, for an additional chlorophyl hit.

Cut the asparagus spears into 3-5 cm lengths, and blanch in boiling water for about 2-3 minutes, depending on the width of the stalks. Refresh immediately under a running tap, or in iced water. You don’t want them to continue cooking, as they do cook for longer later in the process.

Soften the shallots and the garlic in the oil, until they are translucent. Keep them moving, so they do not catch. I always find that shallots will burn much quicker than onions. Once they are done, blend up with the asparagus, and the roughly chopped chervil. If you want to be really cheffy, you’d blend them then pass them through a drum sieve or something similarly fine. I am less cheffy, and was perfectly happy to have a bit of texture in my mousse, so I blended it up as fine as I could get it in my food processor.

Asparagus mousse of the right consistency for stuffing

Stuffing Thick

Beat the eggs and cream together, and stir in the asparagus mixture. The mixture should be pretty thick for a stuffing, but you could thin it with a little more cream if you intend to make a mousse. Season it really well. It will need it.

Then you can either use it to stuff meat, which should be poached gently in water or stock; or you can put it into greased ramekins or dariole moulds, and cook it in a bain marie until it is just set. The time you need will depend on the size of your mould. It took me about 20 minutes, but I was using pretty large ramekins.

If you have greased your dish well enough, you should be able to turn it out. I did this, but decided that I wanted to serve it on toast, and you’ll find it also spreads nicely.

10 Comments

Filed under Feast

I Want (Fennel) Candy

Candied Fennel

Sweet and Fresh

Having been inspired to start blogging again, I have been making the most of recent inspiration for the next few Feast posts. The cooking and recipes, as always, are my own, but credit for the dishes are definitely due elsewhere. I take a magpie approach to food, often finding shiny little pieces here and there. Maybe one day I’ll enter the 21st century and get myself a smart phone, but for now, I forage for ideas, as well as edibles, and record them all in a series of notebooks, which I have to go digging through in order to remember the inspirations. Does anyone else do this? Please tell me that I am not the only one scribbling things down furtively in restaurants, shops and even the street. For me, it is like foraging and farming in note form, and as much of an obsession as they are for me in real life.

I’m sure we are all familiar with candied peel, and even crystalised angelica, if you are fond of cake decoration. These days , it seems that candied vegetables of all nature are appearing on both sweet and savoury dishes in restaurants and pop ups up and down the country. One of the first, and the one that instantly caught my magpie eye was candied fennel. I have also seen candied celery and beets (especially chioggia beets) among other things on menus, although I find the idea of them much less appealing.

Fennel is one of my favourite vegetables, and I love it in risotto, soup, and salad, braised, roasted and raw. This is a great way to use the tougher outer leaves and stalky bits if you are not keeping them for stock, too.

This version is really simple, despite my fears that it may require multiple exposures to sugar syrups of varying strengths, it isn’t the case. I kept mine plain, but they are also good served as sweets, and sprinkled with sugar.

Today’s recipe was inspired by Simon Rogan, who is a far better forager and cook than I could ever hope to be. I can’t remember where I first heard about it, but I suspect it was on a cookery programme, because  I have written down “candied fennel, Rogan. V. interesting, possibly for strawberry tarts? Experiment”. I finally got round to making this, as part of an even wider experiment, that does not involve strawberries or tarts of any kind, but you’ll have to wait until my next Feast post to find out more about what I wanted them for. This cliffhanger is not quite of Eastenders Duff Duff proportions, but hopefully, you’ll want to keep reading.

Recipe: Candied fennel

Ingredients

50 g sugar

50 ml water

1 tbsp lemon juice

Half a fennel bulb diced

Method

Make a simple sugar with the water, sugar and lemon juice. Heat gently until the sugar has dissolved.

Add the fennel. Bring to the boil then reduce to a simmer until the fennel is translucent, but retains some texture. It took me about 15 minutes, but it depends on the size of the dice,  and how much bite you want them to have.

Remove from the heat, and strain off the cooking syrup. Don’t discard this, it is perfectly good for other uses, and you know it’s a shame to waste such a tasty sauce.

Put some greaseproof paper, wax side up on a baking tray, and spread the fennel dice out into a single layer. Allow to cool on the tray, then store in an airtight container before use.

Enjoy them on their own, with sugar or as part of something delicious.

2 Comments

Filed under Feast