Tag Archives: Cheese

From Milk to Mozzarella

Home made Mozarella balls

Milk Solids

This month, I have got quite a few cheese posts on the way, inspired by the Cheese, Please! Challenge over at Fromage Homage. As soon as she announced that the challenge this month was to be fresh cheese, I knew I wanted to play. My mind was racing over the possibilities (of which, more to come), but I have a birthday party coming up and I want to let the kids make pizzas (with ingredients made from scratch, of course!). The obvious place to start on my fresh cheese odyssey is with mozzarella. I’m probably going to enter all of my recipes in one larger round-up post at the end of the month, but I am going to share the individual recipes that I make with all the fresh cheeses too.

So, we’ll start at the very beginning; a very good place to start; mozzarella, a fresh cheese with bounce!

I looked around online, and decided that mozzarella from scratch can’t be that hard, can it? I quickly found a few nice recipes, which I cobbled together to come up with my techniques I share here. Most of the recipes include using a microwave, which I don’t have. Instead I have been most inspired by the Barefoot Kitchen Witch and the techniques used in this post from the New England Cheese Supply Company.

Cheese Please blog badge

Making one’s own mozzarella counts as a fresh cheese recipe, doesn’t it? So I think it will be a great entry for Cheese, Please! And even if it is really only precursor for the actual recipes, it doesn’t matter, it was pretty simple, I had a lot of fun, and I have the softest hands I have had in ages, so that’s an added bonus!

Recipe: Home Made Mozzarella

Ingredients

2 l milk – you can use whole, semi skimmed, pastuerised or whatever you like really. The only milk that doesn’t work is UHT.
¾ tsp citric acid, dissolved in 60 ml blood temp water
2 drops vegetarian rennet in 30 ml cold water
Salt to taste

If you do not have a measuring jug that allows you to measure such small amounts of liquid, remember that 1 ml of water =1 g, so you might find it a lot easier to simply weigh the water.

In the Netherlands, rennet is called stremsel, which I personally think sounds a lot nicer. The great news, whatever you call it, is that vegetarian and original rennet are widely available. My regular online brewshop stocks all varieties, as well as citric acid, which is great for me!

In addition to the ingredients, it is a good idea to gather together the equipment you will need before you start.

Equipment

Large saucepan
Thermometer, preferably one that can measure low temps
Cheesecloth or muslin, sterilised by boiling
Sieve
Slotted spoon
At least four large bowls
Boiling water
Ice

Method

Curds after citric acid and gentle heat

Lemon/ Curd

Add the milk to your saucepan, with the dissolved citric acid. Heat gently until it gets to 32ºC. If, like me, your thermometer will not measure that low (I used my jam thermometer, which starts at 60ºC), heat very gently until your curds look like the photo above. When you stick a (clean) finger in it, it will feel cooler than you, but not that much.

Curds after adding rennet and heating

Rennet Ready

Add the rennet water, and heat a little bit more to 37-38 degrees. Again, if your thermometer doesn’t go that low, then use the photo above. You will not feel a temperature difference if you stick your finger in this liquid.

Curds after rennet and with rest

Curd Wayhey!

Take the curds from the heat, then allow to sit for 5 minutes or so. You will clearly see the separation of the curds and the whey, which will look more watery. Cut the curds crossways with a sharp knife.
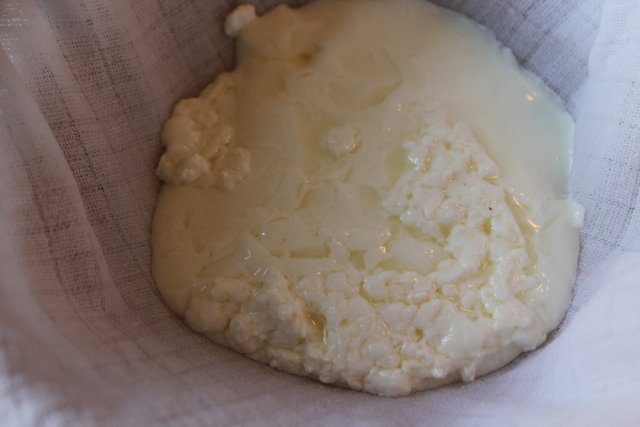
Fresh Curds

Fresh Curds

Line your sieve with a cheesecloth, or muslin square, and place over one of the bowls. With a slotted spoon, remove the curds from the pan, and put them in the sieve. They will look quite wet, like above. Cut and fold them over with the slotted spoon, to get rid of some more of the whey.

Curds, after most of the whey has run off

Whey Less!

The curds will go from watery to looking much drier, and will lose quite a lot of volume. Don’t throw away the whey, it has a lot of uses, and keeps for a long time in the fridge.
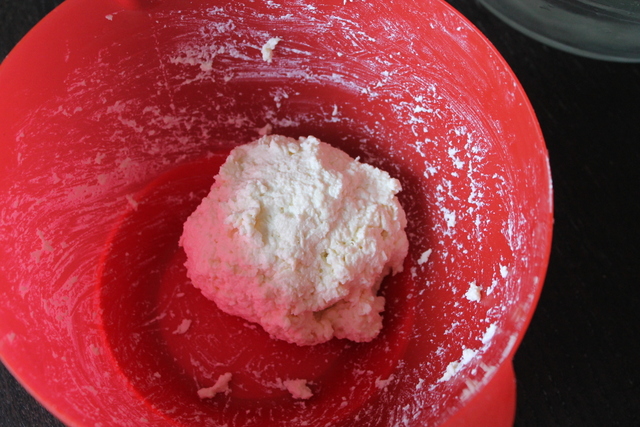
Curds, after initial kneading

Curd Need

Remove the curds to a separate bowl, and knead for a little bit, until it looks a lot less lumpy. Boil enough water to allow you to sit your sieve on a third bowl, so that the sievey bit is submerged. Get a different bowl of iced water ready as well.

Place the curds in the sieve in the hot water, and allow them to pour, stretch and fold off the slotted spoon. I’m sorry, I didn’t get a good picture of this, because it’s pretty hard to do this and photograph yourself, and the Big Guy was at work. Anyway, it will start to get more stretchy and smoother as you go on.

Curds getting smoother and sretchier

Come Together

As the water cools, the cheese will stop stretching. Once this happens, boil a kettle again. While it is boiling, remove the curds to the bowl and knead some more. At this stage, add some salt to taste, and knead to mix well.

Stretchy Cheese

Nearly There

Repeat submerging in the boiled water, stretching and then kneading until you have a stretchy, pliable cheese. You can either shape this as one large ball, or divide it into smaller balls if you prefer.

Shaped Mozzarella ball

Cheese Balls

I found it easier to use the hot water for one final shaping. I used the sieve and the slotted spoon to roll the cheese around in the hot water to make a ball shape.

Once you have shaped the cheese, submerge in iced water. Mozzarella should be used fresh, but can be stored in briney water the fridge for up to 4 days.

Advertisement

19 Comments

Filed under Feast

Cracked in the Box

Foodie Penpals July Box

A Box of Treats

It’s that time again when I can reveal my matches for Foodie Penpals. I have to say, I really am enjoying this, from deciding what to send out, and trying to make that as tailored as possible to my penpal; to receiving my own box and thinking about some great recipes to make with the contents.

This month, I was matched with Kay at KayTeasCakes and I got a parcel from Teresa from Rockspring Crafts.

Unfortunately, at the time of writing, I have just heard from Kay that her parcel has not arrived. I am away at the moment, and don’t have a tracking number, although I am trying to sort something out. I am really sorry that there has been this problem for Kay, but if I have to I will recreate her parcel and send it to her as soon as I get home. In the worst case scenario, Kay will get two parcels next month, but I hope that her parcel will arrive soon. Please go and cheer Kay up by marvelling at the beautiful cakes that she makes for her stall in Harringay, or even popping along and buying some if you are in the area.

I was very lucky to be matched with Teresa this month. She was also kind enough to notice that I am an expat, and ask me if there was anything I needed from home. I am really appreciating these offers from my penpals, it is nice that people think that there will be things I am missing.

Teresa sent me a lovely box of goodies, some of which have really got me thinking. She obviously had a good time finding me unique items.  An added bonus is that she is a fellow Westcountry person, so, it has been great to get products from almost home!

Firstly, was a lovely lamb, with garlic, fennel and chilli recipe. I love lamb, and we can get very good Texel lamb here, so I know this is going to be a winner. There was also some pineapple and papaya. I make my own muesli (mostly because too many shop-bought mueslis have unwelcome banana chips in), and this has already featured as a very tasty addition. I am thinking of doing some baked goods with the rest soon. Of course, I shall blog it when I do. Also included was some onion salt. I have never used flavoured salts before, but this is a great addition to salad dressings, and I am sure it will be in many more things to come.

Foodie Penpal Cayenne Pepper and Nutmeg

Spice and More Spice Make all Things Nice

These spices will certainly come in handy. Spices form an essential part of my store cupboard, and I use both cayenne and nutmeg regularly. I have already grated a bit of nutmeg into some rogue nettles that popped up in my broad bean patch. I wasn’t about to let them go to waste, so I cooked them like spinach, and added butter and nutmeg after I had squeezed out all of the moisture. I love this way of eating nettles, and definitely recommend that you give it a go. They are also fantastic as a spinach substitute in curries and greek dishes, like spanakopita.

Foodie Penpals One Shot Garlic and Marmite Cheese

New For Teresa and Me

Teresa says that she enjoys finding a few new items to include in her foodie parcel. This time it was One Shot Garlic and Marmite Cheese. Originally there were three of these moreish little cheeses, but I think everybody gets one item that doesn’t make it as far as the photo, and this may have been mine this time. Ahem!

Foodie Penpals Meringue and Chocolate

The Makings of a Great Dessert

Teresa took a chance and sent me a meringue. Unfortunately, this was the cracked in the box that I refer to in the title. However, I am really pleased, because the two of these ingredients are the basis of a great dessert that I first had in Sweden. It is called Meringue Suisse, and I will make and blog that soon. It requires broken meringue, and I am lazy, so the Foodie Parcel has saved me a job.

A Hand Made Mug Rug

A Hand Made Mug Rug

To help pack things together, Teresa included a mug-rug that she made herself. . I am always in awe of people that can make their own things. I did roughly six weeks of needlework at school, and the teacher made me unpick and re-sew everything that I ever made. I caught her out once, when I just returned to my seat, and didn’t unpick nor re-sew anything, returning for her approval a little later, and she passed it. I found that really discouraging though, and have never attempted to make things with textiles again.

I really love my mug rug. Teresa makes them from scraps leftover from quilting and other projects that you can see on her blog, and of course, I love leftovers! She says that the idea is to have something bigger than a coaster & smaller than a placemat to hold a cuppa with space a couple of biscuits or treats. And look, that is exactly right.

Mug Rug, Tea and Biscuits

My Mug Rug in Action

Thank you so much Teresa, for such lovely treats, and to Carol Anne for organising Foodie Penpals in Europe.

Here’s the rough outline of how it works:

  • All interested parties in the UK and Europe – bloggers and blog readers alike – sign up by the form available at the bottom of this post
  • Participants are matched on the 5th of the month
  • Penpals send thoughtful, food related parcels, on or before the 20th of the month. The parcel must include something hand written – a note explaining the box’s contents, a recipe card, whatever you like. The price limit for the boxes is £10 – this is a limit, the point is not the cost, but the thought (no, really!)
  • Penpals open their boxes and rejoice!
  • At the end of the month, everyone blogs about their box, or writes a guest blog post if they are usually a blog reader and not writer. Everyone reads one another’s posts and rejoices some more. Posts are made available on Lindsay’s blog so we can all find each other easily

4 Comments

Filed under Feast

The Queen of Tarts

Asparagus & Lancashire Cheese Tart

The Knave of Hearts, He Stole the Tart

When I got some Lancashire Cheese from my foodie penpal, I knew I had the start of a great dish. When the Big Guy brought home what was likely the last bunch of local asparagus that we will see this season, I knew exactly what that dish would be.

Lancashire cheese and asparagus are a marriage made in heaven. The sharp flavour of the cheese would be perfect to go with the chlorophyll hit that you get from seasonal asparagus. Add to this fresh herbs, and put it in a tart, and you really are onto a winner.

Maybe it’s my imagination, but as well as the negative environmental impact, I think that asparagus that has been flown across the world has lost a lot of it’s green flavour. For these reasons, I won’t buy it. Maybe it is also the anticipation of this short-lived season that makes it taste better,  who knows?

I made my own pastry for this. Any offcuts will freeze well, wrapped in greaseproof paper, or you can be economical with the oven, and make a few jam tarts, or even unseasonal mince pies with the offcuts. This is something that I learned from my mother. We would rarely have a pastry dish without her baking some little sweet treat to use it up.

I used chervil and parsley in this recipe, because I grow them both, and I love chervil. If you have difficulty finding chervil, then you can substitute them both for a good bunch of chopped dill.

This quiche was actually better cold, when the cheese really sang out against the asparagus. Making this dish great for a picnic. You know, for when the summer actually arrives…

Asparagus & Lancahshire Cheese Tart

Forget the Knave, Watch out for Teddy Bears…

Recipe: Asparagus and Lancashire Cheese Tart

Ingredients

For the Pastry: 

100 g plain flour

50 g cold butter

Pinch of salt (or just use salted butter)

Cold water, less than 30 ml

For the filling: 

1 bunch of asparagus

100 g shelled weight broad beans

8 eggs, beaten

100 ml cream (or milk)

Small bunch chervil, finely chopped

Small bunch parsley, finely chopped

Salt and pepper (to season egg mix)

100 g Lancashire cheese, grated

Method

Rub butter into flour, until it resembles breadcrumbs. Slowly add the water until it forms a dough. You may not need it all.  It must be cold, not tepid, so it’s best not to measure out the water and let it sit while you rub in the butter. When it has formed a dough, you don’t want to work this too hard, so just shape it into a ball.

Wrap the pastry in clingfilm, foil or a plastic bag, and put in the fridge to rest, for about an hour.

Arrange the asparagus. First, snap off the woody bit at the end of the stem. The point at which it breaks naturally will be where the tender, edible part of the stem starts. This will vary according to how long the asparagus has been cut. Don’t discard these  tough ends, they make a great soup.

Arranging the asparagus spears

Power Arrangement

Cut the asparagus stems to size so that you can arrange them in a wheel around your flan dish. Cook the asparagus spears in boiling salted water for about 3-6 minutes, depending in the width of the spears. Cook the offcuts of the asparagus with the broad beans, in boiling water for a maximum of 2 minutes, depending on the size of the pieces. Drain all of the cooked vegetables and run under cold water as soon as they are done. you want them slightly underdone for this dish, as they will cook a bit more in the tart later.

Double-pod the beans, which may seem like a pain, but will be worth it later.

Preheat the oven to 200°C.

Grease a flan dish. I have a silicone one, but you may prefer a metal one with a loose bottom, either are good.

Roll out the pastry evenly, to about 1mm thick. Carefully slip it over the rolling pin, and line the flan dish with it. Cut a bit of the excess pastry from over the edge of the dish, and form a ball with it. Use this to gently press the pastry into the corners, and any fluted edges that you may have on the flan dish. This is thin pastry, and  will be using a liquid filling, so you want to avoid  putting holes in it, or the filling will leak, and burn. Using the dough ball, and not your fingers (especially not the nails) will help prevent tears and holes.

You can either trim the pastry to the edge of your flan dish, or leave a bit of an overhang. Pastry will shrink when it cooks, so I prefer to leave an overhang, which I trim off after the blind bake.

I sometimes coat the warm pastry trimmings in a light dusting of icing sugar and serve as a sweet snack. I can’t bear to throw away any of the edible things!

If you choose to trim the pastry, then you will need to gently pinch it up between your thumb and forefinger, to raise it above the sides of the flan dish, thus compensating for shrinkage (difficult to accomplish if your pastry is thin enough).

Now you need to blind bake the pastry case. Gently prick all over the base with a fork, as evenly spaced as you  can, without going through the pastry. Cut some greaseproof paper so that it overlaps the pie dish by about 3 cm each side. Scrunch up the greaseproof, as if you were scrunching up a piece of paper that you were about to put in a wastepaper basket. This will help the paper to line the pastry case and get into the corners and fluting better. Put an even coating of blind baking materials in the pastry case, on top of the spread out grease proof paper. Both the pricking and the blind bake will help prevent the pastry from rising, during the initial baking process.

You can get special ceramic beads for your blind bake, but these are expensive. It is cheaper to use dried beans from your store cupboard,or at a push a thick layer of rice. Beans are better, because you can still cook with them after they have been used as blind bake, and  they are heavier than rice. Once the rice has been used as blind bake, it can’t be cooked, so re-use it as blind bake.

Put the tart shell, with the blind bake into the oven and allow to cook for at least 10 minutes, or until the pastry case is crisp, and does not have any “damp” patches. Remove the blind bake, and put the tart case back into the oven for about 5 minutes, or until it starts to brown.

If you need to, trim your pastry case at this point. Or leave it, if it doesn’t look too scruffy.

Pastry Case Sealed with Egg Wash

Glazed and Confused

Since you are using a liquid centre, it is a good idea to seal the pastry case, to help prevent leaks. To do this, brush the case with a little of the beaten egg that you are about to use for your filling. Put it back in the oven for a couple of minutes until the egg wash has given the tart case a shiny, browned finish.

Add the cream, chopped herbs and the cheese to the beaten egg, and mix well. Season with a little salt (because the cheese is also salty) and a good grind of pepper.

Sprinkle the beans and asparagus offcuts onto the base of the tart, then arrange your larger spears over the top in your desired design.

Pour over the filling, and give the tart a shake, to make sure that the filling is evenly distributed in the case.

Place back in the centre of the oven, cook for 10 minutes, then reduce the temperature to 160°C. Cook for a further 30 minutes, or until the filling is just cooked, but retains a little wobble.

2 Comments

Filed under Farmed

A Box of Delight

Foodie Pen Pal Parcel

Full of Western Promise

Exactly two Fridays ago, I had to chase the postie down the road for this. My doorbell is broken. He didn’t knock the door, instead shoving one of those really irritating “we-called-when-you-were-out-now-you’ll-have-to-schlep-to-a-post-office-across-town” cards through the door. Luckily for me, I had been waiting in for this, so I was able to spring into action when I heard the letterbox.

This my first Foodie Penpal Parcel. I had been seeing people all over Twitter talk about this, but thought that it was probably only for people in the same country. I was glad to discover that Carol Anne at Rock Salt had taken the idea from Lean Green Bean and was coordinating this blog swap for the whole of Europe. I am really glad it is so inclusive. There are also groups across a lot of the World, so you can probably find one and join in. You don’t even need to have your own blog; readers are welcome too, and many of the penpals will be happy to host a guest post on their site for readers to write about what they got.

I was matched with LoopyLou, and got The Lone Gourmet as the person to send me a parcel. Such a coincidence that both my matches were called Louise, and one also used to live in the Netherlands. I’m not sure if these matches are planned or random, but I enjoyed the synchronicity of it all, anyway.

I got a little carried away with the weight on my parcel, then realised it would have cost a King’s ransom to post from over here (this is a great tip for next time; jars are really heavy). I was heading back to the UK for Mum’s birthday, so I decided to post it over there. Through a series of coincidences and holidays, my parcel ended up being hand-delivered by my sister, and finally ended up in Lou’s greenhouse at the beginning of this week, in good time for the reveal day, but probably not in time for her to have used any of the ingredients. If you want to see what I got for Lou, head over to her blog.

Foodie Pen Pal Parcel Contents

So Many Possibilities!

Louise at the Lone Gourmet was very kind and sent me things that she knows I can’t get over here. It was a real taste of home. A lot of thought went into this, and I’m really grateful to her for taking the time to source some typical English fayre.

Firstly, I got some Earl Grey tea. Of course, you can buy what the Dutch call Earl Grey over here, but every British expat knows that you can’t get a good builder’s-strength cuppa in continental Europe, and so tea is always something on the list of things that you ask other people to bring over when they come. I also love the packaging for this product – it comes in a paper cup which you can use to hold your precious brew. I love this idea. Multiple-use packaging really appeals to the Womble in me.

I also got a sachet of organic tikka masala mix, the most classic of the curry dishes for the British palate. It has a chicken recipe on the back, which I intend to try. But, I do think that this also has potential as a spice rub for white fish. I am going to halve the mixture, and do a little experimentation with this.

Saddleworth Cheese Co. Lancashire Cheese

Coronation Cheese

Louise got me some lovely Lancashire Cheese, which is quite local to her. The eagle-eyed amongst you may notice that it has a picture of a moustachioed Martin Platt from Coronation Street on the front. Apparently, like Blur’s Alex James, this is what he did when he left the Street, although I gather he is much less of a bore about it all. It’s a good cheese – a crumbly texture and slightly sharp.

Snacks from my Penpal

Testing, 1,2..

I had a snack of a little to test it when I opened the box (well, it would have been rude not to really), and then I used it in a tart with probably the last asparagus of the season. I will blog the recipe for this in the next couple of days.

JD Gross Dark Chocolate with Orange Pieces

Testing Will Power

Finally, I got some extraordinarily good chocolate. I have managed to stick to only having eaten a single square so far, since I needed to open it to take a picture (honest, Gov), but I have had to hide it from the Big Guy. I think that this should be saved for a special chocolate mousse or something else that will do it justice.

Thank you so much Louise, for this wonderful box, and to Carol Anne for organising this lovely treat.

It has been so nice to browse through the two penpal blogs, find other new blogs, and get to know my penpals, not to mention the fun I’ve had thinking about the box I was going to send, and the ingredients that I received.

Here’s the rough outline of how it works:

  • All interested parties in the UK and Europe – bloggers and blog readers alike – sign up by the form available at the bottom of this post
  • Participants are matched on the 5th of the month
  • Penpals send thoughtful, food related parcels, on or before the 20th of the month. The parcel must include something hand written – a note explaining the box’s contents, a recipe card, whatever you like. The price limit for the boxes is £10 – this is a limit, the point is not the cost, but the thought (no, really!)
  • Penpals open their boxes and rejoice!
  • At the end of the month, everyone blogs about their box, or writes a guest blog post if they are usually a blog reader and not writer. Everyone reads one another’s posts and rejoices some more. Posts are made available on Lindsay’s blog so we can all find each other easily

7 Comments

Filed under Feast