Tag Archives: Leftovers

Veganuary Day 8: Herbs and Spice

A simple tomato pasta sauce on farfalle pasta, liberally topped with nutritional yeast and dill
Simply Delicious

Monday started a bit late for us both, and we hadn’t prepped any breakfast the night before. The tofu scramble was the quickest thing we made last week, so that’s what we made again, with the very last of the tarragon I’d dried from the garden. I’m only grumpy that now I’ll have to buy it. Today, we substituted kale for the spinach. I missed the silken texture the spinach lends it, which is something to remember the next time I put it on the meal plan.

I was craving carbs at lunch time, so we turned to a quick pasta. The sauce was made with softened onion, garlic, tomato paste and a tin of tomatoes. Once it was stirred through the pasta, I topped it with nutritional yeast and a generous helping of finely chopped dill. I used the stalks too. They have plenty of flavour and added some texture to the meal. I like to cook my pasta briefly, so it’s slightly past crunchy. I find it helps prevent the mid afternoon slump.

Dinner was another portion of the aubergine dhal. It was even better than the day it was cooked. I celebrate dishes like these, where you make a huge batch, and they just keep getting better. I do find this dhal will last 4 days in the fridge, but after that will get ‘fizzy’ and spoil pretty quickly. But it freezes well, so the rest will provide a ready meal on a few cold nights sometime in the future.

Advertisement

Leave a comment

Filed under Feast

Veganuary Day 5: Musings on Mayonnaise

Pumpkin Chili Burrito - today''s vegan lunch that we spilt
Going Halfies

There was a lot of dishes that we’d made earlier in the fridge. Today, we mostly used these up. We did have a freshly cooked meal this evening, but that was to use up some aubergine we’d got knocking around in there.

Breakfast was the remainder of yesterday’s tofu scramble. Other tofu scrambles are available, but I enjoy this recipe very much. It has a lot to do with the tarragon. It’s a pretty quick recipe too, so great for those busy mornings when you haven’t done your prep.

Lunch was a mixed bag. We had one portion of the Harrisa Soup and one burrito left. We heated them both up, and had half each. Not quite sure what this fusion should be called. It was filling and warming, which is what we needed today.

I was thinking about even more toppings for the soup as I ate. In her book Plenty, Diana Henry has a great vegetarian recipe for a Niçoise Vegetable Stew with a Rouille. It has three or four ingredients, yet it is so flavourful. However, the rouille is made the traditional way, with eggs. I found what I hope is some pretty good vegan mayonnaise, and I intend to experiment with aquafaba. I hope one of these ways will make a good rouille, that will behave similarly to the the egg version in the warmth of the soup.

I had long forgotten the recipe for tonight’s dinner. We used to eat this a lot back when we lived in London. I don’t know why we stopped, but I’m glad that I rediscovered this smoky aubergine dhal. This recipe makes plenty, these make-it-once-eat-it-lots kind of recipes are great to fall back on for weeknight meals. I didn’t have black lentils to hand, but it’s just as good with yellow spilt peas. We will have another three dinners from this batch.

1 Comment

Filed under Feast

Veganuary, Day 3: The Perils of Shopping When Hungry

The Big Guy currently does most of the shopping, for which I’m very grateful. I can always tell when he went to the shop hungry. Our shopping is suddenly spiked with treats and snacks, not all of which are the healthiest options. Of course, he’s definitely not alone in doing this when he’s hungry.

We had a hearty breakfast with the last portion of the kale and mushroom gratin before the Big Guy had to go out to do some chores. On the way home, he was passing some shops that might stock some of the grains, specific dried chilis and some other things I thought would be helpful in our new diet. It was almost lunch time when he got to look for the supplies, and he came home with two vegan saucijnbroodjes, which are Dutch sausage rolls. We wouldn’t buy them when it isn’t Veganuary, so I knew he’d felt tempted by his hunger.

Credit where it’s due; they did look good. Crispy pastry covered in poppy seeds. I actually thought they’d be an interesting foil to the dull celariac soup from yesterday, so I could get away with not having to jazz it up. You know we weren’t going to throw it out.

I was wrong. The pastry was filled with a paste filling that was vaguely tomato-flavoured, which had some scant sticks of tempeh in it. it didn’t distract from the soup. Instead, we added a lot of freshly chopped parsley. I guess a good lesson to remember is that if we don’t like the standard version of a thing, we’re not going to like the vegan version of that thing. And eat before you go shopping!

Dinner was a second helping of the enchiladas from last night. The opposite of lunch: hearty, flavourful and satisfying. It’s always good to end the day on a high.

Leave a comment

Filed under Feast

Land of Milk and Ginger

Lacto-fermented Ginger Ale

Like Lemonade, but With Ginger

Well, I was intending to make three flavours of lacto-fermented lemonade and wittily call this post Lemonade, Three Wheys, but I’m afraid I’ve rather run out of steam and time. So, today you get the latest recipe in my cheesemaking adventures, but it is only one flavour of lemonade – ginger (perhaps confusingly).

If you Google milk and ginger the most common result is a ginger milk pudding, which is a rather soothing-sounding Chinese dish, apparently. Obviously, I did this, and had a look at some of the pictures. It reminded me a bit of junket, which I had to make for some historical food thing for brownies once. I am not a fan of junket. But then again, my junket did not have ginger in it. I am quite fond of ginger, so I may end up giving this a go.

I really wanted to have a go at lacto fermenting ginger beer, but that requires a starter or ginger beer plant, which I didn’t have time for. So, that is the reason that I am going to call this Gingerade. And let me tell you it is no worse for that!

This method is one of two ways to naturally carbonate drinks, without the need for a Soda Stream. The other way is to add yeast. It is also a really healthy drink – the whey has loads of probiotics, which you have to pay a good deal for if you buy those fancy yoghurts. Any bloating that you may, or may not relieve is entirely your own business.

I never really got fed the standard carbonated drinks when I was a child, so I never really developed the taste for them. I’d rather have water, or fruit juice than a fizzy drink (only if wine isn’t an option, obviously!), but I could definitely develop a taste for this. I tried it after three days, so it was lightly sparkling, which I liked a lot. You can get a fiercer bubble if you leave it in the warm for longer. I was happy, so put it in the fridge. It will continue to ferment in the fridge, but at a much lower rate.

I will definitely be trying to lacto-ferment ginger beer, and other lemonades, So I may be able to use my witty post title after all, and of course, I will be blogging the efforts. I’m also going to have a go at alcoholic ginger beers too, and why not – makes a change from Belgian beer for me, for sure!

I tried it today, in the my sunny spring garden, which is the perfect setting for this drink, in my opinion. Well, until I can have it with ice in the summer, of course!

Spice Trail Blog Badge

As well as this appearing as part of the Cheese, Please! Fresh Cheese Challenge (which really has been the gift that keeps on giving for me this month!) roundup, which I will be posting tomorrow, I’m going to have a second bite of the cherry at this month’s Spice Trail hosted by Vanesther of Bangers and Mash. Mostly because I really do love ginger, but also because I covet those beautiful little spice tins that are being offered as a prize this month. I can only hope, but this month there is a lot of stiff competition, with a lot of entries, many of which I have bookmarked for later.

Recipe: Lacto-Fermented Gingerade

Ingredients
30 g ginger
Juice of 2 lemons
150 g runny honey
1 tsp rock salt
4 tbsp fresh whey
2 l water

Method

Sterilise enough bottles to hold 2 l of gingerade. I used the sterilisers from my home-brew, which I find the easiest method for the types of bottles that I used. If you use wider necked bottles, then you can run them through  a hot dishwasher cycle, or wash them and put them in a low oven, as you might for making jam or lacto-fermented vegetables. At the same time, sterilise a funnel that fits into the top of the bottles that you are using.

Finely grate the ginger. I used a microplane, but if you don’t have one, use the finest side of a box grater. Mix the grated ginger with the rest of the ingredients in a large bowl, making sure that the honey and salt are really dissolved in the lemon juice before you add the water and the whey.

Before bottling, stir the gingerade well, so that you can be as sure as you can that there are bits of ginger and lemon pulp in each bottle. Fill each bottle with the gingerade. You will need to leave about 5 cm at the top.

Leave to start to ferment in your living room or kitchen. You may need to get it started by tipping the bottes over once to stir things up once or twice a day. Be careful, because once it starts to ferment, the pressure will build. After three days, test to see if the carbonation is to your liking. If it is, then store in the fridge. Remember that it will continue to ferment in the fridge, but at a much lower rate.

Serve on a sunny day. Maybe at a picnic (serving suggestion).

This recipe makes slightly more than 2 l of liquid. I used up the rest in a rather fantastic raspberry coulis, but you might just as well drink it, or add it to stewed apple or even rhubarb. Very good indeed.


18 Comments

Filed under Fermented

Under the Milky Whey

Fresh Whey and Vegetables

Chop A-Whey!

A quick look on Pinterest reveals that you can lacto-ferment pretty much anything – from garlic to hummus. I saw fruits, vegetables, herbs, spices, beers, mayonnaise, BBQ sauces and even mustard on there. Apparently it is amazing what won’t be improved by bunging in some whey.

As you know, I happen to have quite a lot of whey taking up all the space stored very carefully in my fridge.It is the yellowish liquid in the photo above, and it is the by-product of making your own cheese, or straining yoghurt.

Apart from the miracle of being the new superfood, due to all the probiotics; you can feed whey to animals, use it as a fertiliser, make various toiletries for skin benefits, and body builders dry it then consume it by the bucket load.

You can also soak beans, or grains in it before cooking, use it instead of the liquid in pancakes, cakes, and bread (or pizza dough). soups, and stock. You can even add it to shakes and use it as a cheese starter in some kind of lactose Inception.

Whatever you do with it, you should not pour it down the sink. Apparently, it can de-oxygenate water systems. So, for this reason, and the fact that I hate waste, I’m going to use mine. Don’t worry, it also freezes really well, so if you can’t get through it all, you can keep it for later.

You may have noticed that I enjoy a nice pickle, go crazy for chutney, and take pleasure in preserves. It is only natural, then,  that I should have a go at lacto-fermenting as a novel way of preserving food, and as a way to use up leftovers. I’ve had a good dig round the internet, including over at the lovely host of Cheese, Please!, who lacto-fermented cucumber and carrots to come up with the following recipes.

For the first, I wanted to be able to make a direct comparison with a pickle that I already know. I make pickled fennel a lot, based on the River Cottage Preserves book, so I used the same aromats and dill here.

The second lot are inspired by a friend of mine who makes amazing pickled cucumber from a mysterious Asian salt. I have no idea what this stuff is, but it is hot, sour and sweet at the same time. I have tried to recreate this with the whey – we’ll see where we get to.

Apparently, lacto-fermenting is pretty long-lasting, but depends on how strong the cell wall of the thing you are preserving is. You can expect the fennel to last between 4-6 months in cold storage, and the cucumber to last up to 3. The fermentation will continue, even in cold storage, so it is something to be aware of, and date the jars well before you store them in a cool, dry place.


Lacto fermented fennel and cucumber

Perfectly Preserved

Recipe: Lacto-Fermented Vegetables

Ingredients

For the Fennel:
1 tsp mixed peppercorns
1 tsp coriander seed
1 tsp fennel seed
1 bulb of fennel, cored and thinly sliced
Fronds of dill
100 ml whey
300 ml boiled water, allowed to cool
1 tbsp rock salt

For the Cucumber:
1 tsp mixed peppercorns per jar
1 tsp juniper berries per jar
1 large cucumber, in 3 cm slices on the diagonal
1 red chillies, sliced on the diagonal but seeds left in
Fronds of dill
200 ml whey
600 ml boiled water, allowed to cool
1 tbsp table salt
1 tbsp sugar

3 jam jars

Method

Sterilise your jars on a hot cycle in the dishwasher, or by washing in hot soapy water, drying and placing in a low oven for an hour.

Prepare the vegetables, and boil the water for your fermenting liquid.

To the sterile , still warm jars, add the relevant spices, then layer up the vegetables, making sure to get a layer of dill fronds in between them as you go. Pack them as tightly as you can.

Mix together the whey, water and salt, as well as the sugar for the lacto-fermented cucumber. Fill the now packed jars with the fermenting liquid, up to 3 mm from the top of the jar. Screw on the lids tightly and store in a cool dark place for between 3 days and the maximum time for the vegetables.

I intend to leave these for about a month, before I try them. When I do, I will be sure to let you know what I thought.

11 Comments

Filed under Fermented

Fresh Cheese – In the Gnudi

Ricotta Gnudi and Tomato Chilli Sauce

Naked Food

Following on from my cheese making efforts, I thought that I could have a go at making ricotta. Literally translated as “twice cooked”, ricotta is right up my alley, as a way to reduce waste, and maximise leftovers. So I set about gently heating the whey left from my mozzarella to 92ºC,  and left it to cool to about 60ºC, before straining it through a thick muslin. I was so dismayed to find that it yielded next to no additional curds – 35 g to be precise.

35 g Ricotta

Bitter curds

Convinced it was something I had done badly, I turned to Google for reassurance. Whilst the technique was sound, it appears that the whey is acid, which is not conducive to making ricotta, which needs a “sweet whey”, or one that is produced from bacterial coagulation, instead of one brought on by acid. I probably should have done a bit more homework on that before I started, it would have saved time and gas!

Not one to be put off by such things, I bottled up the whey for later use. And made more mozzarella with unpasteurised milk. Having nothing to lose, and because I wanted the whey from this batch, I decided to try and extract more curds in the only way I knew.This time, I also strained it through cheesecloth, although I found that I couldn’t squeeze this out, because the curds simply fell through it.

The difference was amazing, I got 200 g of fresh, soft curds! Whilst it is perfectly possible to make cheese with any kind of milk, I think using unpasteurised milk pays off, if you can get it. I may also have a go with milk powder just to see if this is a cheaper alternative. Plus I have a lot of rennet that I need to use up now.

I have always fancied having a go at ricotta gnudi – soft Italian pillows, not dissimilar to light gnocchi. Gnudi (pronounced nyoo-dee) are, as the name suggests, “naked” ravioli. That is; they are the ravioli filling, naked of its customary pasta. They are best served with the simplest of sauces. The Big Guy and I were both coming down with colds, and so I wanted some chilli spikes in this sauce. I wavered over chilli, garlic and olive oil; but in the end settled on a tomato sauce with chilli, in order to take it from a starter to more of a main course with the addition of a nice green salad.

As well as a delivering a lovely pasta dish, my inner four year old enjoys sniggering when I announce what is on the menu. Reports that such pronouncements were accompanied with an impromptu dance of joy are totally unfounded. Cheese Please blog badge As you have probably guessed by now, This is yet another entry for the Cheese, Please! fresh cheese challenge. I have enjoyed myself this month, and you know I hate waste, so I’m determined to use up every last bit of the milk.

Recipe: Ricotta Gnudi With Tomato and Chilli Sauce

Ingredients

For the Ricotta:
Whey from making any type of cheese, the best being sweet whey from bacterial coagulation, otherwise unpasteurised acid whey will be good.

For the Pasta Sauce:
1 tbsp oil
½ red onion, finely chopped
1 red chilli, finely chopped, removing the seeds are optional
1 clove garlic, crushed to a paste
250 g tomatoes, chopped
Salt and pepper

For The Gnudi:
200 g ricotta
Zest of one lemon
Good grind of black pepper
1 tsp thyme leaves
40 g parmesan, plus more for garnish
1 egg, lightly beaten
Approx 70 g plain flour
Large knob of butter, 1 tsp and the thyme stalks for cooking

Method

Heating whey to 92ºC to make ricotta

It’s Getting Hot in Here

Make ricotta by heating the whey gently to a temperature of 92ºC. You will need to watch it, especially as the temperature exceeds 85ºC, because you do not want this to boil over, unless you especially like cleaning. Allow the whey to cool again, to a minimum of 60ºC, but preferably lower.

Strain through a sieve lined with a cheesecloth into a container large enough to hold the whey. Keep this for more things later – such as some pizza dough, other bread, stock, soups, and something else I have up my sleeve for later this week.

What you have left is ricotta. You will need to use a spoon or a spatula to remove it from the cloth. If you have left it to dry long enough, you may have to crumble it off. This is great in sweet and savoury dishes – I’ve even found recipes for ice cream. What you do with it is up to you.

For the sauce, sweat the onion in the oil until translucent. Add  the chilli and the garlic to the pan, and allow to cook for a minute. Next, add the tomatoes, and cook them down on a low heat, stirring occasionally to prevent them sticking. When the sauce is thick and the gnudi are ready,  season to taste.

While the sauce is cooking, make the gnudi. Mix together the ricotta, zest, thyme, pepper, parmesan cheese and the egg. Gradually add the flour, and mix in until the mixture forms a ball. It may take a bit more or a bit less than 70 g flour.

Shape the gnudi with wet hands. A lot of people shape them into balls, but I liked to form more elliptical gnudi. Put them on baking paper, or another non-stick surface.

Get a deep pan full of boiling water with the salt, butter and thyme stalks in. It is important to have the pan at a rolling boil. Put the gnudi into the water and cook for about 5 minutes. When they are cooked, they will float. Drain with a slotted spoon, and add to the sauce. You may also need a tablespoon or two of the water that you cooked the gnudi in to loosen up the sauce.

Coat the gnudi with the sauce, then serve immediately with a sprinkling of extra parmesan cheese.

11 Comments

Filed under Feast

Simple, Cleansing Pork Pho

Pork Pho

A Fantasticaly Fresh TV Dinner

I have eaten rather well lately: at new lunch spots with my ladies; a rich lamb tagine, cooked for me by my friend from the Morning Claret; and a veritable feast of dim sum that I cooked up last Sunday, for the lunar new year. I had great fun doing it, but I did learn that it is probably OK to make some things in advance and heat them through on the day. There are so many intricate little dishes to make for a proper dim sum feast. I made char sui pork, with which I then made sticky rice and char sui bao (as well as chicken and mushroom hom bao). I made crispy seaweed (with curly kale), pak choi in garlic, and braised aubergine. I also made these excellent vegetarian shumai that Petra from Food Eat Love posted the other day. They were delicious, and gave me the courage to try other dumplings too. I’ve never quite understood how to tuck up the dumplings, but Petra’s clear instructions just clicked with me, and so I gave them a go. Unfortunately, I need a bit more practice before they look lovely, so there are no photos.

Encouraged by the success of the shumai, I decided to go all out, and have a go at xiao long bao, or the special pork dumplings, that are filled with mince and pork. Mine were loosely based on the Serious Eats Soup Dumplings. Nothing like a good bit of over-reaching to really show your skill. Or the limitations of it, in any case. More practice needed there, too, I think.

Don’t get me wrong, they were delicious, but not that soupy, as I managed to put slightly too much meat in the filling, and so the thin and delicate pastry broke. I’m not going to be put off, however. I was very pleased with them, and I will get better, I’m sure.

I made the Serious Eats stock for the bao, but I deviated a bit from the filling. For one thing, I don’t eat prawns, because I can’t really find any that could be said to be produced sustainably. Instead, I grated in ginger and garlic, and I put coriander through the pork mince.

After all that eating, today I was in search of something cleaner, and simpler. The Big Guy was out for dinner tonight with work, so as well as clean flavours, I wanted something simple, but that was comforting enough to settle in on the sofa with to catch up on some TV.

Having feasted so well at the weekend, I was not without leftovers, particularly the very good stock, and some of the xiao long bao filling. Despite needing the practice, I wasn’t in the mood for more dumplings, so I ventured further south for tonight’s dinner. Just like I deviated a bit from the Serious Eats filling, I have deviated a bit from a traditional Vietnamese Pho, but the resulting soup was just as fresh and comforting as I’d imagined it would be.

Cooking-with-Herbs-300x252

Since this dish contains herbs (and if I’d have had Vietnamese mint, I’d have added that too), and is Chinese/Vietnamese inspired, I have also decided that it is perfect for this month’s Cooking with Herbs, run by Karen at Lavender and Lovage. She is also hoping for recipes inspired by romance for this month, in light of it being Valentine’s day soon. I’m not so sure about all the romance, but I do know this soup is a great way to show yourself some love if you have over-indulged, or if you have a night to yourself.

Recipe: Pork Pho

The amounts given here are enough for one person.

Ingredients

For the Meatballs:

100 g minced pork

½ tsp soy sauce

1½ tsp rice wine

A pinch of sugar

A small clove of garlic, finely grated

A 1 cm piece of ginger, finely grated

Small bunch of coriander, finely chopped

For the Pho

400 ml good stock – I used chicken and pork from Serious Eats. Just chicken stock is also fine, but please don’t use stock cubes

½ tbsp fish sauce

½ carrot, cut into thin batons

1 garlic clove, thinly sliced

2 cm ginger, cut into thin batons

40 g rice noodles

2 spring onions, sliced on the diagonal

20 g mange tout, sliced on the diagonal

1 chilli, seeds in or out, whichever you prefer, sliced thinly on the diagonal

3-4 sprigs of coriander, leaves whole and the stalks finely chopped

Pinch of salt

Juice of about a quarter of a lime

Method

First, mix all of the meatball ingredients together, then roll them into small balls. You want them to be about marble size. Refrigerate for at least half an hour to help them to keep their shape.

Cook the stock with the fish sauce, garlic, ginger and carrots. Add the pork balls, cover and simmer gently for 10 minutes, until the meatballs are cooked through.

Meanwhile, cook the rice noodles. When cooked, drain, and add them and the vegetables to a deep bowl. Sprinkle  the herbs on the top.

Season the soup with salt, as required. Pour the soup over the noodles and the vegetables in the bowl, and squeeze in lime juice to taste.

Serve immediately, in front of the TV, and enjoy in peace.

9 Comments

Filed under Feast

Pytt i Panna – Swedish Ways With Leftovers

Pytt I Panna

Leftover? Not Any More

Happy New Year to you all, I wish that you’ll get what you need this year.

I rang in the New Year with friends old and new, and some fantastic food made for me by my friend who writes the Morning Claret. As you might expect, this was accompanied by some excellent wines.

I usually start the year with a few resolutions. As the road to hell is paved with good intentions, and I didn’t have the best year in terms of regular blogging last year, I decided that this year, I would settle for simply committing to at least one blog post a week for the next 52 weeks. I already have a few that I want to share with you, and I have some great ideas for recipes that I am going to be testing for you in the near future.

If I get this done this year (with some much improved photography this year, thanks to my new camera the Big Guy bought me), then I will consider this a resolution well met. However, if you made any resolutions, I’d love to hear about some of yours.

Regular readers will know how much I love leftovers. To me they are ingredients to make delicious new dishes from. Pretty much everything can go to making new edible things. I use scraps in my stock, make trifle when life hands me leftover panetone, and even make ice cream from leftover mincemeat (which I think is an idea I got from Nigel Slater, so I won’t be blogging about that). If all other inspiration fails, there is always soup, which is often the best when you tinker about to use up the contents of your fridge.

There is always one dish that you can rely on to use up all the bits and bobs left over from a large meal. For Brits, it is Bubble and Squeak. The Chinese might fall back on a fried rice dish. If you are Swedish, you make Pytt i Panna – literally translated as “pieces in the pan”.

Since many of their meals rely on meat, vegetables and potatoes, this staple is as versatile as bubble and squeak. If you can fry it, it will go in. You can use up leftover cooked veg, or you can use up those sad old specimens that you’d intended to make something with, or the knobbly ones from the veg box that you have run out of inspiration for. You can also use a mix of both, if that is what you have. I would personally not recommend that you use tomatoes in this dish, but they would be rather good, well-grilled and served on the side.You should always have the onion for real pytt i panna, sweating it until it starts to colour, the caramelised bits are what makes this dish so good.

This time, I used up the last of the Christmas ham, made from a wild boar, again because that is what I had. I’ve also made this with beef, pork, leftover sausages, chicken, and a pretty excellent vegetarian version with a nut roast I’d made. I’m sure it would be equally good with turkey, and especially with goose, if that was your Christmas dinner of choice – especially cooked up with the rest of the bits and pieces in some of the lovely goose fat.

As you can probably tell from the description above, the following recipe does not need to be adhered to strictly, it is more of a guideline, based on what I had available on the day. The only two essential ingredients are the potato (sweet potato also works here, as would Jerusalem artichoke and celariac), and the onion, and you must allow both of them to colour, but apart from that just put pieces in a pan, as the name suggests.

This dish is lovely with a fried or poached egg on top. I had it with a side of slow-cooked red cabbage, which was also great.

I hope you made the most of your Christmas leftovers, let me know what you did in the comments.

Recipe: Pytt i Panna

Ingredients

5 medium potatoes or leftover boiled potatoes
About a quarter of a cauliflower that was past its best
2 onions, roughly chopped Leftover Christmas ham – I had about 150 g
1 tbsp cooking oil
Knob of butter
Salt and pepper to taste
A small bunch of dill that needed using up

Method

Dice everything into roughly 1 cm sized pieces. Break the cauliflower into small florets and dice the stalks.

If you are using raw potatoes, parboil them until they just allow a knife tip. Blanche the cauliflower in a separate bowl, and drain after 3-4 minutes.

In a large frying pan, cook the onions in the oil until they are starting to colour. Add the potatoes, again, cooking until they have some colour all over.

Add the knob of butter, ham and the cauliflower to the pan, then cook through. If the cauliflower also takes on a little colour,  so much the better.

Season well, and sprinkle with dill before serving.

5 Comments

Filed under Feast

A Picnic on Public Transport

Asparagus and Potato Tart

Tarted Up Leftovers

The Big Guy and I are seasoned travellers. If you live in a different country from either of your families, you have to get used to the rhythm of packing, transport, and departure times. Where we can, we take the train; it has a much better rhythm – with a continuity of movement, both in terms of the motion of the carriages, and because there is no hanging about in a departure lounge, or being forced through an array of harshly lit shops. The train gets you where you need to be without fuss; you have space to sit comfortably and to move around.

One of the things that we haven’t got the rhythm of is taking our own food. Although, I do know exactly where all the best places to buy food along the journey are. We have recently returned from one such trip abroad, although this time, we had a leg of the journey on a coach. It was OK, but I will be glad if they ever sort out the troubles on trains run by a certain rail company, which has been unable to run for far too long now.

We decided that we should be better prepared for this journey. Since our usual rhythm was interrupted, I could not guarantee getting to my favourite pit stops. I also had a few ingredients in the fridge that wouldn’t last until we returned. So, the obvious choice was to make something to take with us. A picnic, of sorts.

I had a little of the salad, some cream and some eggs that needed using up from the dinner I made for friends, and a few last sprigs of chervil. As so often happens, the day before I was leaving I woke up and knew that these would be perfect in a tart, with some goat’s cheese. We could have some for dinner that evening, and then we could take the rest as a picnic for the coach the next day.

Like many of the best laid plans, the idea for a nice goat cheese went a bit awry. It was a bank holiday, and none of the usual shops were open, so I had to dispatch the Big Guy to the supermarket. Unfortunately, all they had in the way of goat cheese was some presliced stuff, that could have been any generic cheese. It certainly never has the tang of goat that I was looking for in this dish. Fortunately, he returned with some sharp, crumbly feta instead. This was a much better option, it needed to match the asparagus.

The tart was tasty, filling and survived the journey. So did the salad we had with it, because we dressed it en route from a small jar. This is my top tip for picnic salads – if you dress it before you travel, the salad will cook in the acid, and you will be left with a container full of flaccid disappointment.

Cheese Please blog badgeFour Seasons Food Challenge Chez Foti & Delicieux

I know I have entered my dishes into a lot of blog hops lately, but I couldn’t resist entering this recipe into the inaugural Cheese Please Challenge, hosted by Fromage Homage. Then I heard about the inaugural Four Seasons Food, dreamed up by Anneli at Delicieux and Louisa at Chez Foti. This dish is so apt for both.

This was my perfect public transport picnic, and I didn’t waste anything in my fridge. I’d love to hear what appears on your picnic blanket, or even coach seat when you make food for on the go.

Recipe: Asparagus and Potato Tart

Ingredients

For the Pastry: 

100 g plain flour

50 g cold salted butter

Really good grinding of black pepper

1 egg yolk

For the Filling:

100 ml cream

4 eggs

small bunch chervil, very finely chopped

100 g of leftover asparagus salad, or 3-4 small salad potatoes and 5 asparagus spears cooked until just tender, and cut into 5 cm chunks

2 spring onions, sliced finely

90 g feta cheese

Method

Season the flour. I wanted this pastry to taste peppery, the rest of the tart can hold its own. Don’t be afraid of adding  more pepper than you think.

Rub the cold butter (it needs to be fridge temperature) into the seasoned flour until you have a breadcrumb consistency. Add the egg yolk and bring together into a dough. If you need to, you can add a little bit of cold milk to make it all come together. Add a splash at a time.

Form a disc with the dough, and cover it with cling film or foil, and leave it to rest in the fridge for 20 minutes to an hour.

Heat the oven to 200°C. Roll the pastry out thinly on a floured surface. Carefully line a greased flan case with the pastry, and press into the sides or fluting with a small offcut of pastry in a ball, to avoid any tears or holes, you don’t want the filling to leak and burn on the bottom.

Prick the bottom of the pastry all over with a fork. Line the pastry with greaseproof paper, and add a good layer of blind bake – this can be ceramic beans, dried beans or rice – to give some weight help keep it flat and thin. Bake in the oven for 15-20 minutes, or until the pastry looks dry and is beginning to brown on the sides. Remove the blind bake, and put back in the oven to allow the pastry to cook all over to a light golden colour.

While the pastry is browning, whisk together the cream, eggs, and chervil.

Once the tart case is cooked, remove and turn the oven down to 180°C.

Pick the salad over to remove any leftover capers and cornichons. Scatter the rest over the tart case, so that you get pretty even cover. Then scatter over the spring onions and crumble the feta around, again, so that the coverage is quite even.

Pour the eggs and cream over the rest of the filling, shaking the case a little, to ensure even distribution. Return it to the oven and bake for a further 30-40 minutes, or until the centre is just set, but still has a little wobble if you shake it.

As with all quiches, this is great served hot or cold, but if you want to serve it warm, let it rest for about 10 minutes after it comes out of the oven, so that the filling does not ooze all over the plate.

9 Comments

Filed under Feast

A Silky Soup for September

Spiced and Silken Roast Vegetable Soup

A Change in the Seasons

OK, so I was clearing out the fridge, but this is a great way to use the last tomatoes and aubergines of the season, and the first sweetcorn of the next one.

At the moment, we are trying to avoid calorific food, but I am determined that does not mean that we will miss out on flavour. This is easy when you can pack your salads and other dishes with loads of fresh herbs, but as we near the end of the herbs in the garden, I am looking to spices to plug the gap. And they are doing a great job.

My Sister just had her hen do, and I made everyone roasted aubergine with a chermoula spice rub. Partly because I was doing vegetarian, and also partly as part of my quest to make more middle eastern food.

When I found a couple of aubergines in the fridge, I initially thought I was going to make a chermoula and aubergine soup. When you roast or burn aubergine in its skin, it develops a lovely smoky, silky texture, as you can see from Baba Ganoush and similar dips. That was also going to give the soup a richness without the need for fat or cream, which is perfect for how I’m trying to eat at the moment.

As I kept poking, the fridge also relinquished some tomatoes and half a red pepper. In the spirit of not wasting food, I decided that they could go in the soup as well. And since I was already roasting the aubergines, I may as well roast these too, making the oven use more efficient, making it easier to peel the veg, and also to develop a bit of flavour, especially of the later developing vegetables that may not quite reach their full potential.

At this time of year, the sweetcorn are just appearing too. The Big Guy loves fresh corn, and we had a few cobs, though not yet from our garden. Since the soup was to be spicy and smoky, I didn’t want to just let the golden little kernels cook in the soup itself, I wanted them to add to the overall smoky flavour, so I decided to put a cob under the grill until the kernels were browned.

I had also intended to use some preserved lemons to add to the soup, in keeping with the chermoula idea. I was going to chop them fine, and use them to garnish the soup, but when I tasted it, it definitely didn’t need a sour salty note. Instead, I opted for a spoonful of yoghurt, to counter the fact that the chilli I had used was much hotter than expected!

This soup is great for the start of September, as the summer turns to autumn, and the nights get that bit colder. And it turns out that aubergines are great to add creaminess to a soup without the need for dairy too.

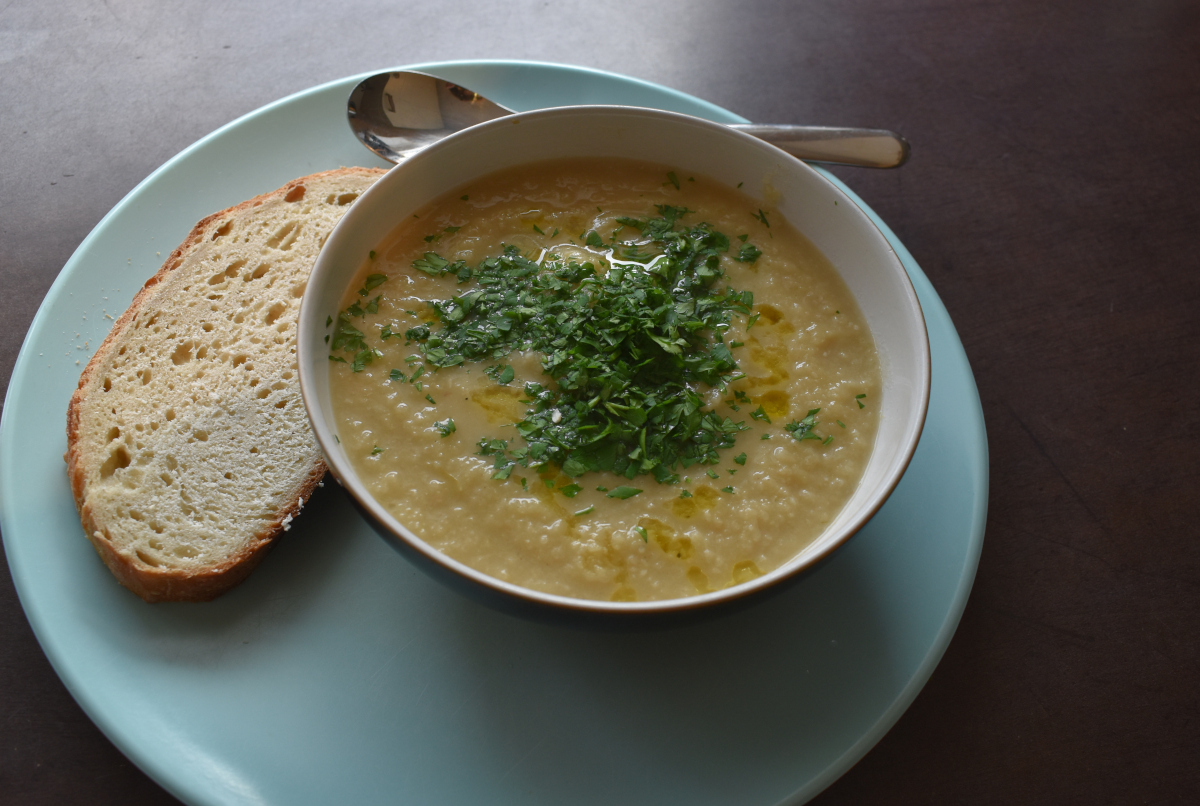
Recipe: Spiced and Silken Roast Vegetable Soup

Ingredients

2 medium aubergines

½ red pepper

6-8 tomatoes

4 cloves of garlic, still in their skins

salt and pepper

2 tbsp olive or vegetable oil

1 cob of corn, with the husk removed

1 medium onion, chopped

1 tsp cumin seeds

1 red chilli, deseeded and chopped

1 tsp ground coriander

750 ml vegetable stock

2 tbsp natural yoghurt

Method

Heat the oven to 200 °C

Cut the aubergine and the tomatoes in half. Arrange the aubergines, pepper and tomatoes in an ovenproof dish, and season with the salt and pepper. Slosh over 1 tbsp of the oil, and toss the veg to coat with the oil. You want the aubergine and tomato cut side up; but the pepper skin side up, because you want it to char.

Put in the oven to roast for 30-40 minutes, until the vegetables have taken on a bit of colour. After about 15 minutes, add the garlic cloves, so that they don’t burn to a crisp. You want them to be golden and soft, not crunchy.

Once the vegetables are roasted, put the grill on high, and put the corn underneath it. You will need to turn it as it cooks. If you have a separate grill, which I don’t, you can do this at the same time, it may take a while.

Meanwhile, dry fry the cumin until it is fragrant, then grind to a fine powder in a pestle and mortar, or a spice grinder.

Sweat the onion in the rest of the oil, until translucent. Add the chilli and cook for another minute on a gentle heat, then add the spices, and just cook through.

Squeeze the garlic from their skins, and add to the spice and onion. Allow to sweat on a gentle heat while you scrape the creamy flesh from the aubergine. Add this to the saucepan, and cook for 2-3 minutes to combine the flavour.

The tomato and pepper should also be really easy to skin as well by now. Mine just slipped off. Discard the skins, as these are indigestible, and hopefully the pepper skin will have blackened and blistered, so will be bitter and unpleasant anyway.

Add the flesh of the tomatoes and the pepper, along with any juices in the roasting dish to the saucepan. Add the stock, and bring to the boil. Cover the pan and simmer for about 15 minutes.

Blend the soup with an immersion blender or a food processor, until it is smooth and rich.

Run a knife down the corn, to remove the kernels, which should be brown and succulent, not black.

Divide the soup between 2 bowls, add a tablespoon of yoghurt to each, and sprinkle the corn kernels over the top.

Perfect to come home to after a day’s foraging, whether that be outside or in the fridge!

14 Comments

Filed under Feast