Tag Archives: Dessert

Speculoos Ice Cream; Get Some Special Lotus in Your Life

Speculaas Ice Cream

Lotus Paste Without the Postage

When I used to do Foodie Penpals, many people would yearn for a jar of Speculoos (or Biscoff) paste in their parcel, and would covet jars sent to others. Since I live in the Netherlands, I have ready access to a supply from Lotus (original and best), if I should want any, which I mostly don’t. But, posting jars is expensive, especially since the smallest size they make is 400 g, so I decided to make my own. People make their own nut butters and choc-nut butters, so it couldn’t be that hard, right?  So I thought, until I actually looked at the ingredients.

It is mostly oil – palm, and rapeseed; sugar of one kind or another; rice and soya flours; and stabilisers. I won’t buy palm oil, so I  would really struggle to get the consistency right.

Last summer, I happened to read this recipe for Specunana Brownies. I won’t be making these, because I can’t eat bananas. But, Camilla’s photo with the brownies and ice cream really inspired me. I knew then that the best way to give speculoos to others without having to pay excess postage would be to make a speculoos ice cream, and write down the recipe for you all to enjoy.

I have entire notebooks (and a draft blog post) where I scribble down ideas that I have. If I live to be a million, I won’t live long enough to make them all, but it doesn’t stop me. Every so often, I go back over them, and I came across this one again recently. I had some egg yolks going spare, so I decided to give speculoos ice cream a go.
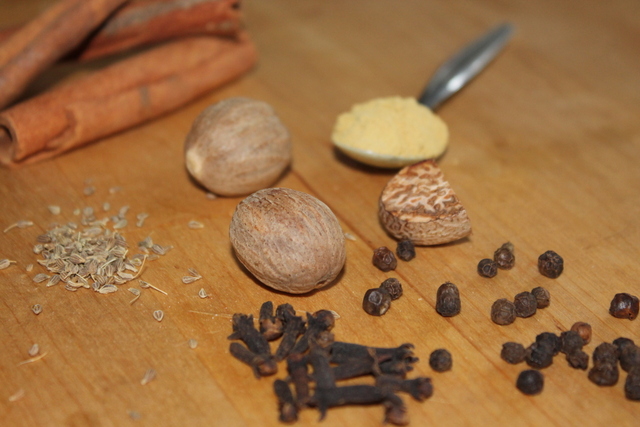
Speculaas Spices: cinnamon, nutmeg, ground ginger, aniseeds, cloves, peppercorns

Speculaas Spices

David Lebovitz makes a cinnamon ice cream using whole spices. I like this approach, and so I based my own recipe on as much whole spice as I could, whilst remaining true to the speculaas spice. As David suggests, you also have the option of adding more ground speculaas spice mix before you freeze it. If you aren’t near the Netherlands around the beginning of December, then you can always make up the spice mix I have used for my Kruidnoten. I found that with the amounts I used, I didn’t need it, but the strength of spice can vary hugely. I waited only until the custard had cooled, because I was happy with the taste – anything eaten cold will lose flavour, so the original base must have real depth. You can leave it overnight to be sure, if you prefer. If you do need to add some ground spice, add half a teaspoon at a time, mix well (there may be lumps), and taste before adding more.

Another main ingredient in the Lotus speculoos spread is brown sugar. I knew it would give the ice cream its classic colour, but I didn’t want it to be the dominant flavour. So I settled for a couple of tablespoons, which worked perfectly.

I don’t have an ice cream machine, so I made mine by hand. It will be quicker, but just as good if you use a machine, I’m sure.

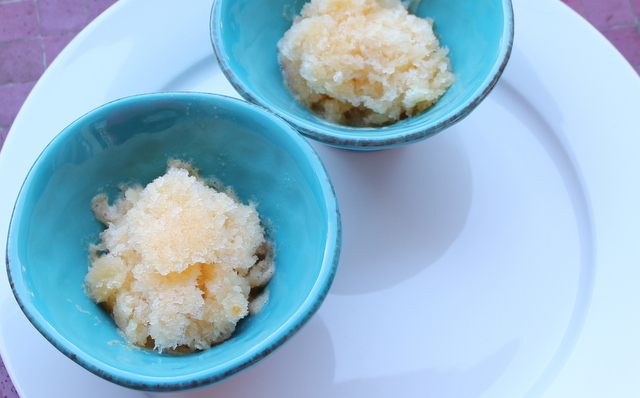
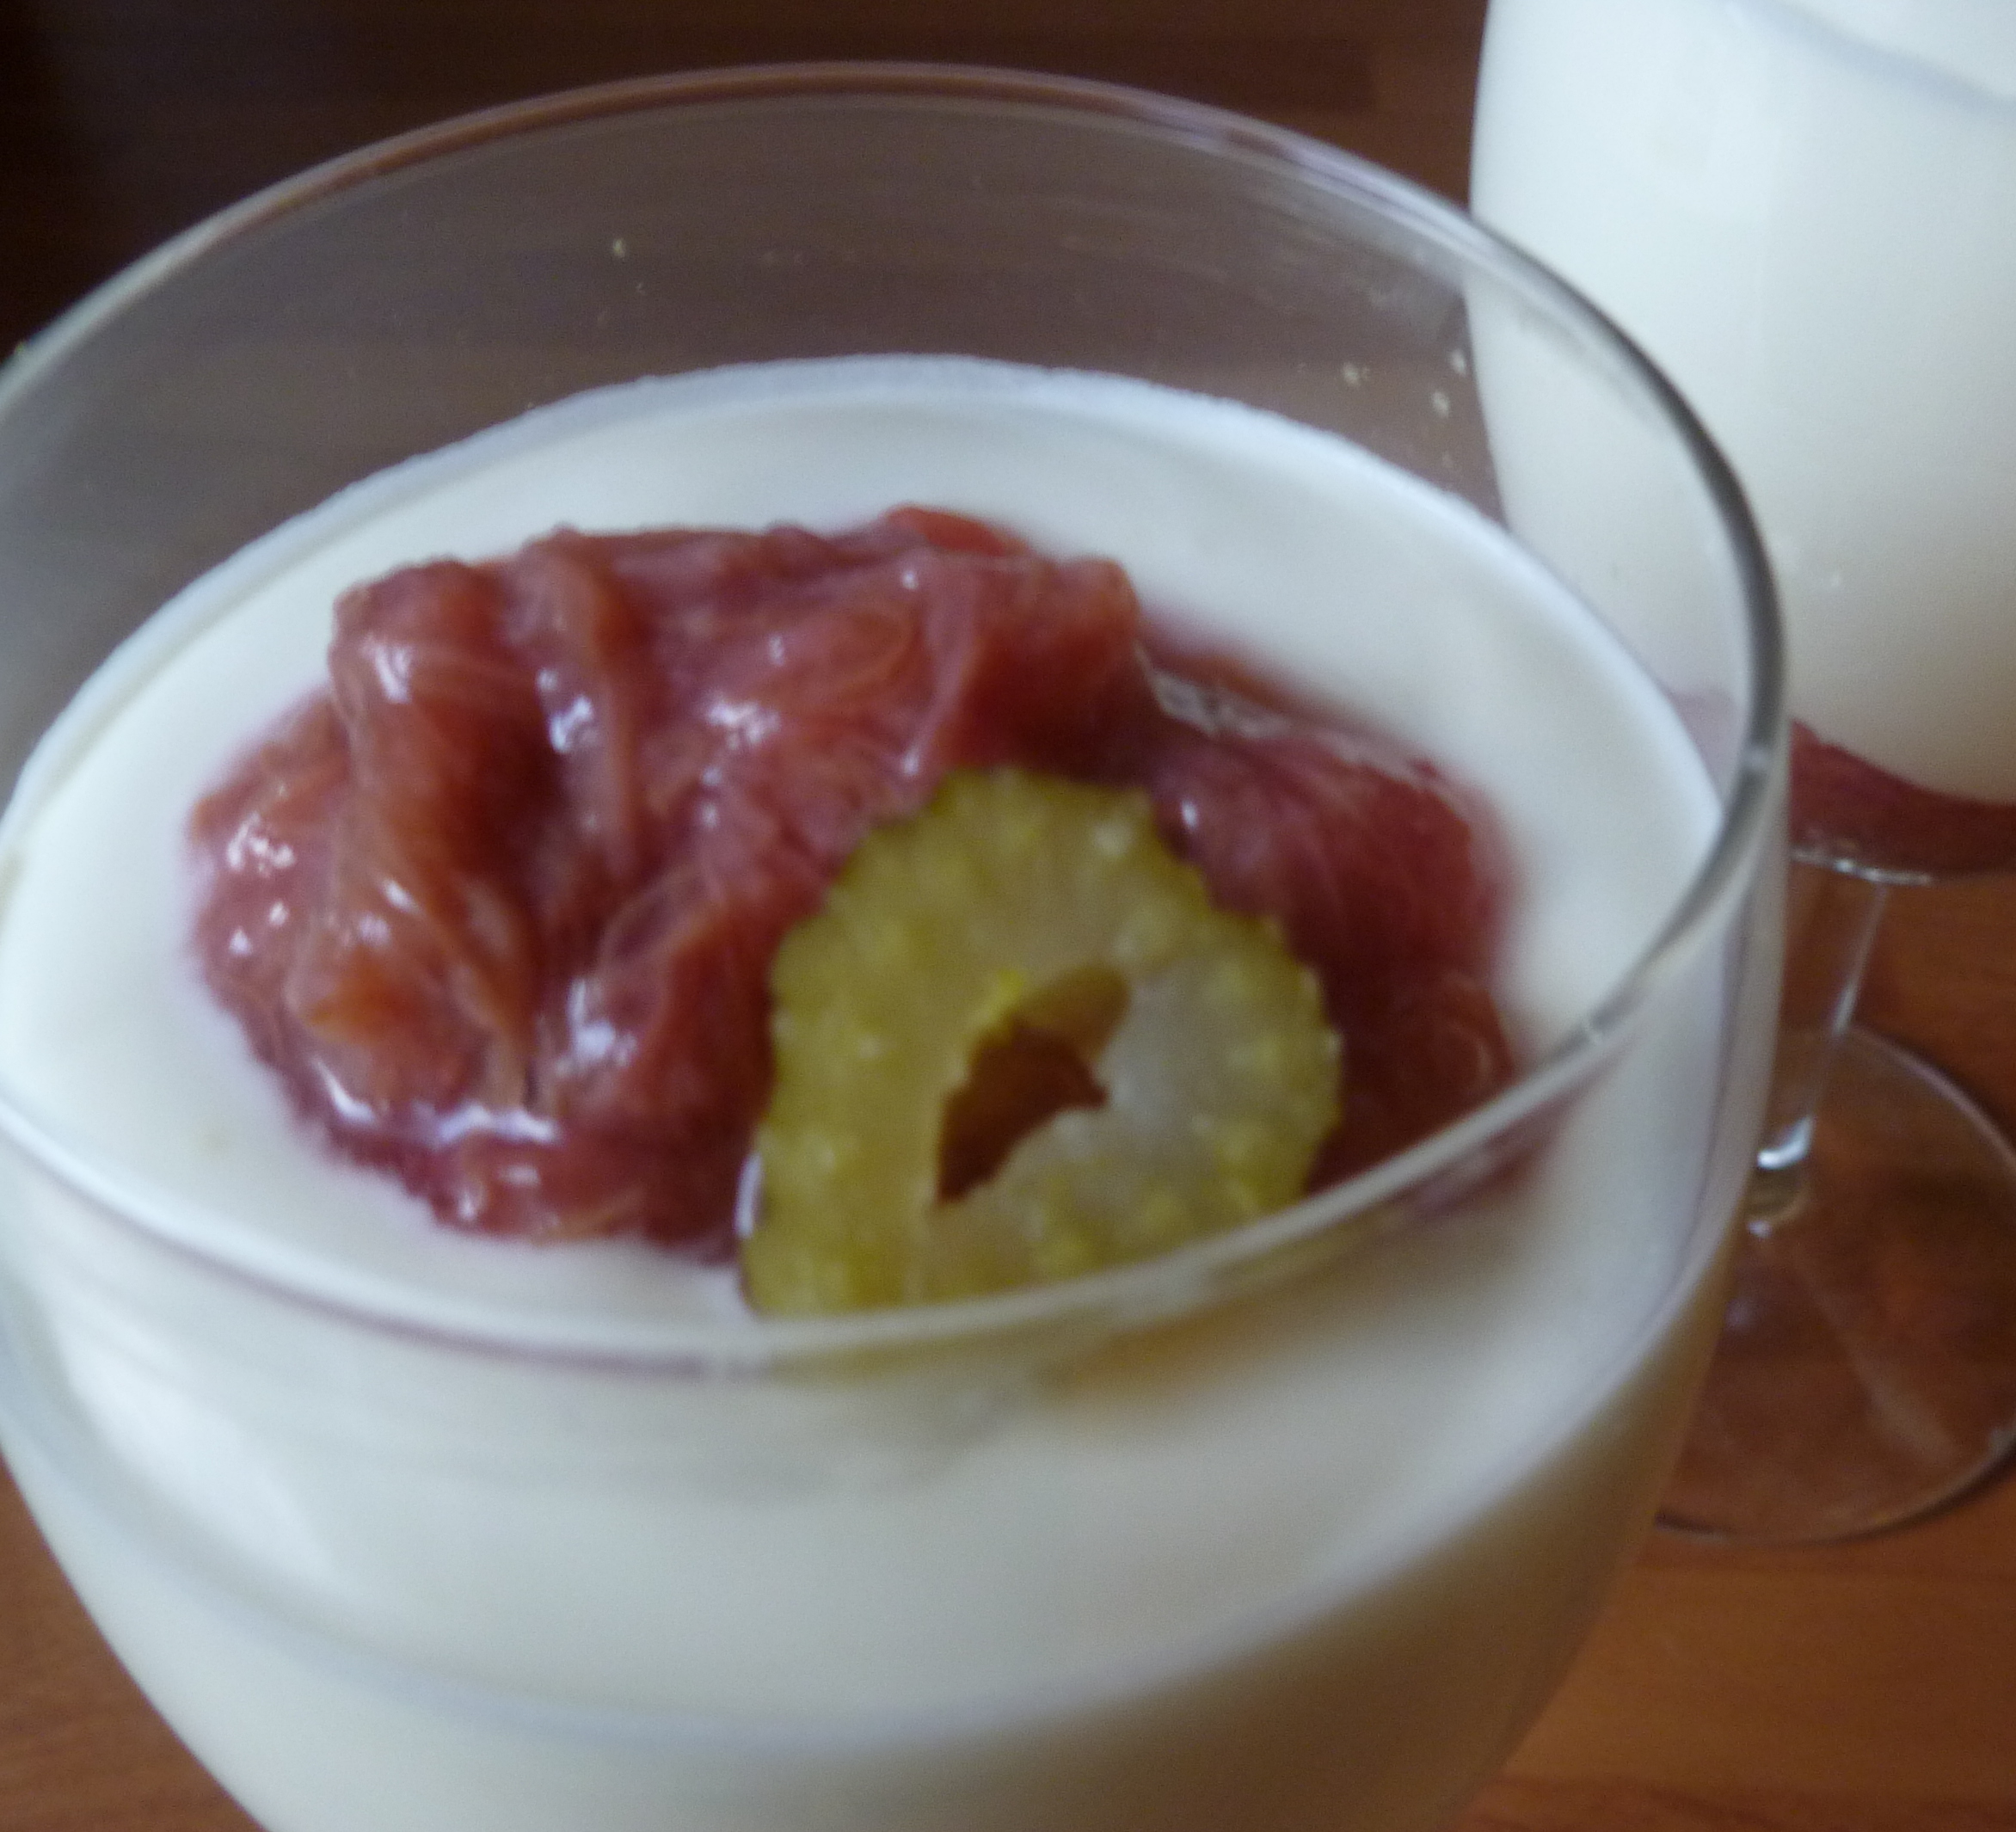
This ice cream is a smooth and as tasty as the original spread,  just colder. So, instead of having Speculoos/ Biscoff envy, why not make your own?

Spice Trail Blog Badge

And since there is plenty of ginger in this recipe, I’m going to enter it for the Bangers and Mash Spice Trail.

Recipe: Speculoos Ice Cream

Ingredients

500 ml double cream
700 ml milk
5 cinnamon sticks
About 1/4 whole nutmeg, grated
1 tsp ground ginger
10 cloves
1/4 tsp aniseed
1/2 tsp whole black peppercorns
100 g caster sugar
2 tbsp dark muscovado sugar
6 egg yolks

Method

I made a handmade ice cream before, with pictures. The ice cream may be a different colour, but the steps are the same.

Break up the cinnamon sticks slightly into big chunks with a pestle. Then place the milk, cream and all of the spices into a saucepan. Heat to just below boiling point. Remove from the heat, and set aside for at least half an hour to steep. Once the spices have worked their magic, strain through a fine sieve.

Bring the milk back up to just under boiling point. Whisk together the egg yolks and both sugars until they are light and creamy. You’ll be making a custard base for the ice cream.

Put the bowl containing the eggs and sugar onto a damp cloth, so you can pour and whisk without the custard going everywhere. Very slowly, add the warm milk to the eggs and sugar, whisking all of the time. You must take your time with this stage, or the egg will scramble.

Once all of the milk and egg are combined, return it to the pan. Heat gently, stirring constantly to stop the milk from catching on the bottom. Do not allow the milk to boil; again, you’ll get spicy, scrambled eggs. When the custard has thickened so that  it leaves a line when you run a finger down the back of the spoon you are stirring with, it is done. Return it to the bowl you used to beat the eggs and sugar in.

Now you need to cool it down quickly. Run a sink full of the coldest water you can manage. You need enough water to come most of the way up the bowl that you are using, but the water must not get into the custard, or it won’t thicken. Place the bowl of custard in the sink and stir while it cools.

Taste the custard. If the flavour is already really deep, then you can proceed to freezing. If you are at all unsure, then refrigerate the custard overnight, and see how it tastes when it is much colder. If you don’t think there is enough flavour, then by all means add some ground speculaas spice. If you need to add ground spice, then you will need to give the custard a really good whisk, to avoid lumps of spice in the mix.

Pour into freezable containers with a lid on. I use recycled ice cream containers, which are perfect for the job.  Put the lids on, and freeze for an hour.

I always make custard with a balloon whisk, because it gives me more control, and doesn’t make the custard froth too much, which will give a weird consistency. However, I always churn the ice cream with an electric whisk, to really make smooth ice cream. Remove the ice cream into a mixing bowl, using a spatula to make sure there are no crystals left around the edges. Churn the ice cream until smooth, using the electric whisk. Return to the container, and refreeze. Repeat churning and refreezing until you have a thick, but smooth ice cream, then leave to freeze completely overnight.

Remove from the freezer about 10 minutes before serving.

Advertisement

15 Comments

Filed under Feast

Aye Crumble!

Apple Crumble and Custard

A Faithful Friend

Today’s post is for my Brother Out-Law (since the Big Guy and I are not married, otherwise he would be my in-law!). Whenever I need a relatively simple dessert, that I can  make up quickly, but that can sit in the oven while we eat a main course, I always fall back on a crumble. Good, comforting, and a great way of using up fruit if you find yourself with a glut; or if you were tempted at the market, but now they are sitting there looking sad, and you need something to use them up with.

I made a pear and apple crumble for the Big Guy’s sister and her family for just such an occasion over Christmas. They asked if I would be blogging the recipe. At first, I resisted, because it is a common dessert. Except, it is a common British Dessert (and in the US, where it is called a Crisp, for reasons I am unable to fathom). It was quickly pointed out that a lot of different people read my blog, including my Swedish family, and they may not think it that common. So, I relented, and here is my version of crumble.

Let’s be honest, crumble is never going to be fine dining, but it is always a great dish to have as a standby for when you need to serve up a tasty dessert.

You can, and probably should, serve a crumble with ice cream, custard or pouring cream. I served this one for dessert after the Beer Can Chicken with some warm, thick custard that I made up using my usual custard methodology. This may have been served in the Netherlands, but you really can’t get more British than that.

Made with Love Mondays

Since I always make crumble and custard from scratch, and always with a lot of love, I’m going to add this to this week’s Made with Love Mondays, hosted by Mark at Javelin Warrior. I haven’t joined this in quite a while, but I always enjoy the posts.

Ingredients
For the crumble:
120 g plain flour
40 g cold butter
50 g rolled oats (you may need a bit more if you use cut oats, for texture)
50 g nuts, roughly chopped
3 tbsp demerara sugar
Fruit of your choice
Butter to grease the dish and dot on the top of the crumble
For the custard:
2oo ml double cream
150 ml milk
1 vanilla pod
4 egg yolks
65 g caster sugar

Method

Rubbing in the Flour and the Butter

Rubbing in the Flour and the Butter

Make the crumble mix. Cut the butter into small cubes, and add to the flour and then rub into the flour, using your fingers and thumbs. Keep going until they look like fine breadcrumbs.

Flour and butter at the fine breadcrumb stage

Stop When the Mixture Looks Like This

You can use rolled or cut oats in this mix, but since their inclusion is as much about texture as they are about flavour, you will need more if you use cut oats.

Roughly chopped nuts

Roughly Chopped for Texture

You can also use whatever nuts you like, or leave them out altogether if you prefer. I have happily used whole almonds, blanched, or flaked, hazelnuts and macadamia nuts. I’ve also used pumpkin seeds, although these burn a bit easier than nuts. I’m confident that walnuts, pecans or brazil nuts will work just as well. They do not top my list of favourite nuts, so I rarely have them in the house.

This another one of those recipes where you can play fairly fast and loose with what you add. For a real crumble you must have the flour, butter and sugar. I personally think that oats are essential, although this may be controversial in some quarters. In fact, I have also used muesli at a push, which I substituted for both the oats and the nuts. I did remove the dried grapes, because the layers you use are thin, and the currants/ raisins will burn. I dislike burnt currants, but you may be of a different opinion, in which case, use muesli and leave the dried grapes in to your heart’s desire.

Add the rest of the ingredients to the flour and butter, except one tbsp of the sugar, and mix thoroughly.

Then, grease an oven proof dish well with butter. Place large chunks of fruit across the base of the dish in a single layer. Again, it is pretty much anything goes. You can use a single fruit, like the traditional apple, or more unusual peach. You can mix it up; combinations like rhubarb and strawberry, or apple and pear work well. I have added chopped crystallised ginger, and herbs and spices. What you add is up to you. If you are adding fruits that will exude a lot of liquid, such as rhubarb, plums or peaches, then you may find stirring a tablespoon of plain flour through the fruit before you put it in the dish will help stop the juices soaking into the crumble topping, and leaving you with a steaming bowl of soggy disappointment.

Pre-Baked Crumble

Pre-Baked Crumble

Sprinkle the crumble topping over the fruit in a thin layer. It needs to coat the fruit, but not be too thick, or it will be claggy when you come to eat it. If there is any topping leftover, don’t worry, this mixture freezes really well, and you can save it for a time when you want to make a smaller crumble – maybe one just for yourself, made in a smaller pot or ramekin. Sprinkle the remaining tablespoon of sugar over the crumble, and dot here and there with a little butter.

Put in the centre of the hot oven, and bake for 30-40 minutes, or until the fruit is cooked, and topping is golden brown. If you have quick cooking fruit, cook in the oven until the fruit is done, then finish browning the topping under the grill.

Serve warm with custard or ice cream.

14 Comments

Filed under Feast

Show Some Love This Valentine’s – If You Must

melting moents with grapefruit cream

Melting Moments – When Your Work’s Worth Sharing

I come from a fairly stoical family, who are not big on physical affection. We prefer friendly pats on the back to full-blown hugs.  When I got my A Level results, my Mum had to tell my Dad to give me a hug to show he was proud of me. I knew anyway, and he knew that I knew; but we hugged for my Mum’s sake, and it was awkward. That hug has stuck with me for 20 years, so it just goes to show that it was a Momentous Occasion. We show love through our merciless mickey-taking – and long may it continue!

It will come as no surprise whatsoever to you then, when I confess that I do not have a romantic bone in my body (and whenever I have spare bones hanging about, I tend to make stock from them, so even if I had, it wouldn’t have lasted that long). Cut flowers and chocolates will not woo me (although edible seeds and chocolate as an ingredient would win my heart  in a flash). George, from the Famous Five, was more my style than Cinderella, or Sleeping Beauty. I have never dreamed of fairytale weddings, or handsome princes. My dreams were more likely to feature horses and hansom cabs! The Big Guy and I have never celebrated Valentine’s Day. I think he would love to be a bit more romantic on a more consistent basis, but I don’t like all that soppy stuff.

So, in light of this information, you may surprised to find a Valentine’s post on Edible Things. Not to worry, I am not being inconsistent. We have an organisation-wide meeting on today, and the HR department thought it would be a good excuse to have a bit of a celebration, so they asked us all to show our colleagues some love for Valentine’s, by making each other some fair food.

This set me off in a bit of a panic; if I can’t see what is romantic about a meal for the Big Guy, how was I ever going to come up with something original and interesting for my workmates? So, I turned to Facebook (whilst love may make me queasy, I’m always happy for people to show their likes…) to ask folks over there what they thought. I got some great suggestions but when Emma mentioned melting moments, with a passion fruit filling, I knew this was the perfect thing to serve up. And that I was going to make and blog about passion fruit curd. To me, this is the king of the fruit curds, tart and sweet. Unfortunately, no passion fruits were to be found, so I settled for the next best thing; ruby grapefruit. Once citrus is well cooked, most of it will go orange, so don’t be disappointed to find that you haven’t got a ruby coloured curd.

Ruby Grapefruit Curd

You Ain’t in Kansas Anymore

The curd needs to have time to cool before you use it in the filling, so you should make it the day before you bake the biscuits.

These easy and delicious treats look, and taste impressive. When all’s said and done, what better way to show your colleagues that you are fond of them?

Recipe: Melting Moments With Grapefruit Curd Filling

Ingredients

For the Curd (makes 2 jars):

Zest of one, unwaxed grapefruit

200 ml grapefruit juice

125 g butter

450 g sugar

200 ml beaten egg (about 4)

For the Melting Moments:

125 g softened butter

115 g plain flour

45 g icing sugar

50 g custard powder (or cornflour and a tsp of vanilla extract)

For the Filling:

200 ml double cream

Method

Making the curd isn’t hard, but does require patience. Firstly, sterilise your jars, by washing in hot water and placing in a low oven, or by running them and the lids through a hot cycle on the dishwasher. You can seal curd with cellophane,  but if you use lids, these will need to be boiled as the curd is approaching doneness.

There are two methods for cooking curd – direct and indirect heat. The direct method is quicker, but there is a greater risk of the egg scrambling. Sometimes, with very vigorous whisking off the heat, you can save it, as long as you notice as soon as it starts to curdle. The indirect method runs much lower risk of splitting, but it does take a lot more time. If you want to use indirect heat, you will need to cook the mixture in a double boiler, making sure the water at the bottom does not touch the bottom of the bowl, and check it occasionally to make sure the water has not evaporated.

Whichever method you choose, combine the grapefruit zest and juice, butter and sugar, and heat gently, until all of the butter has melted.

Making the curd - after the egg is added

Curd Away

Over a low heat, slowly add the egg to the buttery mixture, whisking vigourously as you go. When all of the egg is combined, increase the heat to medium, and stir until the mixture is thick and creamy. This could take a while, so settle in with a good book, but make sure you don’t allow the curd to catch on the bottom, and remember to scrape down the sides too.

Once the pouring consistency reaches thick ribbons, put it in the hot jars, and fill to 3 mm from the top. Cover with a wax disc, and seal immediately. The curd will last up to 4 weeks. Once opened, store in the fridge.

To make the melting moments, preheat the oven to 160°C, and line two cookie sheets with baking paper.

Beat the butter until pale and fluffy. Add the flour, icing sugar and custard powder, and mix well. This is a pretty dry mix, but it should all come together. There is no need to bother with seiving the dry ingredients.

Formed melting moments

Not as Flat as a Pancake!

Roll small lumps of the dough into balls. This amount of dough should give you about 26 biscuits. Place them on the cookie sheets, then flatten them with the back of a fork, which you should dust occasionally with icing sugar.

Bake them for 15-20 minutes, until crisp. Be aware that these biscuits should come out of the oven pale, as they will continue to cook, and colour more while cooling. Allow to cool.

Whip up the cream until it is pretty stiff, and stir through 3 tbsp of the curd. You can leave it as swirls through the cream, if you want. Place a little curd on the base of a biscuit, add a tiny dollop of the cream (or you will lose it out of the sides) and sandwich it together with a second. Sit back, and enjoy a melting moment.

In theory, these should last a couple of days in an airtight container, but I’ve not yet been able to test this theory.

6 Comments

Filed under Feast

From the Last Food of Christmas

Easy, handmade mandarin and dill sorbet

Edible Things Gave to Me
A Sorbet From the Mandarin Tree

I bet a few of you still have some things knocking about after the Christmas holidays. Especially mandarins.

As you may have noticed, last year was the year that I discovered the joys of combining desserts with herbs. People have been putting things like mint, basil and lemon balm in desserts forever. Last year, I mostly branched out into fennel, with my Rhubarb Foolish and Fennel and Strawberry Tarts. This year, I see no reason to stop experimenting.

I got inspiration for this dish from taking a quick break from the Christmas prep and sneaking off for five minutes with a mandarin. I must have still had some dill on my hands from the Gravad Lax. What I ended up with was inspiration. This is a great combination, as if they were made to go together. The dill is actually pretty subtle in this, it somehow seems to enhance the mandarin flavour, making it really sing on your tongue.

Easy way to juice mandarins

Top Tip!

Mandarins can be a little bit hard to juice by hand. Well, hard on the hands anyway, as I found out last year when making marmalade. Their skins are so soft and thin, that if you have any number to juice, it becomes uncomfortable very quickly.

If you have a fancy juicer, all well and good. If not, and you ever have to juice a few mandarins, this tip will save you from feeling that you have juiced more of your hand than you did the fruit. Peel them, then bung them in a jug and juice them with a stick blender. Pour the resulting juice through a square of muslin. You can either leave it to drip through for a few hours, if you want a very clear juice; or you can squeeze it through straight away if you don’t mind a cloudier juice.

Tips for using clumped sugar

Rock Sugar

In fact, I’m full of top tips today. When cleaning out the cupboards recently, I came across half a bag of badly-stored sugar, that had got a little damp at some point. As you know, I hate to waste food, so I kept this, knowing that I would find something that it would be suitable for. This recipe is just the thing, because it requires a simple syrup. I just put it in a ziplock bag, wrapped it in a couple of tea towels, and bashed out the lump with a hammer. It wasn’t fine sugar, but I could get the right amount out to melt gently into a syrup. Obviously, it would have been better not to abandon it to its fate in the first place, but I feel good that it didn’t go to waste.

And talking of not wasting food, this recipe also uses another the things that I always have knocking around in my fridge or in the freezer – egg whites. I absolutely love sweet and savoury egg-based sauces, and make all manner of custards, hollandaise and fresh mayonnaises on a regular basis. I am always in need of recipes for egg whites. If you have more suggestions, please do share.

As well as using up all the leftovers, this clean, bright and refreshing sorbet is the perfect antidote for the heavy and rich Christmas foods we have been eating recently. It is also a really easy recipe, to make, even if you don’t have a ice cream maker (which I don’t).

Cooking-with-Herbs-300x252

Coincidentally, this recipe really fits the brief for this month’s Cooking with Herbs, run by Karen at Lavender and Lovage, so I’ve entered it on her blog. There are always so many great recipes there, so hop over with me at the end of the month to have a look.

Recipe: Mandarin and Dill Sorbet

Ingredients

8 mandarins, preferably unwaxed

200 g granulated sugar

300 ml water (and maybe a little more)

about 25 g dill

1 egg white

Method

Wash and zest six of the mandarins, and juice all of them, using the handy method I outline above.

Put the zest, sugar, water and dill in a saucepan. On a gentle heat, melt the sugar, and then bring to a boil. Once it is boiling, cook the syrup for a further five minutes, then leave to cool for ten minutes.

Taste the syrup. At this point, you should be able to taste the dill quite well, but it does come after the less-subtle mandarin punch. If the dill is enough for you, set the syrup aside to go cold. If you are having trouble tasting the dill, add a few more sprigs to the syrup, before you set it aside.

Once the syrup is completely cold, strain it through a fine sieve, add the juice, and make it up to a total of 600 ml with cold water, if it falls short.

Pour the entire mix into a shallow container with a lid. An old ice cream tub is ideal. Freeze it for about 4 hours, until the sorbet is thick and syrupy.

Whisk the egg white to form soft peaks. Put the sorbet mixture into a mixing bowl, and whisk it thoroughly to break up the ice crystals.

Add a little of the sorbet to the egg white, and mix it in thoroughly. Fold the rest of the sorbet to into the egg white.

Return to the container and freeze again. Check it after a couple of hours to see if the egg white has separated a little. If it has, re-whisk it.

The sorbet will be ready after seven hours from when you added the egg white, but stores well for longer. Remove from the freezer 10 minutes before serving.

This should be easy enough to make in an ice cream maker, too. I guess you will need to churn it for a bit, then add the whisked egg white, then churn again. Just follow the manufacturer’s directions for the rest.

17 Comments

Filed under Feast

Procrastination Pâtisserie

Strawberry and fennel tarts

The Kind Of Procrastination That Leaves a Sweet Aftertaste

At the time that I cooked this, I really should have been packing for a work trip. I have also been so busy since I got back; including dealing with a gaping hole in my kitchen ceiling through which my neighbour’s shower leaks, and a recalcitrant landlord; that I have not really had the time to blog. Procrastination is a big theme in my life. Both mine and that of others, unfortunately.

You may also have noticed that I have had a little bit of an obssesion with pairing  things with fennel of late. I had briefly considered strawberries with candied fennel, a long time ago, but instead it became Rhubarb and Fennel Foolish, following some inspiration from Mister Kitchen at the Rollende Keukens.

I had some fennel stewed rhubarb leftover a while back. I had it for breakfast with some yoghurt and the first of the year’s strawberries, and discovered another match made in heaven. The seed of an idea was planted, and then I put off enacting it until I had something else I wanted to put off doing.

Unlike most procrastination, this did not leave me grumpy, nor with the slightly sour taste of panic in my mouth. Instead, it was a delicious treat for the last meal with the Big Guy before I left for the Philippines for a work trip. If only I’d got around to blogging it sooner…

Strawberry and Fennel tart in Profile

A Treat You Shouldn’t Put Off

I’m really very proud of this tart, it tastes like it is full of complex techniques, but it really is pretty simple. Even the crème patissière is not as complex as it sounds, since the flour in it means it thickens much quicker than it heats, so the risk of splitting is much less than with normal custard.

In fact, I thought that this little treat would be  great first entry into the Made With Love Monday blog challenge, hosted by Mark at Javelin Warrior because it was all my own work, and was made and shared with love.

Recipe: Fennel and Strawberry Tarts

Makes 6 small tarts

Ingredients

For the Crème Patissière:

½ tsp fennel seeds

350 ml milk

4 egg yolks

65 g caster sugar

15 g plain flour

15 g cornflour (or use 30 g cornflour)

For the Sable Pastry

25 g icing sugar

100 g plain flour

30 g ground almonds

50 g cold butter, cubed

1 egg yolk

A splash of cold milk to bind

For the Tarts:

15-18 Strawberries

2 tbsps rose petal jelly or  strawberry jelly (not jam)

1 tbsp water

Method

Crème Patissière

Add the fennel seed to the milk, bring to the boil, turn off he heat and allow it to infuse for 20 mins.

Meanwhile, whisk the egg yolks and the sugar together until pale. Whisk in the flour and cornflour until thick and glossy.

Once the milk is infused with fennel flavour, bring it back up to boiling point, and strain through a sieve. Let it sit for about a minute. Slowly add to the egg yolk mixture. Don’t add it too fast or the eggs will scramble.

Return the custard to the pan, and bring to the boil, whisking constantly, and pretty rapidly. Once it starts to cloy on the whisk, take it off the heat, pour into a waterproof container, whisk a little more until it is thick. Sprinkle a little icing sugar over the top, so that it doesn’t form a skin.

Cool quickly by dipping the bowl in iced water (don’t get water in the custard). Refrigerate until needed. I did mine the night before I needed it.

Cheekily hoover up the scrapings in the saucepan, like you were 5 again. You won’t regret this step, I promise.

Sable Pastry

Sift the flour and icing sugar. Add the ground almonds. Rub through the butter, until the mixture resembles breadcrumbs.

Mix in the egg yolk. Add very small splashes of milk, until you can just bring the pastry together. You won’t need a lot, this pastry is quite soft.

Wrap the pastry in paper or clingfilm, and allow to rest in the fridge for at least 40 minutes.

Heat the oven to 200°C.

Roll the pastry out thinly. It’s a delicate pastry, it should be really short and buttery when cooked, so don’t add loads of flour when you roll it out. Instead, roll it on a lightly dusted sheet of baking paper (wax side up).

Grease 6 small tartlet tins. I find the ones with the removable bases are the easiest to use.

Line the tins carefully with the pastry. If your pastry is really short, you could make a sausage from it, cut into thin discs, and then overlap some discs and press them together to thin the pastry. Or you could roll it thinly, use a saucer to cut out rounds of the pastry, and slip it into the tart tin using your baking paper. Either way, carefully push the pastry into the flutes of the tin, using a little bit of scrunched up spare dough. Trim the pastry by rolling your rolling-pin over the top of each tart tin.

Cut squares of baking paper (you can use the same stuff you rolled the pastry on) a bit larger than the tart tins, and scrunch each of them up, as if you are going to throw them in a bin. This will help the paper sit better in the tart case, so that you can get the blind bake into all the nooks and crannies, ensuring that none of your pastry can rise.

Gently prick the bases of the pastry cases with a fork. Unscrunch the baking paper, and line the top of the pastry cases. Line thickly with ceramic beans, dried beans or rice and tap on a work surface to get them into the fluting of the cases.

Bake the tartlet cases in the oven for 10 minutes. Then remove the blind bake, and return to the oven for a further five minutes until the pastry is  crisp and lightly browned all over.

Set aside for five minutes, and carefully remove from the tins. Allow to cool completely.

Tarts

Once your pastry and crème patissière are completely cool, you can assemble your tarts. Slice the strawberries in a way you find aesthetically pleasing. Put some of the crème patissière into each tart case, and spread over the base. Arrange your strawberries prettily over the crème patissière.

Make a glaze by heating the rose petal jelly and water gently until the jelly has melted. Mix well, and brush it over the strawberry arrangement.

Enjoy as a slightly unusual treat, with or without friends.

2 Comments

Filed under Feast

Young and Foolish

Fennel Rhubarb Foolish

Going Foolish Over Spiced Rhubarb

Today’s inspiration has come from two places. During the rhubarb tasting menu at Mister Kitchen at the Rollende Keukens, I had a bit of a revelation. As part of the main, they had roasted a few chunks of rhubarb and served them with pork, and a slice of their very good sausage. The sausage had fennel seed in it, and I tried this with a bit of the rhubarb, and the combination is incredible.

I came back from the tasting with a head full of experiments with rhubarb, both sweet and savoury, and if they work, you’ll see some of them on edible things soon.

But, I knew I needed to do something with the fennel and rhubarb as soon as possible. I am still playing with this, but one of the first things that I did was to stew some up with a few fennel seeds. This really is amazing. And surprisingly, the fennel seems to sweeten the rhubarb, so you need a lot less sugar. I had this with some plain yoghurt for breakfast.

swallow-recipes-for-life

Then, I saw this Month’s Recipe for Life, held by Vanesther over at Bangers and Mash. This is in aid of Swallows, a charity that supports adults with learning difficulties. Vanesther is much more eloquent than I could be on the subject, so please do check out her site to read more about it.

This month, she has chosen rhubarb, spice and lemon as the three key ingredients this month, and I knew this was the challenge for me. It will be good to share the brilliant combination of rhubarb and fennel as, really, more people should know about this.

I deliberated for a few days as to how I could best bring some lemon into the mix. Then I got invited round to a friend’s with some other fabulous ladies, and it prompted me to come up with the dish I am entering. The dish needed to be simple, mobile (because I was going to take it round to my friend’s) and most of all the lemon needed to balance with the subtle fennel.

The obvious choice would have been a classic rhubarb fool. Fools are pretty nice, but there is also something to be said for a syllabub, which is essentially cream and alcohol, and what’s not to like about that? Some kind souls had left a bottle of Pernod, and one of Limoncello following a party sometime, and then I had the basis for a few experiments in syllabub. Turns out that both of these are pretty good, but the Limoncello just about had the edge.

Whilst thinking about this, I decided to try to add some texture with some candied fennel, which I’ve also been thinking of having a go at for a while. It really does add interest and an additional subtle fennel taste, but it would also work without it. And now you know what the suspense was all about from my last post.

So, here is the recipe for my Fennel Rhubarb Foolish. Not quite a fool, and not quite a syllabub, and there’s not a lot that’s foolish about that.

Fennel Rhubarb Foolish

Not Fool, Not Foolish

Recipe: Fennel Rhubarb Foolish 

This recipe is enough for 5 people if you serve it from a wine glass

Ingredients

300 g rhubarb, chopped into chunks

1/2 tsp fennel seed

Juice of half a lemon

splash water

2 tbsp sugar

250 ml cream

50 g sugar

250 ml greek yoghurt

25 ml Limoncello

Grated zest of 1 lemon

Juice of half a lemon

Candied Fennel

Method

Firstly, lightly stew the rhubarb with the fennel seed, lemon juice, and sugar. Add a splash of water, to prevent the rhubarb from burning as you apply the heat, but be aware that it will give off liquid itself, so don’t add too much, you don’t want it swimming. As I said, the fennel takes the sharpness off the fruit, so don’t add too much sugar, you can always add more towards the end of the cooking process if you need to. Cover the pan, and stew it on a low heat until the fruit just starts to break down. Taste for sweetness and fennel, and add more sugar or fennel seeds (not a lot) if necessary.

If there is a lot of liquid, strain it off. Don’t throw it away, it is great to macerate strawberries and raspberries in, or to use instead of a simple syrup in some cocktails.

Set the stewed rhubarb aside to cool. Meanwhile, whip up the cream, sugar and lemon zest until the cream forms soft peaks. Add in the yoghurt, and fold it through. A classic syllabub is usually just cream and wine, but I wanted this to be slightly more substantial, hence the yoghurt.

Once the cream and yoghurt is well combined, add the lemon juice and the limoncello. Taste to make sure it tastes lemony enough for you, but not so lemony that your face puckers like a disapproving octogenarian. Add more lemon juice or limoncello to taste.

Finally, layer up in wine glasses, with rhubarb, candied fennel, the syllabub, a dollop more rhubarb and the candied fennel stalk to finish. Then bore your friends while you take photos and they wait hungrily for a lovely tagine (that was made by my friend, not me at our dinner party).

7 Comments

Filed under Feast

Very Suisse!

Meringue Suisse

A Swedish Childhood Dessert

As you will know when I got my Foodie Parcel last month, I was very excited to receive a broken meringue as part of a lovely package.  I promised Teresa that I would blog the recipe for Meringue Suisse, which I knew I was going to make as soon as I saw the broken meringue.

This is a dessert that the Big Guy had often in his childhood. In Sweden. I am not really sure where the Swiss thing came from, although I could probably surmise something about Swiss chocolate, or the fact that it resembles the Matterhorn or something.

This time, I made the basic recipe, and used good quality vanilla ice cream from the shop. As with most simple recipes, the better quality the ingredients, the better the final dish will be. Teresa’s meringue and chocolate were both of such quality that I didn’t want to mess around with the recipe too much.

The basic recipe I give here is pretty simple, but you can play around with it, if you like. Try adding soft fruits (the Big Guy’s family add bananas, but I’ll be having none of that!). You can make it fancy by making your own ice cream or meringue, or you could even make praline or do a bit of sugar work. Crumbled amaretti biscuits could also be a very good topping.

What other toppings or additions would you choose?

Recipe: Meringue Suisse

Ingredients

Good quality vanilla ice cream

1-2 tsp slivered almonds

60 g dark chocolate, broken into chunks

15o ml whipping cream (to be used in 2 parts)

Knob of butter

1 meringue, broken into pieces

Method

Remove the ice cream from the freezer, so it can soften to a scoopable consistency.

Toast the almonds in a dry frying pan. You will need to watch them carefully, and stir them often, as they catch easily. Once they are a nice golden colour on both sides, remove from the pan, to prevent them from cooking any further.

Combine the chocolate, 50 ml of the cream and the butter in a saucepan. Cook over a very low heat until the chocolate has melted. Don’t stir it at this stage.

Meanwhile, whip up the remaining cream to soft peaks.

Once the chocolate has melted, remove from the heat and stir the sauce well to combine it. It may look a little grainy at first. Don’t worry, keep stirring it and it will become a smooth and glossy sauce. Allow to cool slightly, so that it does not melt the ice cream immediately.

Scoop enough ice cream for two people into a bowl, and combine with the meringue. You will need to have reasonably soft ice cream for this. Put the ice cream and meringue mix into serving bowls and top with the whipped cream.

Pour over the chocolate sauce and sprinkle with the toasted almonds. The chocolate sauce should go a wonderfully fudgey texture when it hits the cold of the ice cream.

This is a very easy dessert, but one that looks and tastes impressive. The only question is how will you top yours?

Leave a comment

Filed under Feast

Tiramisu – Another Day Another Trifle

Tiramisu

A Mere Trifle

(c) J. Casper 2011

This is another take on  a trifle, of course, continuing in the spirit of eating well and using up what you have. This also appeared at the international Christmas dinner, but is great for any occasion.

The history of this dessert is uncertain, but it seems to be a lot younger than my family’s sherry trifle. However, purists would argue that my recipe is not a tiramisu, but at the time I served it, I didn’t think that “Coffee and Custard Layer Construction” had quite the same ring to it. Although now I see it written down, I am wavering…

The traditional tiramisu consists of layered sponge, soaked in coffee, and a  mascarpone and Marsala custard. But, I had some more spare panetone and I had made 2 l of custard, so I diverted from the original. I think that you can add a slug of Marsala, or even some Tia Maria if you want. I preferred a big smack from the coffee, and so didn’t want it mellowed in this instance. I certainly don’t think it suffered for it.

If you are an improvisational cook, like I am, you will enjoy getting the most out of what you have, so may well find other, equally good things in your cupboard, or fridge. It is good to know that you don’t have to stick rigidly to the old traditions, but that you can still produce great tasting food. You never know, if it is good enough, you could be starting a tradition for yourself!

Recipe: Tiramisu

Ingredients

180 g panetone

3 espresso coffees

6 egg yolks

100 g sugar

500 ml double cream

500 ml milk

½  vanilla pod

100 ml whipping cream

Cocoa powder to dust

Method

Make the custard, using the usual method, which is here, in case you need a reminder…

Leave to cool overnight in the fridge, if you can, but at least a few hours if you forgot that you are entertaining the next day, or have a pressing appointment.

Cut the panetone into strips of roughly the same size and thickness, and put in a dish, in a single layer if you can. I used a flat baking dish for this, not the final serving dish. Pour the coffee over it in as even a way as you can, you don’t want large portions of the sponge to remain untainted by the coffee.

Set the panetone aside to soak for about half an hour.

Once the panetone is thoroughly soaked, layer it into the serving dish (or individual glasses)  so that you have sponge, custard, sponge custard. I find that this is enough for two layers, but you may get more or fewer, depending on the width and depth of your serving dish.

Leave about 3-5 cm at the top, and refrigerate if you are not going to serve it straight away.

Just before serving, whip up the rest of the cream, and put it in a layer on the top of your trifle. Dust with cocoa powder, and serve it to guests who have already feasted on loads of food, but they won’t be able to resist just a small bit of this too.

2 Comments

Filed under Feast

Sherry Trifle

Sherry Trifle

Sherry Trifle, for all Festive Occasions

(c) J. Casper 2011

In my family, a festive occasion is never complete without a sherry trifle – home-made, of course! We have a family recipe from my aunt’s mother-in-law, who was very particular about her recipe. She never, ever used fruit, and would frown upon versions that had superfluous ingredients. We have them for all manner of get-togethers, and a party wouldn’t be the same without one.

She passed her secret recipe onto my aunt. I have never asked her the exact recipe, but she has given me enough hints and tips that I have been able to come up with a good enough approximation. The exact recipe remains a closely guarded secret. Well, at least I imagine it that way, it seems nice to have a recipe that gets passed on to only a select few!

I have been meaning to post about the one that I made for our international dinner, but I had so much to post from Australia and since then, this is the first opportunity that I have had. I figure that this recipe is good for any party, and what better excuse than on your next snow day? Given the weather at the moment, I’m sure you won’t have to wait that long for the next one!

This version of sherry trifle has a few main differences to my normal one. Firstly, following our mince pie and mulled wine party, we had half a panetone left over that someone brought. I hate to waste things, so it seemed the perfect way to use this was to add it to the trifle instead of the usual sponge.

Secondly, I sent the Big Guy off to buy the sherry, and he came back with Pedro Ximinez. It does fit the brief of a sweet sherry, but it is much more interesting than the usual cream sherry, so beloved of elderly ladies, that is traditional in the family one.

Thirdly, the jam is usually strawberry or raspberry. I didn’t have any of those, and so I used some of the blueberry jam I had left from a trip to Sweden.

I am not sure that these amendments would have met the approval of the originator of the recipe, but it was certainly appreciated by my guests at our international christmas dinner!

Recipe: Sherry Trifle

Ingredients

6 egg yolks

100 g sugar

500 ml double cream

500 ml milk

½  vanilla pod

150 g panetone, cut into strips and spread with jam

100 ml sherry

200 ml whipping cream for the topping

Method

Firstly, you need to make a custard. It also need to be fairly thick, so I use half milk and cream. Normal custards can be made with just milk, but this one needs to hold up when you serve it, and not run everywhere, so the cream is necessary here.

You can make the custard using the step-by-step guide that I posted yesterday.

Set the custard aside to cool completely. If you can chill it overnight, so much the better.

Spread the jam on the panetone, and place it in the bottom of the serving dish. My traditional sherry trifle is served in a large bowl, from which everyone is served, but you can also arrange it into glasses for individual servings. Add the sherry to the sponge, and leave aside to soak in for 20 minutes.

Add the custard on top of the panetone. Spread it so it is as even as possible, but leave about 2-3 cm at the top of the bowl.If you are not going to serve this immediately, chill it again.

Just before serving, whip some cream to stiff peaks, and put it on top of the custard.

This is not a lightweight dessert, but it is a great treat. Especially for a celebration.

2 Comments

Filed under Feast

Custard – a Step by Step Guide

You may have noticed by now that I am rather fond of dishes that involve custard. This is partly because I can only get Vla in the Netherlands, which is too sweet for use on desserts, and has been thickened with flour; but partly because homemade custard is much more tasty than it’s packet counterpart . It would, indeed, be possible to add Bird’s Custard to the list of Stuff Visitors Must Bring From the Motherland, but actually, making custard is relatively easy, so I don’t usually bother.

As it is so easy, and I have a couple of recipes coming up that require custard (and many more to follow, I’m sure) I thought that I would give a quick step-by-step guide, to save me typing out the method all the time.  The recipe calls for the use of vanilla bean. I know they are expensive, but they really are superior to using vanilla extract, so try to get them if you can. There is a good vanilla bean paste on the market too, that would be a better substitute if you really have to. Of course, I have managed to find a way to eke out the most value from a single vanilla bean, and nothing is wasted!

Most of the time, a recipe will call for you to split a vanilla pod in half, then add all of the seeds, and the pod to the warming milk/ milk replacement. I usually only ever scrape half of the bean, and add the seeds to the liquid. The exception to this is when making ice cream, or a LOT of custard, as these will require a whole pod.  I always add the split pod too, but when the milk has warmed through, I remove the pod, rinse, and dry the halves. When they are dry, I put them aside in an airtight container (a small jar with a lid). The next time that I need to make a custard, I still have seeds from half of the pod, and the old pod to add to the milk, so I get double the custard for the price of one.

Still not done, you can then dry the pods for a second time, and snip them into shorter lengths. Add these to an airtight jar filled with sugar. The remaining oils in the pod will infuse, leaving you with vanilla sugar. This is a much more acceptable substitute for vanilla pods in your next batch of custard, than using vanilla extract. There are many other recipes that you can use this in. I find stewing fruit with a little of this sugar is a really great addition. The vanilla pods will continue to be useful in this way for a few weeks. When they are dried up, they have imparted all their flavour to the sugar, and only then should you discard (or better yet, compost) them. That is a lot of value from one lowly bean, making it all a lot more worthwhile!

I have not given proportions here, as this will vary from recipe to recipe, whether you are using milk, cream, soya milk or even coconut milk (which is excellent in custard – I recommend that you give it a go). You can also make savoury custards but the methodology differs, so this is for sweet custards only.

STEP ONE – The Milk

Flavoured milk, just below boilng point

When the milk looks like this, remove from the heat

The milk (or replacement) has to carry the flavour. Usually, this will be vanilla, but could also be cocoa, ginger or fruit syrups. Whatever flavour you are adding needs to get heated with the milk. Some flavours, like the vanilla will infuse sufficiently having been brought up to the boiling point. Others will need to steep for a while before you heat the milk, to intensify their flavour.

Whichever way, you will need to gently bring the milk up to boiling point, but try not to let it boil. You will have reached this point when there are small bubbles at the sides of the pan. Take it off the heat at this point.

STEP TWO – The Eggs

While the milk is slowly coming to the boil, separate your eggs. I have assumed that a picture is not necessary for this part of step two. Be careful not to get yolk in your whites. I advise breaking each egg over a small, separate container before adding the whites and the yolks to the main batches. This way if any do break, you haven’t lost the lot. I have also taken a risk on scooping out some egg yolk when I managed to get a little bit (and I stress it was little) of yolk in my whites once when I didn’t follow my own advice, and it turned out OK, with no discernible effect on the yolks, but it was not great worrying about it.

Don’t throw away the egg whites. They make great meringues and macarons. They also freeze well, if you don’t have time to do something with them straight away. I would love to hear any other suggestions for using up egg whites, particularly in savoury dishes, if you have them. Although egg white omlets need not apply!

Egg yolks and sugar, whisked until pale

Egg yolks and sugar, whisked until pale

Once you have your egg yolks, you need to combine with the sugar, by whisking them together, until the mixture is pale.

A tip here is not to add the sugar to the egg yolks unless you are going to whisk them straight away. If sugar is left on the yolks, it will change them, and a skin will form, making the end result a little bit lumpy. This would be the time not to answer the phone if anyone rings!

It is the yolks that act as the thickening agent. I have heard that it is possible to make a sort of vegan custard, using soy flour as a thickener, and coconut milk, but I have never tried this method. Anyway, my point in telling you this is that you need the egg yolks – don’t be tempted to cut down on these, unless you also cut down on liquid too.

STEP THREE – Combining Eggs and Milk

Adding milk to eggs to make custard, slowly at first

Add a small amount of milk first

Some people will tell you that this is the hard part of the custard making process. As long as you don’t let it intimidate you, and you have a bit of patience, it need not be difficult. There is a risk that you could scramble the eggs, if you heat them up too quickly in one spot. This only happens if you apply direct heat to them, or if you try to add too much hot liquid at once.

An easy way to get around this is to only add a small amount of milk at first (really, only 20-30 ml), and make sure that you have whisked it in well before adding the next lot of milk.

You will need to put a damp cloth under your bowl, as I have done here, to stop it sliding around as you whisk, which leaves you with both hands for custard, not bowl-stabilisation.

Whisking in the first bit of milk

Thoroughly combine the first bit of milk before adding more

You can gradually increase the amount that you add each time. At some point, the egg will become quite liquid, at which point you have custard – congratulations! You  can add the remaining milk in a continuous stream, as long as you continue to whisk the custard all the time as you do so.

Adding Milk faster, continuing to whisk

You can start to add the milk faster, but continue whisking

I usually continue to whisk the custard for a little while, once all the milk has been added, more from habit than anything else, I think.

Whisking well to make sure the milk & eggs are thoroughly combined

Give the custard a whisk after all the milk is added, to ensure it is all combined well

STEP FOUR – Thickening the Custard

Custard, not yet thickened

When you return the custard to the pan, it will look like this

Next, the custard needs to be thickened. If you are making custard from scratch, you will need to stir it constantly. There is no getting away from this. I like to see it as spending time with the custard rather than getting impatient about it. Making custard can be relaxing, and fairly zen, if you let it.

Return the custard to the pan that you heated your milk in. Put it on a low heat and start to stir. You need to try to stir so that you are  moving the wooden spoon over all of the base of the pan, so that no custard can catch on the bottom, and cause lumps.

As it cooks, the custard will gradually start to thicken. When you draw a line on the back of the spoon, and the line stays there, and does not run, then your custard is done.

Thickened, Warm Custard

You know your custard is done when you get a line on your spoon

Never allow the custard to boil at this stage. If it boils, you will split it, and will end up with lumpy, scrambled custard, which will taste nice, but will look awful and the texture in your mouth will be horrible.

If this does happen, don’t despair too much. It can be salvaged to make it passable again, but it will have lost a little of the rich, silky texture that good custard is known for.

You can let the split custard cool a little, then put it into a food processor. Start it on a low setting, and gradually increase the speed and keep going until it is smooth again. I got this tip from the Accidental Hedonist a very long time ago, when I first started making custards, and one split on me (or rather, I split it, if we are going for full disclosure…). It really works, and the custard will be almost as good as new.

You can pour custard, hot, onto pies and puddings, baked fruits, or fresh ones. You can chill it for use in trifles or flans. Once chilled, you can cover  it with sugar that you burn under a blow torch, or a very hot grill for a créme brulée. You can bake it in the oven. You can even bathe in it to demonstrate how wacky you can be to raise money for charity, if you really must (not recommended, better use Bird’s for this purpose). Whatever you do with it, you will have a lovely homemade treat that will impress your friends, and that you can be very proud of.

4 Comments

Filed under Feast