It seems if you’re a vegan that prefers savoury breakfasts, the usual staple is a tofu scramble. There are as many variations of this as there are overnight oats. Maybe. I haven’t actually counted them or anything. We started our exploration with this tofu scramble with dijon. The piquancy of mustard and dijon was always going to be a winner for me, the addition of tarragon is a welcome bonus. It’s a pretty good substitute for scrambled eggs, and almost as quick. I like my eggs on the softer side, the silken tofu isn’t as soft, but it’s a good breakfast in its own right.
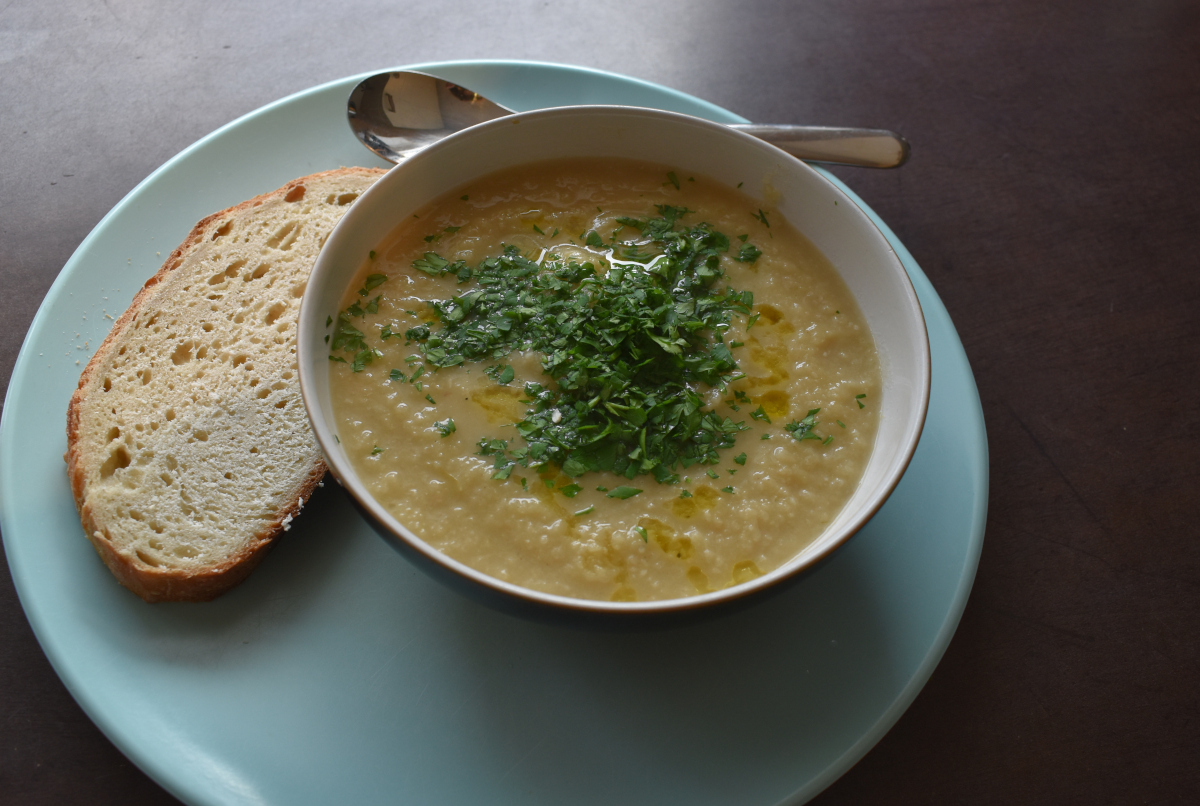
I have several soups in rotation that I’ve been making since I was a student. I was not such a good cook back then, and needed to rely on easy and cheap recipes. Today I dragged harissa and chickpea soup from the memory banks for lunch. Like my Smoky Winter Root Soup, I know I got this from a recipe somewhere, but like that soup the details are hazy. It might have been from a newspaper. I don’t know. I’ve probably made it mine in subtle ways in the intervening years. I share what I do with you below.
This evening’s dinner was really lazy. We both managed to work really late and were too hungry to think about cooking, despite having done an interesting meal plan. Luckily, the Big Guy had panic-bought a vegan bolognaise sauce, which we had with spaghetti. And a lot of extra chili flakes, to make it taste of something. In general, I want to avoid this kind of food. It had lentils in, but also a vegan mince/ ground beef replacement. We don’t eat food that processed normally, and I don’t want to start now. However, it has really got me thinking about my own version of a bolognaise sauce in which care is taken to layer similar flavour profiles as a meat bolognaise, without using facon or vegan ‘mince’. More on that soon.
Recipe: Harissa and Chickpea Soup
Serves 3 as a main or 4 as a starter Prep 10 minutes Cooking 10 minutes
The best harissa I can find
This soup could not be easier or faster, especially if you use tinned chickpeas. The harissa is the flavour in this dish, so get the best harissa you can find. I get mine from grocers that serve the Moroccan community, so I hope it’s authentic. It’s certainly complex: spicy, fruity and it has umami. You can also get rose harissa, which is further flavoured with rose petals and/or rosewater. You can also use rose harissa in this soup.
Ingredients
2-3 tbsp extra virgin olive oil. I don’t usually cook with EV, but this will never get hot enough to reach smoking point, and it adds extra richness 1-2 onions, diced 2 medium carrots, chopped into roughly chickpea-sized dice 1 stick celery, diced Salt to taste Several cloves of garlic, peeled and thinly sliced. I like garlic, so I used half a bulb (about 8 cloves) you can between 6-12, to taste. It should be quite garlic-forward 1-2 tbsp good quality harissa. You can use more, if you like 2 400g tins of chickpeas or 400g dry weight of chickpeas, cooked. In either case, you’re going to use the aquafaba/ liquid Juice of about half a lemon
Method
Warm the extra virgin olive oil a medium saucepan on a gentle heat.
Add the onion, carrots and celery to the pan with a good pinch of salt. Sweat slowly until the onion is barely transluscent before adding the garlic and cooking for another couple of minutes. You want the garlic to permeate the olive oil, but not to brown.
Add the harissa paste. Try and slightly go over the amount you’re comfortable with because it is going to be needed in the final dish. However, it will depend on your tolerance for spice. Stir the paste into the mirepoix, and cook for a minute until the fragrance hits you.
Put the chickpeas and the liquid into the pan. The liquid, or aquafaba, acts as the stock in this case. I prefer to cook my own beans, and do a no-soak method in the pressure cooker, to which I can add aromats, which also helps.
Cover the pan, and cook on a medium heat until the chickpeas are warmed through. Add the juice of half a lemon. Taste for seasoning, you may want to add more lemon juice or a bit of salt, depening on whether the chickpeas were already salted when cooking.
Serve immediately.
Serving Suggestions
This soup is great with toppings. At various times I’ve served this with:
Lemon wedges for squeezing into the soup
Chopped fresh herbs, such as parsley, dill, mint, oregano
Green olives
Croutons
Hot sauce
Herb oils
Garlic bread – made by baking some bread in the oven , with olive oil and salt. When the bread is nicely toasted, rub a cut clove of garlic all over the face of the bread.
How to Store
This harissa and chickpea soup will store without toppings in the fridge for up to a week. You could also freeze this soup, for up to three months. I have had the chickpeas break down a bit from the freezer, but not to a mush, there’s still plenty of texture.
The Big Guy currently does most of the shopping, for which I’m very grateful. I can always tell when he went to the shop hungry. Our shopping is suddenly spiked with treats and snacks, not all of which are the healthiest options. Of course, he’s definitely not alone in doing this when he’s hungry.
We had a hearty breakfast with the last portion of the kale and mushroom gratin before the Big Guy had to go out to do some chores. On the way home, he was passing some shops that might stock some of the grains, specific dried chilis and some other things I thought would be helpful in our new diet. It was almost lunch time when he got to look for the supplies, and he came home with two vegan saucijnbroodjes, which are Dutch sausage rolls. We wouldn’t buy them when it isn’t Veganuary, so I knew he’d felt tempted by his hunger.
Credit where it’s due; they did look good. Crispy pastry covered in poppy seeds. I actually thought they’d be an interesting foil to the dull celariac soup from yesterday, so I could get away with not having to jazz it up. You know we weren’t going to throw it out.
I was wrong. The pastry was filled with a paste filling that was vaguely tomato-flavoured, which had some scant sticks of tempeh in it. it didn’t distract from the soup. Instead, we added a lot of freshly chopped parsley. I guess a good lesson to remember is that if we don’t like the standard version of a thing, we’re not going to like the vegan version of that thing. And eat before you go shopping!
Dinner was a second helping of the enchiladas from last night. The opposite of lunch: hearty, flavourful and satisfying. It’s always good to end the day on a high.
Tuesday is a workout day. I have a familiar routine to help me keep up with the habit. A light breakfast with protein, but no egg, walk the dog, then start my exercise regimen. It’s one of the few days I’ll have a sweet breakfast; I’m not normally a fan. Perhaps granola with yoghurt and fruit, or higher protein porridge. None of these are normally vegan.
Today, or rather yesterday, I went with overnight oats. We love this easy, versatile recipe – you can pretty much take your pick of fruit and pairings to make it flavourful. This one is chocolate and peanut butter. I veganised it by using soy yoghurt and almond milk. I was surprised at how sweet soy yoghurt is. My brand wasn’t sweetened, yet tasted like it had honey stirred through it. I’ve shared our tried and true recipe below. It’s very adaptable, so you can use whatever kind of dairy or non dairy you like.
Lunch was a simple (and if I’m honest, a little dull) celariac soup. I sweated some onion, leek, quite a lot of garlic and the celariac, before adding some of my sumptuous scrap stock. When the celariac was soft, we blitzed it smooth with my immersion blender. I served it with some chopped parsley and drizzles of a really good olive oil. It relied a bit too much on the peppery olive oil for interest. And there’s leftovers. Can’t wait!
Also over lunch, I decided to sign up to the Veganuary daily newsletter for the month. It’s actually a fantastic resource, with cookbooks, recipe ideas, meal plans, going vegan on a budget, and that’s just in the first couple of emails. I recommend giving it a shot, especially if you’re new to a vegan diet.
Our meal this evening was enchiladas – a pumpkin chili stuffed in a tortilla, wrapped and cooked in a hot enchilada sauce. I was introduced to enchiladas by an American friend. Her preferred way to cook these is as a casserole – layering the dish with the chili and the the tortillas like a TexMex lasagne. We currently don’t have an oven, so we’re cooking everything in our Ninja Foodi Max (this is not an affiliate link). Just for space reasons, we’re sticking with traditional enchiladas. I make this often, and serve it with lots of cheese and sour cream. Of course, now that’s not possible. Instead, it was topped with some oat milk yoghurt and a home made guacamole. The chili was from the freezer. No doubt, I’ll make it again soon and share the recipe with you all.
Recipe: Chocolate Peanut Overnight Oats
Serves: 2 Prep Time: 5 minutes Soaking Time: minimum of 4 hours, but overnight is best
This recipe for overnight oats is so versatile, and is put together really quickly. Once you have the basic ratio of oats, liquid and yoghurt, you can change up the flavours with fresh, frozen or stewed fruit. You can change You can use your favourite kind of dairy, whether that be animal or plant-based. You could probably use ready-flavoured yoghurts too. I haven’t personally tried this, but I see no reason why they wouldn’t work.
I’m accustomed to making this with cow’s milk and yoghurt. This time I tried it with soy yoghurt and almond milk, which is why it’s also missing my usual toppings of toasted unsalted peanuts and chocolate shavings – I wanted to really parse down on any potential differences with the texture and flavour. You could also use all oat-based dairy, but I find I crash really badly, and without warning if my breakfast is only oats with no additional protein. You can get around this by adding a couple of scoops of your favopurite protein powder.
This is also one of the few recipes that I measure by volume. This is another recipe where the ratio of ingredients is more important than precision.
Ingredients
1 cup unsweetened milk of your choice. You can use an actual tea cup or mug here if you like. 1/2 cup yoghurt of your choice 1 cup oats – I like the texture of rolled oats 2 tbsp peanut butter 1 tbsp cocoa powder 1 – 1.5 tbsp maple syrup, to taste
Method
Mix together the milk and yoghurt, and stir until it’s all combined.
Stir through the oats, making sure they’re all coated with the wet ingredients
For this recipe, add the peanut butter and the cocoa powder and combine thoroughly.
Refrigerate for at least 4 hours, but preferably overnight.
Serving Suggestion
Enjoy the next morning hot or cold.
You can substitute for any other nut butter you like. or omit it altogether
You can use fruit instead of the cocoa powder.
Toppings of chopped nuts, more peanut butter, raw or stewed fruit would be a great choice.
How to Store
Overnight oats can be made up to five days in advance as part of your meal prep for the week. Store in an airtight container and keep in the fridge.
We started the day with a Kale and Mushroom Gratin, which I’d prepared last night. I sautéed the ingredients together, and set aside to bake this morning. The gratin really benefited from the resting period, and the soya cream really married with the other flavours. The perfect start to Veganuary, and a cold morning. Julie at The Simple Veganista suggests that this is a side dish, or main if you serve it over grains. I thought it was perfect as breakfast, served over a thick slice of sourdough toast. I didn’t miss the unctuouness of an egg yolk at all.
Lunch was a simple hummus and salad wrap. We’d scored some of the various flavours of the excellent hummus and flatbreads from the Lebanese stand in the local market. Very tasty, but not as substantial as I would need for an active day.
We ended the day with the remains of an excellent mushroom bourguinon that I made for New Year’s Eve guests. Served over slippery papardelle (dried, which don’t contain egg, where fresh papardelle might). This is an old favourite, so I’m going to feature this as a recipe post in its own right soon. On NYE, we served it over a bed of creamy mash. Either option is a great match.
There’s an old military adage, which is frequently shortened to the 7 Ps: Proper Planning and Preparation Prevents P*** Poor Performance. I had a very busy day doing the seven Ps in the garden in preparation for the year ahead.
In the kitchen, I went a bit more for an S and six Ps: Some Planning and Preparation…etc. I meal planned for part of the week. The Big Guy did the shopping for the next day, so that we had something prepared. We’re on another lockdown in the Netherlands. Only food shops and pharmacies are open, and they must close at 8pm.
This evening, I prepared breakfast for tomorrow – admittedly a bit reluctantly. I was tired, and not looking forward to not being able to fall back on the very easy option of scrambled eggs in the morning.
However, this morning I’d been very kind to myself, by setting us up with an essential flavour-builder. An umami-rich and sumptuous vegetable stock. Of course, one that is just from food waste. There’s no point in using whole vegetables, when you can get just as much flavour out of the scraps.
Since my previous post on making stock from scraps, my technique has evolved a bit. The original scrap stock still has a place in my repertoire, especially if what I’m using it in has a more delicate flavour. These days, I do a little more prep before the scraps hit the freezer, because I slice everything up as thinly as possible to increase the surface area available for dispersing more flavour. You can do this when the scraps are frozen too, but doing it before you bag and freeze the scraps saves you a lot of time and painful fingers later.
Keep the peels slice the rest as thinly as you can manage before freezing
In 2020, I watched a lot of YouTube. I’m delighted to say that one discovery was Glen and Friends Cooking. Glen’s an experienced cook after my own heart. He loves to cook the classics with his own twist, as well as cook things entirely from scratch to learn how they work. He’s so inspiring with all of the experimentation he does in the kitchen. I really hope you have a look at his fantastic content.
He also inspired this new and improved stock from scraps. He makes an amazing stock, in which he thinly slices a wide array of whole vegetables using a mandoline, then roasts them hard before adding kombu, miso and tomato puree. If you’ve got the time and inclination, give this luxurious stock a go.
The kombu and the miso make so much difference in the flavour, lending essential umami, and a depth you won’t believe.
However, I’m usually far too miserly to add whole vegetables, and too easily distracted to spend a day making stock. So I’ve developed a faster version you can make with scraps, still with such deep flavour, but with a quarter of the prep time, especially if the person you are today thinks about the person you’ll be when it comes time to make the stock, and pre-slices the big scraps as thinly as you can manage.
Tomato-based stock
Recipe: A Quick, Sumptuous Vegetable Stock from Scraps
I suppose this is more of a Freecipe than a recipe, strictly speaking, as the amounts are not exact. As Glen says in his video, it’s the ratio that’s important.
Ingredients
Over time fill a bag with vegetable scraps. If you’ve peeled them from the vegetable, there’s no need to cut them further. If it’s things you’ve topped and tailed, such as onion or carrot ‘ends’ or if it’s something that desperately needs using before it goes over then slice these bits as thinly as you can before freezing them. The contents will depend on what you’re eating. Because I frequently use a mirepoix in dishes, my bag always contains carrot and onion, often the odd celery end. Although there is usually an imbalance in the celery, since it has the least wastage naturally as you use it as an ingredient. So I do find myself thinly slicing a fresh rib or two before it goes in the pot. This is the only time I use the fresh, whole vegetable (but the whole head of celery never goes in).
Items that I don’t use
Potato Peel – the starch lends an odd texture to the finished stock
Cabbage – it’s too bitter in this application
Avocado
Essential Items
Onion ends and skins
Carrot peel and tops. You can include the greens, but make sure you’ve rinsed them extremely well
Leek tops – really, this gives it the most sumptuous mouth feel. Again, make sure they’re washed really well.
Celery
Mushroom scraps, stalks or ones that got too sweaty in the box
Kombu
Miso Paste
Bay leaf
Peppercorns
Dried Mushrooms – I’m lucky enough to usually have dried foraged mushrooms like chanterelles and porcini. You can also use dried shiitake or any other edible mushroom. You can often find a wide variety of dried mushrooms in Asian supermarkets
Tomato Puree/tomato paste- although I sometimes make a stock without, depending on my intentions for the stock. See method for more detail.
Other Scraps I use
Depending on the season and what I’m cooking
Almost any vegetable that is on the turn, especially if I don’t want it for soup. Not any part that is rotting or mouldy, of course
Very well scrubbed celariac nubs, leaves and skin
Squash and pumpkin ends, and the stringy stuff in between the seeds
Bell pepper offcuts – though never the seeds, or the part they come attached to
Beetroot ends – although a word of caution. I prefer chioggia and golden beets. You can use red beetroot for sure, but be aware that this will colour the stock, especially in large quantity. Fine if you’re eating a tomato based dish, less so in a white bean one, for example
Garlic that got a bit dessicated in the cupboard
Tomatoes – or when a recipe calls for deseeded tomatoes, you can add what’s left
Trimmings from topped and tailed French beans
The occassional pea pod, though I prefer to freeze these separately and use them for wine.
Sometimes apple peels and core make their way in, but this is the only sweet fruit that will be OK, and never in huge proportions of the scrap mix.
Aubergine ends – with the green calyx removed
Radishes that got long overlooked
Corn cobs and silk. Since these already have a pretty substantial surface area, and they’re really hard to chop, I usually chop corn cobs into three or four pieces, and not thin slices.
Herb stalks
Spinach stalks and ends
Swiss Chard stalks, if I haven’t eaten them as a side dish
Ginger peel
Spring onion scraps
The outer leaves and tough core of fennel
Reserved liquid from cooking beans – i.e aquafaba. I tend not to use aquafaba from cooking black beans, simply because it keeps some of the colour, and then it will make a black stock, and thus black food. You could also use the aquafaba from tinned beans just as readily.
So you can see broadly what I put in. You can use what you make scraps from. There are few hard and fast rules (apart from the three things I’ve listed above).
Method
Once your scrap bag is full, or you know you’re running out of stock, check the contents for balance. If the bag is light on celery, or you feel you’d like an additional element, slice some up thinly, to restore the balance. Also thinly slice any large lumps of scraps that past you didn’t get to.
Weigh the bag. You’ll need to calculate the weight of liquid to use. If I’m starting with aquafaba, I’ll often measure that, and make sure I have the right amount of scraps, or I’ll top up with water for the amount of scraps I already have.
The ratio needs to be 2:3 vegetable scraps to liquid. I’ve summarised this in two equations:
Liquid weight = 3 x (vegetable scraps /2) Vegetable scraps = 2 x (liquid weight/3)
Heat about a tablespoon of any vegetable oil in a large saucepan.
In batches, add your scraps and sweat them off until they brown. You can do this from frozen. You can choose to add the whole bag at once, but I find you need to stir them more to prevent them catching on the bottom. In turn, this takes the browning process whole lot longer.
Once each batch has a good colour, remove to a separate bowl. You need to get a fairly deep caramel colour, particularly in the onion scraps.
Return all of the browned scraps to the pan. If you intend the stock to be used in tomato dishes, or ones where the colour of the finished dish will be deep, add 1-2 tbsp of tomato puree. Mix throuroughly into the scraps, then cook through on a medium heat, stirring well. The colour of the puree will darken slightly when it’s ready, and will take a minute or two. Omit this step if you want to use the stock in a lighter coloured dish; such as for a white soup, or a velouté sauce.
Pour in the cold liquid. Slowly bring to a vigorous simmer, but not to boiling point.
As it’s coming to temperature, add a strip of kombu, 1-2 tbsp miso paste, the dried mushrooms, 1-2 bay leaves, any other herbs you wish to add, and about a tbsp black peppercorns. Stir to make sure the miso has dissolved.
I never salt stock of any kind. You don’t know how much you’ll need to reduce the stock in the finished dish, or even to prepare it for freezing. You probably also don’t know what ingredients you’ll be using in your finished dish. Salting at this stage risks your dishes being over salted.
Cover the pan with a tight fitting lid, then leave to putter away for about an hour or so.
When the liquid has taken on a deep colour, and you’re happy with the taste, drain the stock into a separate bowl. You may find that some types of scraps, especially lots of dried mushrooms, will absorb a fair bit of liquid. Feel free to press the scraps against the seive to get the scraps to release more liquid.
Discard the scraps, they’ve finally worked as hard for you as they can.
You can put this stock straight into a dish. Otherwise, allow it to cool before you store it in the fridge or prepare to freeze it.
Serving Suggestion
This wonderful, rich stock is great in soups, stews, gravies, to cook rice and grains in. Use it wherever a recipe calls for stock, boullion, broth or even a stock cube. Can also be used in lieu of a meat stock in many dishes.
How to Store
The stock will keep in the fridge for 4-5 days if you use aquafaba, or up to a week if you only used water. It freezes well as it is. I have a lot of competition for freezer space, so I often simmer the liquid after the scraps have been removed, to reduce it by half, then I freeze it in ice cube trays. Once the trays are frozen, I can remove the ‘stock cubes’ to a bag to store longer term. This stock can be frozen for up to six months, although mine never lasts that long.
As you will have seen from my Philippine Tasting Plate, I brought back a few things to use in my home cooking. And what better way to celebrate the recent good weather we’ve been enjoying than to use tropical ingredients?
I got the idea for this dish from a corn salsa I ate at Tomatillo. As is often the way, restaurant food inspires my dishes. The Tomatillo salsa is nice, but I knew that I could twist it a bit to make it even better.
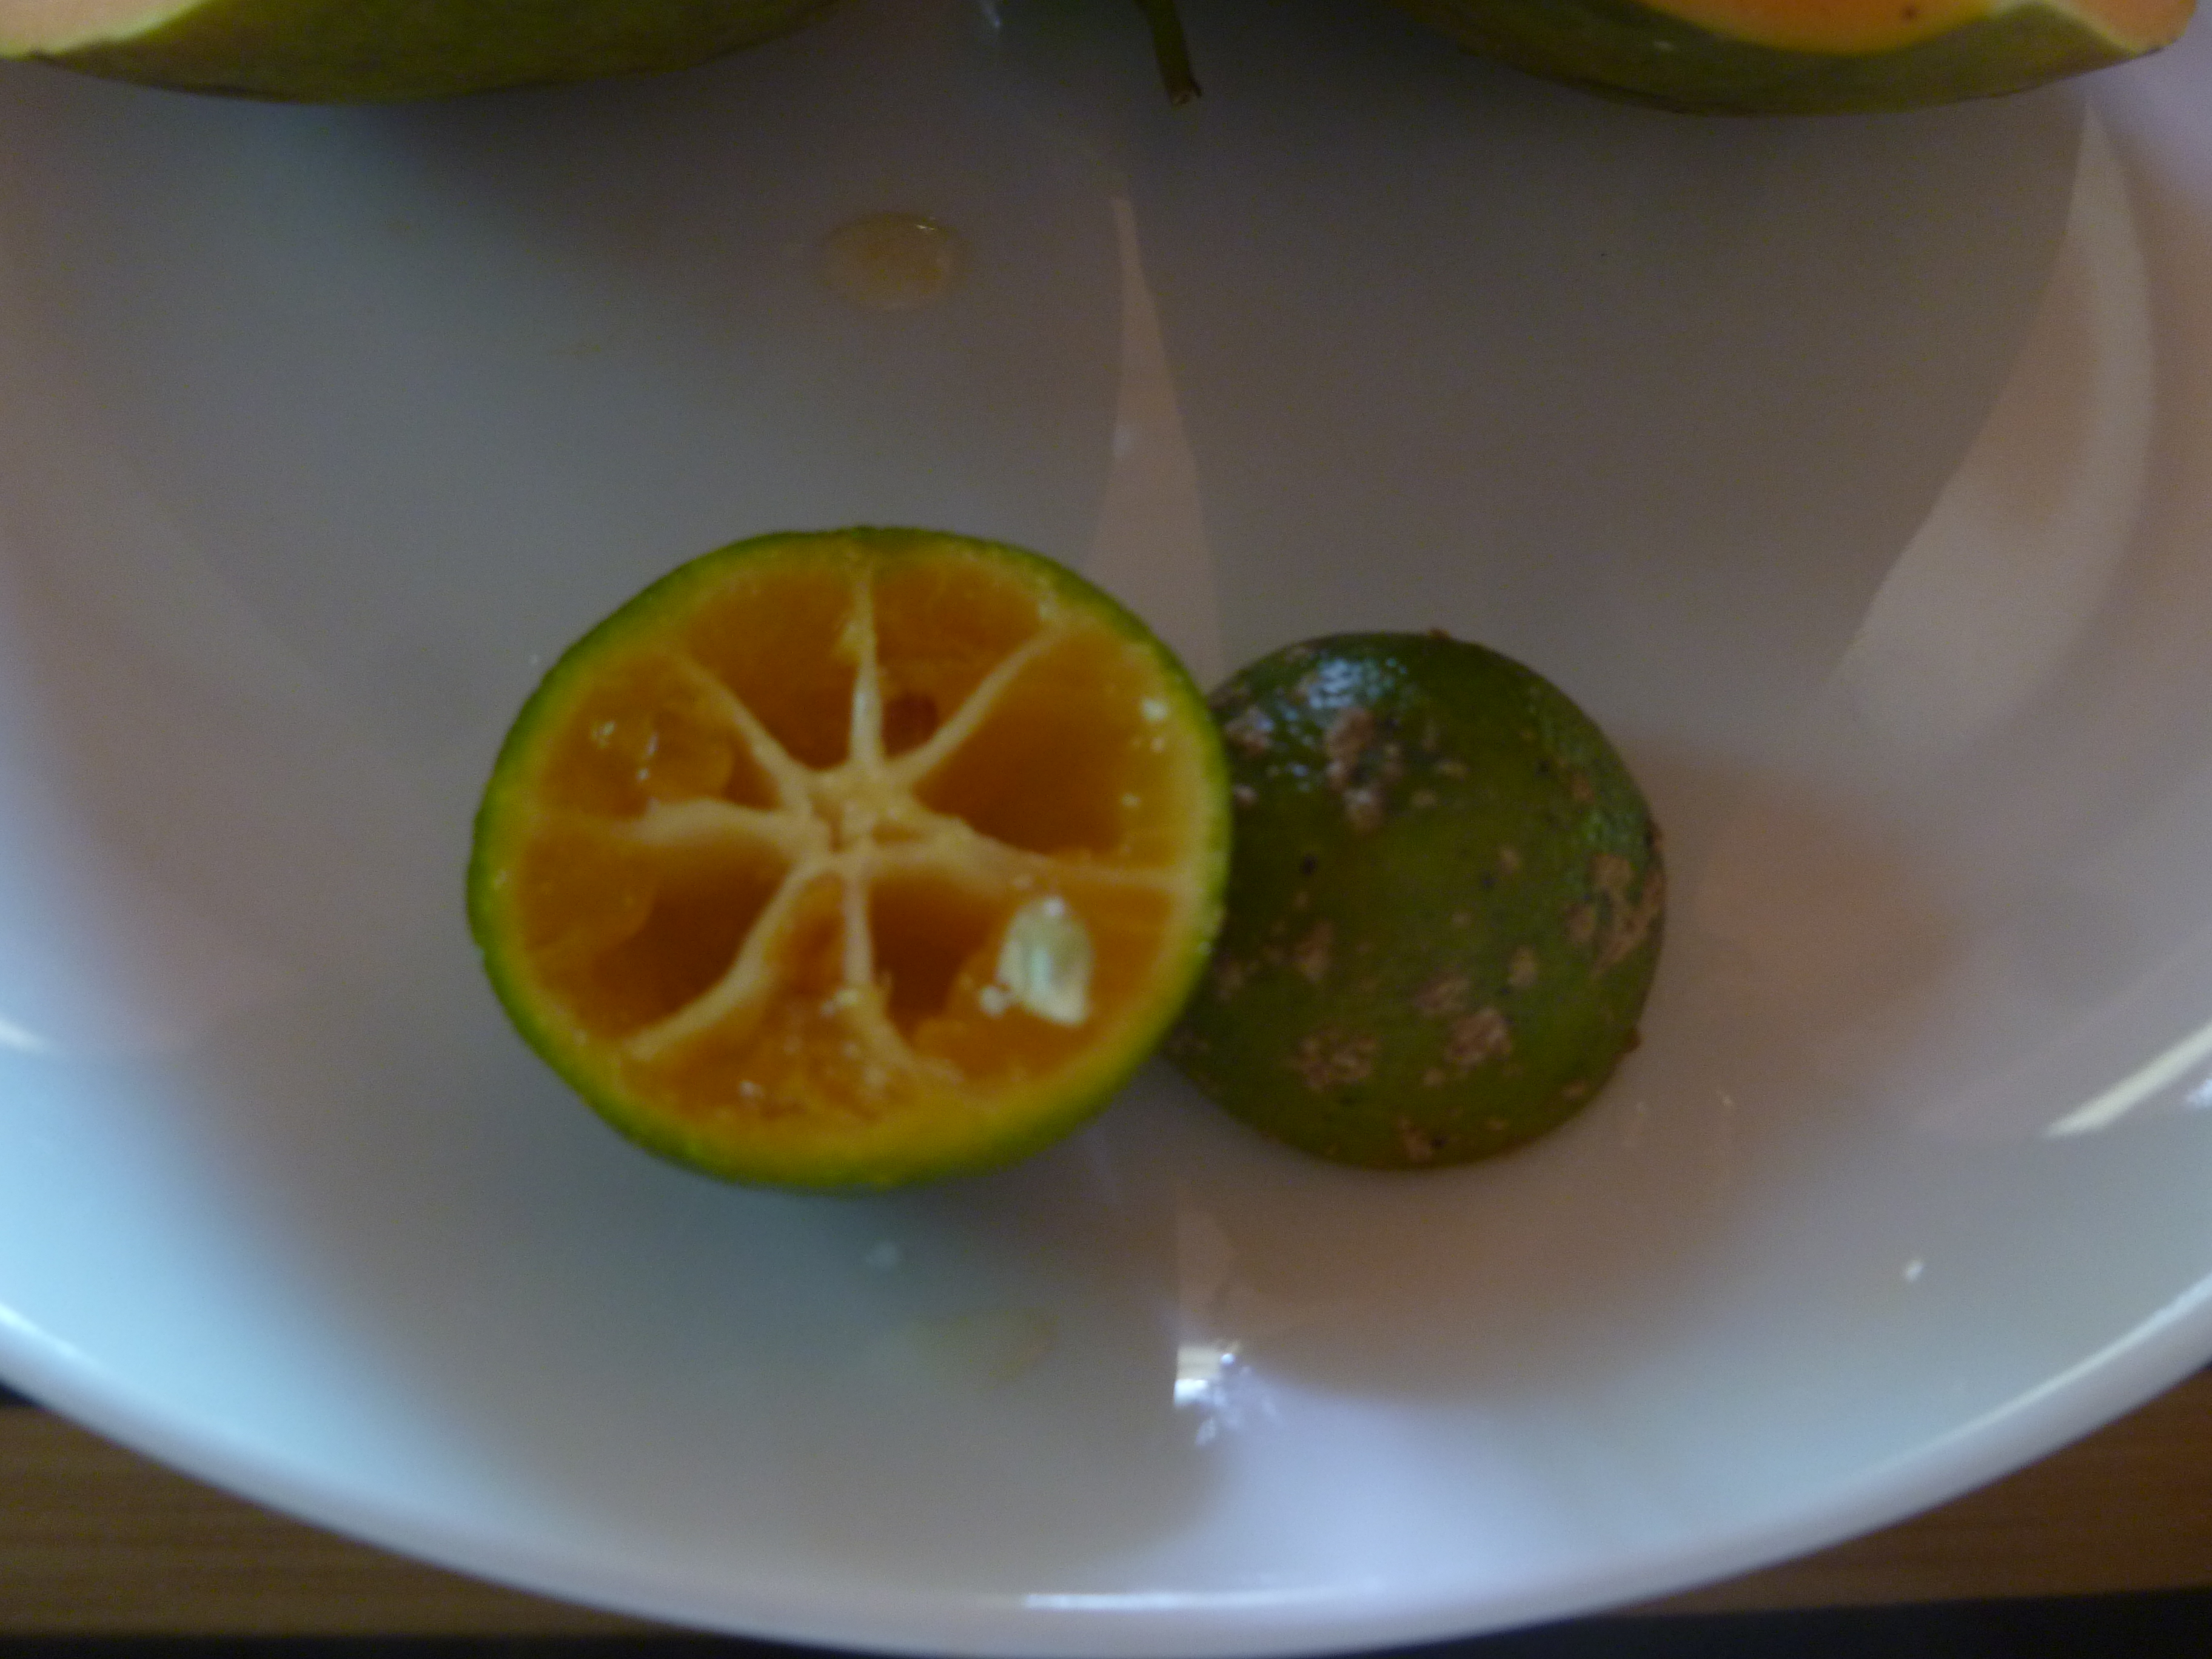
I was already thinking that it needed courgette. Then I remembered the calamansi that I had packed away so carefully, and that was now residing in my fridge. I knew that I had to try to make the dish that began a while ago, and had now taken root in my brain.
Calamansi – about the same diameter as a 10 p piece (or €2)
Calamansi is a small citrus fruit. You can use them like limes, in salads dressings and to season stocks etc, but they are also a popular drink in the Philippines, as well as being a key ingredient in sisig. They are both sweet and sour at the same time, and have a lot of flavour despite their diminutive size.
They also have a lot of pips. I was going to chance my arm and see what would happen if I planted a few, but I forgot to tell the Big Guy what I was doing, and they got thrown out. Ah well, I know that growing citrus from seed is notoriously unreliable, so I probably saved myself a fair bit of disappointment in any case.
I first made this salsa for a birthday canal boat picnic I held for the Big Guy. It was great as a dip with tortilla chips. I was a little nervous to present it as salsa to that crowd, amongst whom were some Americans who have an in-depth knowledge of all things Tex-mex. I have previously been taken to task for a guacamole, because I had put tomato in it, which apparently makes it pico de gallo, and not guacamole. I have also been told my (Mexican recipe) chile con carne is not a real Chile (but the consensus was that it was very tasty). I needn’t have worried, this went down a treat with everyone on the boat. And no-one objected to me calling it a salsa.
I have since served this at a barbecue, where it was similarly well received, and went equally well as a garnish with my home made burgers as it did with vegan enchiladas. I think it would be great as a salad as well.
I made this with tinned corn, but you could also use fresh a little later in the year, although I’d recommend grilling it in the husk first on either the barbecue or under a hot grill. Then shuck and add to the salsa.
Recipe: Corn and Calamansi Salsa
Ingredients
1 red onion, finely chopped
Juice and zest of 6-8 calamansi (or one lime)
½ courgette, finely diced
1 tin of sweetcorn, drained (or one whole corn cob, grilled and shucked)
1-2 red chilis, deseeded and finely chopped
Small bunch coriander, including stalks, finely chopped
Salt and pepper
Method
If, like me, you dislike raw onion then steep the chopped onion in the calamansi juice and zest for at least 10 minutes before you make the rest of the salsa. The amount of calamansi that you need will depend on the size of your onion. You should ave enough juice to just coat all of the onion. I have made this twice, and needed different amounts each time.
Raw courgette doesn’t taste of much, which puts many people off trying them twice. The secret to bringing out the flavour is to blanch them. Because these are finely diced, they only need to be steeped in boiling water for about 30 seconds or so. If you like, you could squeeze a little more calamansi juice (or a couple of drops of lime) into the water. Drain immediately, and run under the cold tap to stop them cooking further. Allow to drain completely. The courgette will now taste of courgette, but will still have a bit of bite.
Mix together the onion, courgette, sweetcorn and chili. Season well, and set aside the salsa for about an hour to allow the flavours to meld. Taste, and add more chili, citrus juice or salt and pepper to taste. Stir through the chopped coriander and serve.
Well the elders are in bloom again, and hedgerows all over froth and foam with the delicate white unbrels, almost like the spring tides coming in. This year is a bit later than ususal, due to the length of the Northern hemisphere winter, but now the sunshine has returned, and naure is more than making up for her long sleep.
I love this time of the year, and stock up on elderflowers for cordial, sugar, and champagne. All of it delicious, and making the most of the best of the season’s forage.
Elder is really abundant where I live, so there is always plenty to go around during the flowering and fruiting seasons; for us foragers and for the birds.
Elderflowers are not just for the sweet things in life, they are also great in salads, and I have heard of sauces to go with meat. An elderflower sauce is on my list of Things I Want To Experiment With. Like most food bloggers, I guess, I have several such lists – electronically, on paper and in my head. A colleague of mine recently found them in some notes I had taken as part of a work trip, and seemed surprised that I would also be making lists of flavours in between meetings.
As well as the flavours that exist on my lists, or go around in my head, I have a number of different or unusual flavours in my kitchen. For example, I am never without vinegars of all kinds of flavours – raspberry, blackberry, tarragon, rosemary; I even have coconut vinegar since a Filipina friend introduced me to it when she kindly gave me her adobo recipe.
For me, then, it wasn’t too much of a stretch to think that elderflower vinegar would be a great way to keep hold of the elderflower season for just a little bit longer, but without all the sugar.
Try to pick elderflowers on a dry day, in the morning. There will be more pollen and nectar in them, which makes the flavour more intense.
This vinegar is good with salads. I am currently embarking on the 5:2 regimen, because my need to develop great food for this blog was beginning to have a toll on my waistline. I have found that the addition of a few herbs to some of this vinegar is a good way to dress a slad without the need for oil.
You can make marinades with it, and even a couple of drops in some water gives a nice flavour, that is not too sweet.
Not So Sweet Little Flowers
Recipe: Elderflower Vinegar
Ingredients
40 g elderflowers
500 ml white wine vinegar
Method
Try to pick the flowers in the morning after a dry spell, in order to maximise the pollen and the flavour.
Remove the elderflowers from the stalks by pulling a fork through the stalks in the diretion of the flowers. You don’t have to be too fussy, as long as you have removed the largest stalks.
Steep the elderflowers in the vinegar, in a non-metallic container or bowl. Cover with a tea towel, and set aside for a few days.
Whenever you remember, give the flowers a stir.
After three days to a week, your vinegar should have reached the strength of flavour that you want.
Bottle up into sterilised bottles. This vinegar will keep well in a cupboard. I cannot resist this fragrant flavour, so the trouble is making it last!
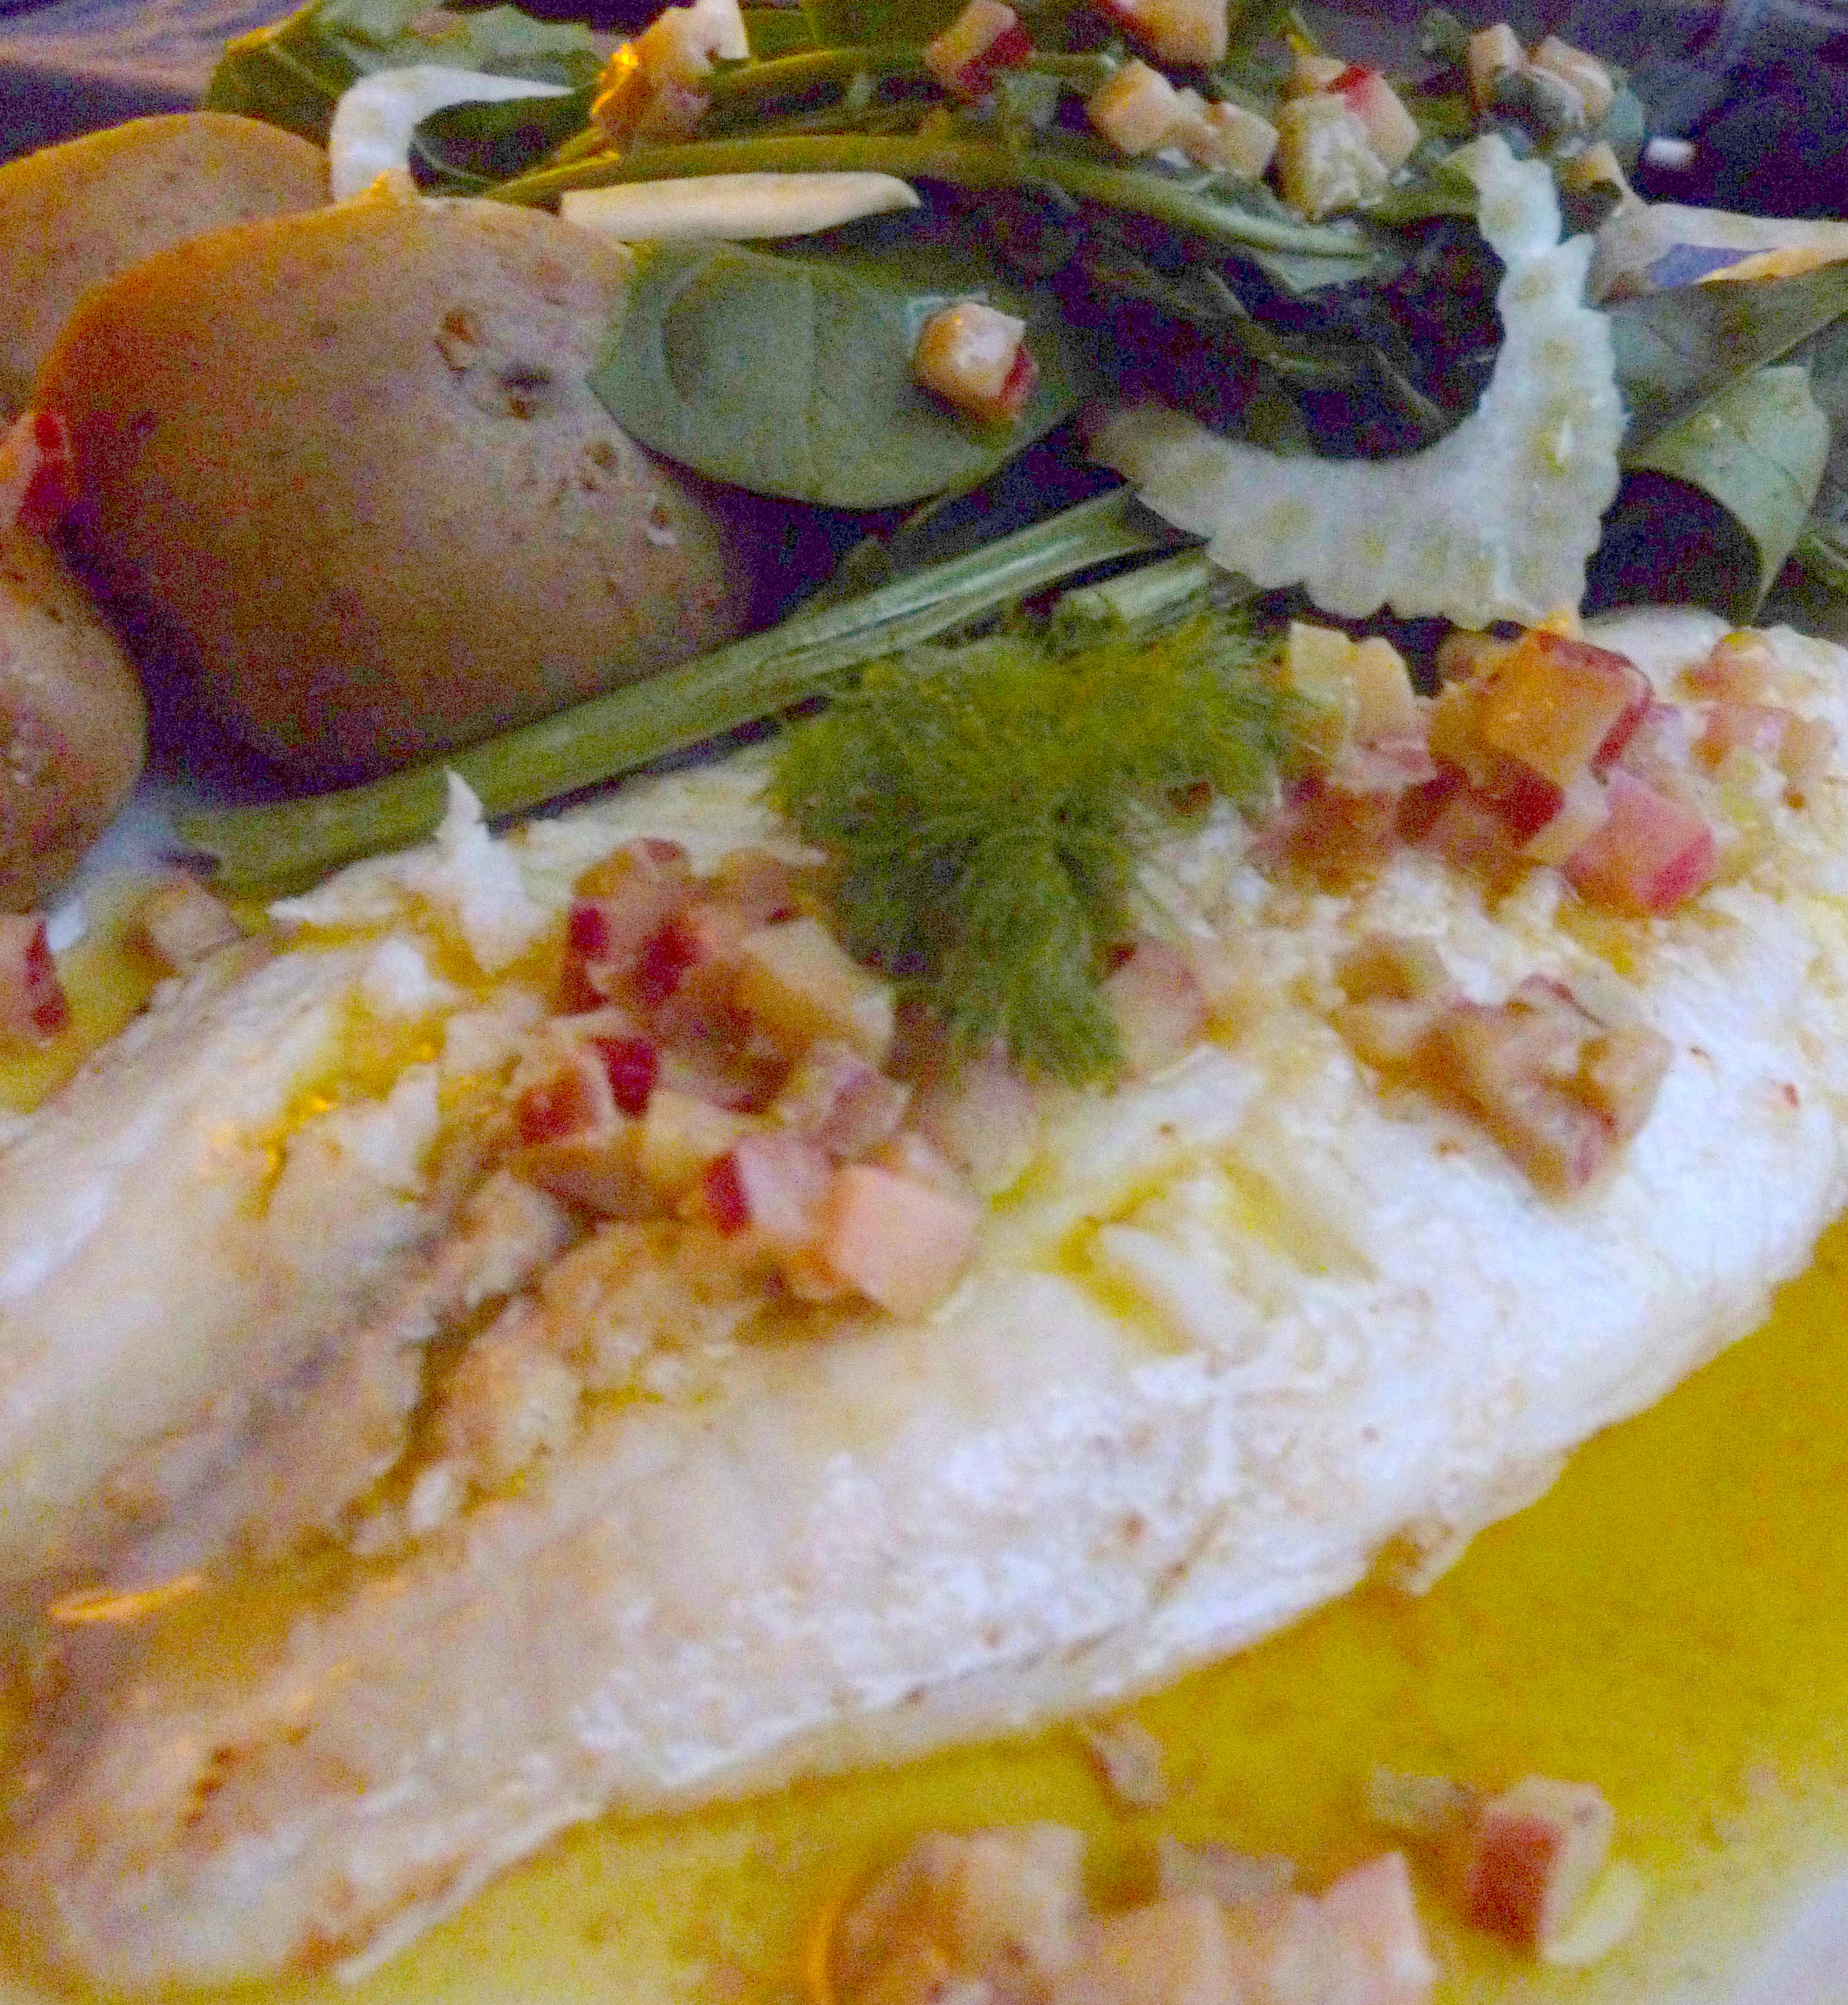
Following on from my inspiration to pair rhubarb with fennel, I have been doing a few more experiments with rhubarb. I have lifted today’s idea almost wholesale from the Mister Kitchen rhubarb tasting menu. They served a sea bass with spinach and a rhubarb vinaigrette. It was great. Of course, I had to come home and fiddle about with it.
Rhubarb is most frequently eaten as dessert, and I am certainly partial to desserts and cakes with it in. People forget that it is actually a vegetable. It is seldom seen in savoury dishes, although I do know that a few bloggers have been experimenting with salads and as savoury compotes lately, so maybe there is a resurgence of rhubarb as a side dish in the offing. Who knows?
I certainly have a few more ideas that I want to try before my plant goes over this year, or I rest it in preparation for winter. Of course, once I am happy with each of the dishes, I will be sharing them here with you.
The version that I ate at Mr Kitchen had a mild olive oil, finely diced rhubarb and kalamata olives, with the stones pushed out, and the flesh torn into chunks. It was rustic and very simple. And it was delicious with the fish and the greens.
I spent quite a while messing about with various things, including shallots, herbs, black pepper, chillies, and so on. I have come to the conclusion that simple really is best. Shallots and rhubarb are both very astringent, so makes for a very sharp dressing, although that might be because I also acidulated the shallots in lemon juice first to take the rawness out of them. This combination as really an ingredient too far for me, so I ditched the shallots in favour of paring everything down
Raw rhubarb is crunchy and subtle. If you decide to follow my lead and make up a vinaigrette yourself, make sure whatever you use does not over power it. I stuck with very simple flavours for this vinaigrette – in fact it is a classic French dressing, with the addition of rhubarb. It works quite well with a pinch of chilli flakes, and with tarragon or chervil, instead of the mustard. I personally think that it is better with the more grassy olive oils, not the really punchy ones, but you may disagree.
Since there is nothing simpler than a vinaigrette, and rhubarb is at the peak of the season, I thought that I’d be a bot cheeky and have two entries to this month’s Simple and in Season, hosted by Ren Behan.
I do recommend that you give a rhubarb dressing a go. This one was lovely with salad and great with fish (I served it with tilapia fillet). I bet it would also be perfect with pork or chicken too.
What classic dressings do you know that might benefit from a little rhubarb?
Recipe: Rhubarb Vinaigrette
Ingredients
About 1/2 stalk very finely diced raw rhubarb
2-3 tbsp Grassy extra virgin olive oil
1 tsp Dijon mustard
Zest of half a lemon, pared
Lemon juice to taste
Method
Once the rhubarb is prepared, Whisk together the mustard, zest and olive oil.
I used lemon with this dressing, because I wanted it to go with fish. You could also team the dressing with orange. Grapefruit works as well, although you will need much less than half the grapefruit zest. Which one you choose is entirely up to you, and you can change it to match your dish.
Add the rhubarb, and season. You will need to taste it at this stage. I found that adding a little lemon juice really lifted this into a great dressing, but the amount that you will need will depend on which citrus you are using, and how sharp your rhubarb is; which will vary with age, size and how long ago it was harvested.
Serve immediately if you can, on fish, a salad, or anything you like really. It does keep for a couple of days in the fridge, but it is better fresh, because the rhubarb will lose its crunch. So simple, there’s no excuse not to give this a go!
A couple of weeks ago, I found out that a few fellow bloggers had, like me, received Nigel Slater’s Kitchen Diaries II. Like me, they had also read it cover to cover, and enjoyed it as much as his first diary (which I have also read; I’m afraid my shelf life is too short for 50 shades, when I can fill my head with the sights, sounds and smells of food). Unlike me, Janice and Susan decided to pay him homage by hosting the Dish of the Month in his honour. Obviously, I was keen to join in, whilst cursing the fact that I hadn’t thought of it first!
I decided to cook from both books, on alternate months. Originally, I had intended to cook things I haven’t tried before from each of the books in turn. However, I was cooking stew for my new team, because I could make it the night before. One of them professed a love for beans and chickens. And just like laid plans, and mice; my intentions gang aft agley.
Once I knew of these preferences, I had to cook the humbly-named Chicken Stew and Mash from Kitchen Diaries (p.79). It has become a favourite. Although it uses winter seasonal vegetables, it tastes a bit like summer.
Two of my team are vegetarian. And you know me, I had to make them feel as welcome as the others. So I needed a veggie stew. But couldn’t get away from the thought that this stew was the one I wanted to make. So, I had to come up with a vegetable version that would still hit the citrus and savoury spot, but with the same depth of flavour as the meat version.
The depth came from caramelised onions. The bulk came from pumpkin, as being in season, and good with orange. And a few chickpeas, because I had some that I’d cooked and frozen previously.
What I ended up was reminiscent of the original stew, with the savoury, citrus, and sweet tones from the orange, herbs and balsamic vinegar; but by necessity was pretty different. Since Nigel himself says in the introduction to Kitchen Diaries II “neither am I someone who tries to dictate how something should be done, and I am never happier than when a reader simply uses my recipes as inspiration for their own”, I think he won’t mind too much, do you?
If you’d like to enter Dish of the Month, then you can find the full details over at Farmersgirl Kitchen or at a Little Bit Of Heaven On A Plate. Add your post to the linky there, so that we can all see what dish you’ve chosen.
If you are using dried beans and chickpeas, soak them in plenty of cold water overnight. Cook them in fresh, unsalted water. They will cook further in the stew, so make sure they are not soft when you drain them. Nigel and I agree on about 40 minutes.
Some of the depth of flavour in Nigel’s version of this stew comes from the Maillard reaction that occurs as the meat browns. I had to replace this somehow, and probably the best way is to allow onions to caramelise really slowly until they are brown. As they started to turn golden, I added the herbs and the bay leaves.
As the onion reaches a deep brown, add the garlic cloves and the orange rind, and cook for a further minute. Add the flour, and mix it in well, followed by the juice of half an orange once you’ve cooked the flour through.
Add the squash and the beans to the a deep casserole dish with a lid, then add the cooked onion and flour mixture.
In the same pan as you browned the onion in, soften the leeks, being careful not to burn them. When you can separate the concentric rings, they are about ready. Add the juice from the rest of the orange, balsamic, and about 500 ml of veg stock to the softened leeks. You can also add a pinch more of the herbs de Provence too, if you feel it needs it. I did. Bring all of this to the boil, season generously with salt and pepper, and then pour this over the vegetables in the casserole dish.
You want the liquid in the pan to come about three-quarters of the way up the vegetables, bearing in mind that the veg themselves will give off extra liquid as they cook. If you need more liquid, add more vegetable stock.
Cook for 40 mins to an hour at 180°C, until the butternut is tender, but still holds its shape. The flour that you have added should have thickened the sauce somewhat, but if you want to thicken it further, slake a little cornflour in a few drops of cold water, and mix that in. Return it to the oven for 5-10 minutes, until it has thickened up. If you are gluten intolerant, skip the flour at the beginning, and just do this step instead (you’ll need about a tablespoon if you are not using flour, then slake and add as instructed)
I return to Nigel’s instructions, and recommend that this is also served with a big pile of creamy mash – potatoes, or a mix of potato and celariac – so that the juices can form little puddles in the mash.
Following on from yesterday’s jelly making escapades, I had a load of fruit pulp from the Japanese quince to use up. I always try to use up the fruit pulp leftover from making jelly, and frequently make fruit butters, or even add them into a pie.
Japanese quince is perfect for this kind of repurposing, and you can make all manner of things, like pies, crumbles, stewed fruit, and many other things. Had I found these earlier on in the year, I may have been tempted to use the pulped fruit in a mincemeat of some kind, but I will probably experiment with that later. I could also have made a sweetmeat, like the membrillo I made last year.
However, this quince needed to be transportable, so I decided upon jam, since it had to get lugged all the way back to the Netherlands and needed not to leak into our luggage.
In keeping with the Persian theme, I wanted to spice the quince with flavours from the Middle East. I decided upon cardamom and cloves, to give it heat. A lapse of concentration also meant that a teaspoon or so of cinnamon also found its way in there, but it’s none the worse for it.
This jam is sweet, although not as sweet as it could be. I used a bit less sugar than the standard 1:1 ratio of the traditional set jam. I had the pectin from the fruit, and the bag of seeds in any case, and I wanted it to be more spicy than sweet. I think the spice mix would also have worked well had I decided to make a membrillo with it.
The only unfortunate thing is that Japanese quince do not turn the beautiful red that ordinary quince become after a long cooking time, so this is a rather brown jam, but it is no less tasty for it. Like the jelly, this will also be good in stews and gravies, but this will work better with lamb, and chickpeas.
Recipe: Spiced Japanese Quince Jam
Ingredients
Jam jars with lids
Boiled Japanese quince pulp, once drained of liquid
Seeds from the quince, tied up in muslin
Sugar (in the ratio 3:4 with the pulp)
Water (equal weight to the fruit pulp)
5 cardamom pods
6-8 cloves
1 ½ tsp ground cinnamon or one cinnamon stick
Waxed discs
Method
While the fruit is still warm, after boiling, pass it through a sieve, so that any skin and remaining pips are retained by the sieve, and you only have fruit pulp left. You will probably need to push it through with a wooden spoon.
Sterilise the jam jars and lids, in a dishwasher, in a low oven or in a pressure cooker.
Weigh your pulp. I got 400 g of fruit pulp from mine. Then you need 3 parts granulated sugar to four parts fruit, so I measured out 300 g of sugar.
Put the seeds in muslin that you used to produce the jelly into the pan with the fruit pulp, sugar, and equal weight of water. Tie the spices up in more muslin, or in the same piece of muslin as the seeds if it is big enough. If you are using ground cinnamon, add this straight into the pulp and mix in well.
Heat gently until the sugar has dissolved completely and then bring it up to a rolling boil. Again, the jam will set when it reaches 104.5°C, or passes the fridge test.
As soon as the jam reaches setting point, sterilise any ladles, jugs or jam funnels you are going to use with boiling water.
Pour the jam into the jars, and fill it to within 2mm of the top. This jam is quite thick, so give it a bang if you can to dispel any air bubbles. Put wax discs on the top, with the wax side down, and seal with the lids while the jam is still hot.